Issue
- Supported JDK and Apache Tomcat versions for the ESET PROTECT On-Prem Web Console
- Switch JDK distribution used by Apache Tomcat for the ESET PROTECT On-Prem Web Console
- Install the Amazon Corretto JDK
- Fix the “Failed to load data” error with JDK 17 or later
Details
Click to expand
The ESET PROTECT On-Prem Web Console runs on Apache Tomcat, a web server and servlet container for Java applications. Apache Tomcat does not include a Java runtime; it relies on the Java runtime provided by a Java Development Kit (JDK). Historically, Oracle JDK 8 (Java SE 8) was the most widely used version for Apache Tomcat, so many deployments depended on it.
Starting January 2019, Oracle changed its licensing for Java SE 8. Public updates for business, commercial, or production use now require a paid subscription.
If you use Oracle JDK 8 (Java SE 8) and do not have an Oracle subscription, you can switch to a free, supported alternative (such as Amazon Corretto).
This article covers Windows installations. For Linux, see the related guides on installing a JDK for SUSE Linux Enterprise Server or Debian.
Solution
Supported JDK and Apache Tomcat versions for the ESET PROTECT On-Prem Web Console
To run the ESET PROTECT On-Prem Web Console, you need a Java runtime provided by a Java Development Kit (JDK) and a compatible Apache Tomcat version.
We recommend installing:
- Apache Tomcat 9.x. (latest stable release)
- JDK 17 or 21 (LTS)
For more information on the JDK versions, see the Supported JDK versions section below.
Supported JDK versions
| Supported JDK version | ESET PROTECT On-Prem version |
| 17 |
10.x – 13.x
|
| 21 |
11.x – 13.x
|
Alternatives to Oracle JDK (no-cost distributions):
-
Amazon Corretto 17 or 21 (LTS)
For installation instructions, see the Install the Amazon Corretto JDK section.
-
OpenJDK-based distributions—for example, Eclipse Temurin 17 or 21 (LTS)
When installing an OpenJDK distribution on Windows using an
.msiinstaller, select the option to set or override theJAVA_HOMEenvironment variable in the Setup Wizard (usually under Custom setup). This ensures the Java installation path is registered in Windows, allowing Apache Tomcat to locate the JDK.
Switch JDK distribution used by Apache Tomcat for the ESET PROTECT On-Prem Web Console
-
Navigate to the Apache Tomcat folder (for example,
C:\Program Files\Apache Software Foundation\Tomcat 9.0). Open thebinfolder and locatetomcat9w.exe. Double-click the file to run it. Apache Tomcat Properties will open. -
Click the General tab and click Stop to stop the Apache Tomcat service.
-
Uninstall your current JDK.
-
Install a new JDK.
-
Go back to Apache Tomcat Properties and click the Java tab.
-
In the Java Virtual Machine field, update the path to point to the
jvm.dllfile of the newly-installed JDK (for example, for Amazon Corretto,C:\Program Files\Amazon Corretto\jdk21.0.9_10\bin\server\jvm.dll). -
Click the General tab and click Start to start the Apache Tomcat service.
-
Verify that you can log in to your ESET PROTECT On-Prem Web Console.
Install the Amazon Corretto JDK
-
Download the Windows
.msiinstallation file for Amazon Corretto 17 or Amazon Corretto 21. -
Double-click the installation file to start the installation.
-
Proceed through the installation steps.
You have the option to set a custom installation path. By default, Amazon Corretto 17 is installed at
C:\Program Files\Amazon Corretto\. If you set a custom path, make note of the path for the next step. -
When the installation is completed, set the
JAVA_HOMEandPATHenvironment variables.-
Set
JAVA_HOMEto the Amazon Corretto installation directory.Example paths:
- Amazon Corretto 17:
C:\Program Files\Amazon Corretto\jdk17.0.17_10 - Amazon Corretto 21:
C:\Program Files\Amazon Corretto\jdk21.0.9_11
- Amazon Corretto 17:
-
Add
%JAVA_HOME%\bintoPATH.
-
-
Verify the installation. In Command Prompt, run:
java -versionYou should see the following output (build numbers may vary):
-
Amazon Corretto 17:
openjdk version "17.0.17" 2025-10-21 LTS OpenJDK Runtime Environment Corretto-17.0.17.10.1 (build 17.0.17+10-LTS) OpenJDK 64-Bit Server VM Corretto-17.0.17.10.1 (build 17.0.17+10-LTS, mixed mode, sharing) -
Amazon Corretto 21:
openjdk version "21.0.9" 2025-10-21 LTS
OpenJDK Runtime Environment Corretto-21.0.9.11.1 (build 21.0.9+11-LTS)
OpenJDK 64-Bit Server VM Corretto-21.0.9.11.1 (build 21.0.9+11-LTS, mixed mode, sharing)
-
Fix the “Failed to load data” error with JDK 17 or later
This issue occurs when the ESET PROTECT On-Prem Web Console runs on Apache Tomcat with newer JDK versions (JDK 17 or later). Starting with Java 9, the Java Platform Module System restricts reflective access to certain internal APIs, which some libraries used by the Web Console require.
To resolve this, you need to add special --add-opens options to Apache Tomcat’s Java configuration so that these modules remain accessible. You can add the options through the Apache Tomcat service configuration (tomcat9w.exe), the catalina.bat or service.bat file.
Add --add-opens options via Apache Tomcat service configuration (tomcat9w.exe)
-
Navigate to the Apache Tomcat folder (for example,
C:\Program Files\Apache Software Foundation\Tomcat 9.0). Open thebinfolder and locatetomcat9w.exe. Double-click the file to run it. -
Click the Java tab and add the following values to the Java 9 Options field:
--add-opens=java.base/java.util=ALL-UNNAMED
--add-opens=java.base/java.util.concurrent=ALL-UNNAMED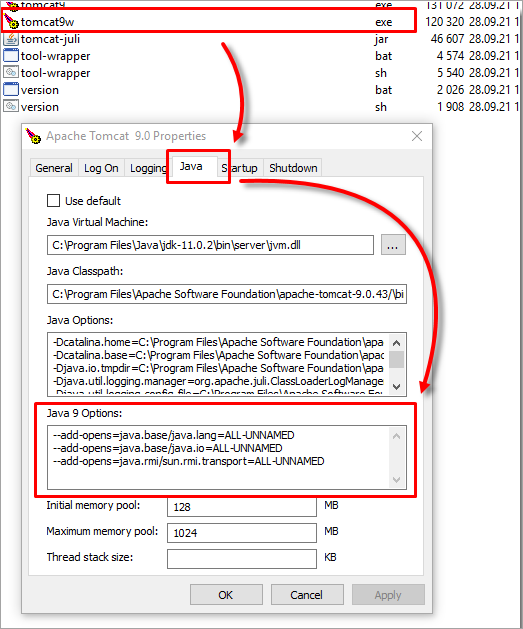
Figure 1-1 The Java 9 Options field now contains the following values:
--add-opens=java.base/java.lang=ALL-UNNAMED --add-opens=java.base/java.io=ALL-UNNAMED --add-opens=java.base/java.util=ALL-UNNAMED --add-opens=java.base/java.util.concurrent=ALL-UNNAMED --add-opens=java.rmi/sun.rmi.transport=ALL-UNNAMED - Click OK.
Add --add-opens options in catalina.bat
-
Navigate to the Apache Tomcat folder (for example,
C:\Program Files\Apache Software Foundation\Tomcat 9.0). Open thebinfolder and locate thecatalina.batfile. Open the file in a text editor. -
Locate the rem Configure JAVA 9 specific start-up parameters section and add the following values:
set "JDK_JAVA_OPTIONS=%JDK_JAVA_OPTIONS% --add-opens=java.base/java.util=ALL-UNNAMED"
set "JDK_JAVA_OPTIONS=%JDK_JAVA_OPTIONS% --add-opens=java.base/java.util.concurrent=ALL-UNNAMED"
The rem Configure JAVA 9 specific start-up parameters section now contains the following values:
set "JDK_JAVA_OPTIONS=%JDK_JAVA_OPTIONS% --add-opens=java.base/java.lang=ALL-UNNAMED" set "JDK_JAVA_OPTIONS=%JDK_JAVA_OPTIONS% --add-opens=java.base/java.io=ALL-UNNAMED" set "JDK_JAVA_OPTIONS=%JDK_JAVA_OPTIONS% --add-opens=java.base/java.util=ALL-UNNAMED" set "JDK_JAVA_OPTIONS=%JDK_JAVA_OPTIONS% --add-opens=java.base/java.util.concurrent=ALL-UNNAMED" set "JDK_JAVA_OPTIONS=%JDK_JAVA_OPTIONS% --add-opens=java.rmi/sun.rmi.transport=ALL-UNNAMED" -
Save the changes.
Add --add-opens options in service.bat
-
Navigate to the Apache Tomcat folder (for example,
C:\Program Files\Apache Software Foundation\Tomcat 9.0). Open thebinfolder and locate theservice.batfile. Open the file in a text editor. -
Navigate to the
--JvmOptions9line and change it to:--JvmOptions9 "--add-opens=java.base/java.lang=ALL-UNNAMED#--add-opens=java.base/java.io=ALL-UNNAMED#--add-opens=java.base/java.util=ALL-UNNAMED#--add-opens=java.base/java.util.concurrent=ALL-UNNAMED#--add-opens=java.rmi/sun.rmi.transport=ALL-UNNAMED" ^ -
Save the changes.