Issue
- A third-party app or a device on your computer is not working properly when the ESET firewall is in Automatic mode
- Find a printer IP address
- Resolve issues with HP printers
- Resolve issues with Apple TV
- Resolve issues with Quickbooks
- Resolve issues with TWAIN
- Other products this issue may affect include:
- Sage 50 Accounting
- Carbonite
- iTunes, Apple Music, and Apple Devices
- Rosetta Stone
- Network Printers
- NAS Hard Drives
- Citrix
Details
Click to expand
If Automatic filtering mode is preventing an app from working properly, set the firewall to Interactive filtering mode to create the rules that grant the program's proper function and then set the firewall back to Automatic filtering mode.
In Interactive mode, when communication is detected and no existing rules apply to that communication, a dialog window reporting an unknown connection will be displayed. The dialog window gives the option of allowing or denying the communication, and the decision to allow or deny can be remembered as a new rule for the firewall. If you create a new rule at this time, all future connections of this type will be allowed or blocked according to the rule.
Solution
macOS users: Create a firewall rule to allow/disallow use of a certain application in ESET Cyber Security
Find a printer IP address
-
Click the Windows button, type
Printers & scannersand click Printers & scanners.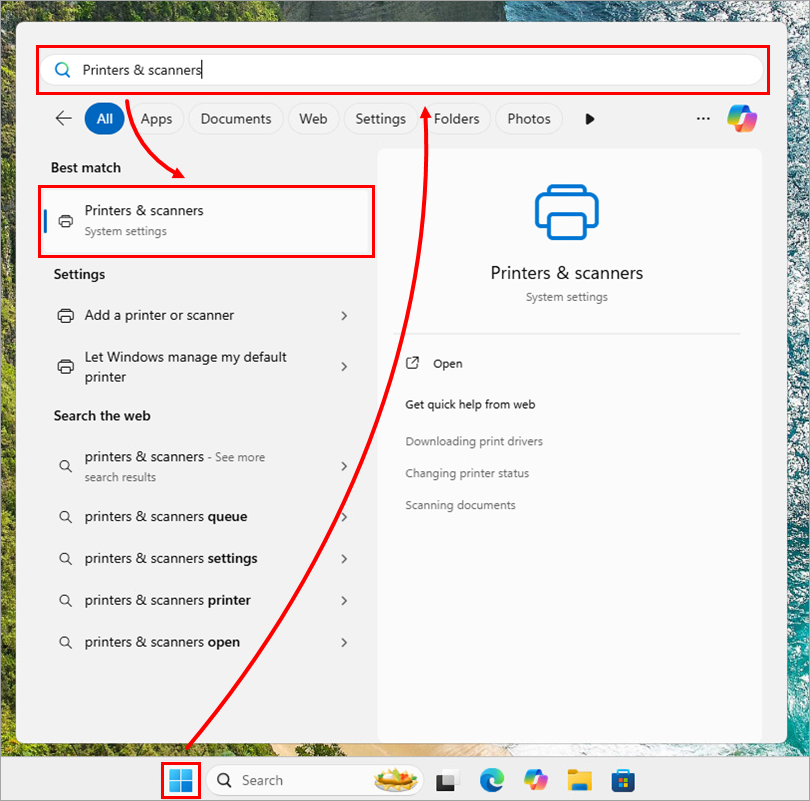
Figure 1-1 -
Select the printer with which you are experiencing issues.
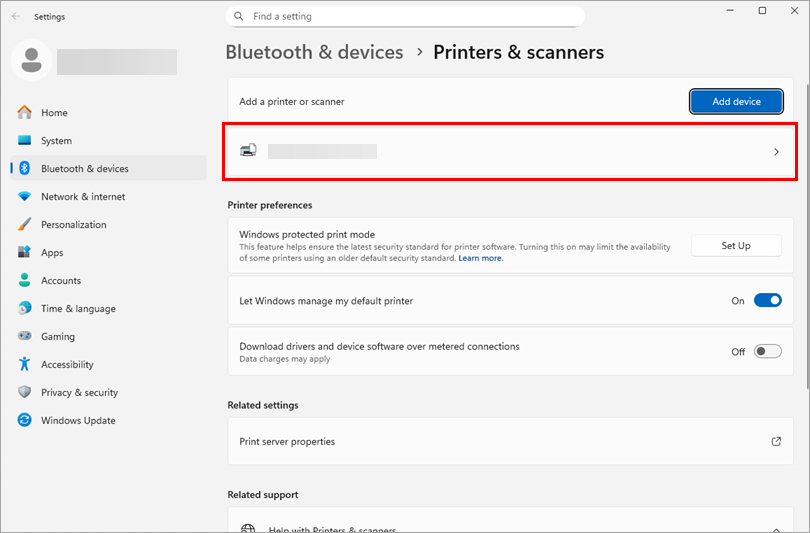
Figure 1-2 -
Click Printer properties.
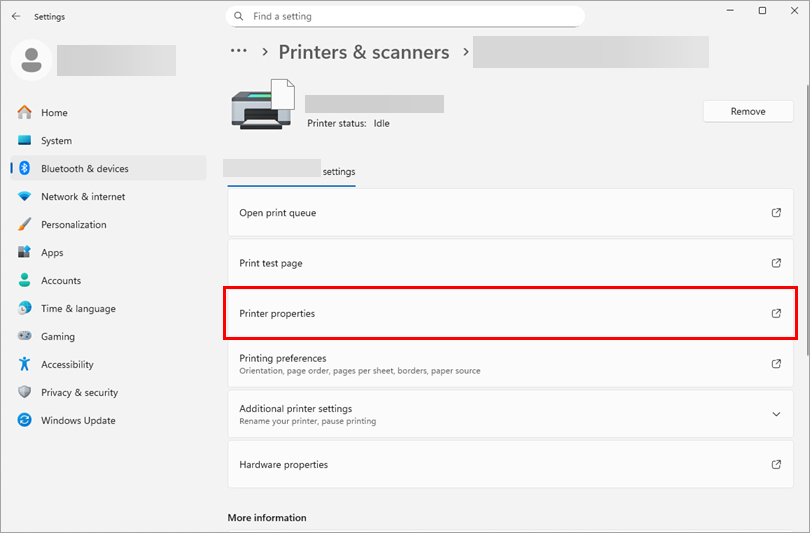
Figure 1-3 -
Click the Ports tab. The IP address should be displayed in the Port box.
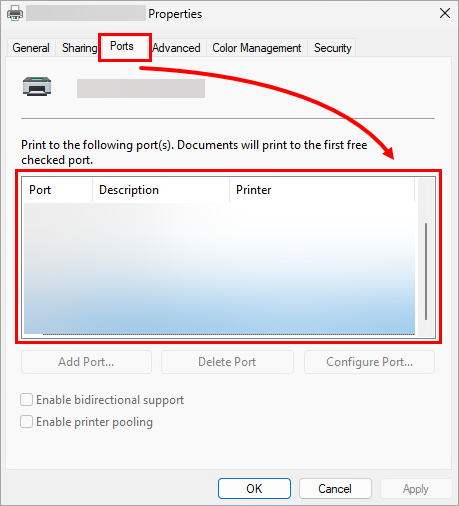
Figure 1-4 -
If you are still unable to locate your printer IP address, you can try using the IP address of your router, which has most likely the same IP address as the printer if it is a network printer. This can be found using the IPconfig command.
Resolve issues with HP printers
-
Press the F5 key to open Advanced setup.
-
Click Protections → Network access protection. Expand Network access protection and click Edit next to IP sets.
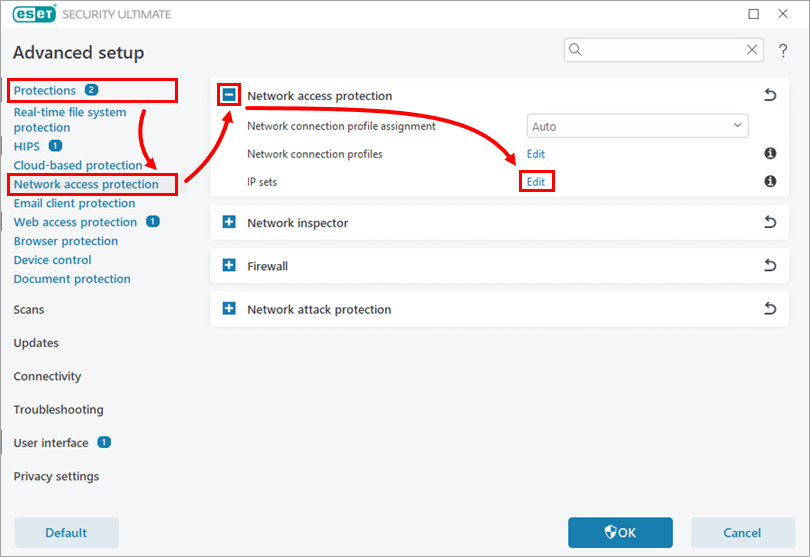
Figure 2-1 -
Select Addresses excluded from IDS and click Edit.
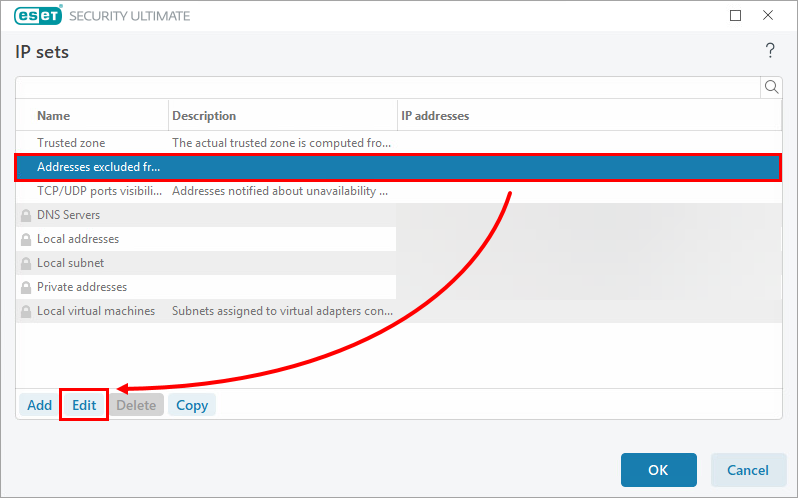
Figure 2-2 -
Type the desired IP address or range of IP addresses in the Remote computer address (IPv4, IPv6, range, mask) field and click OK.
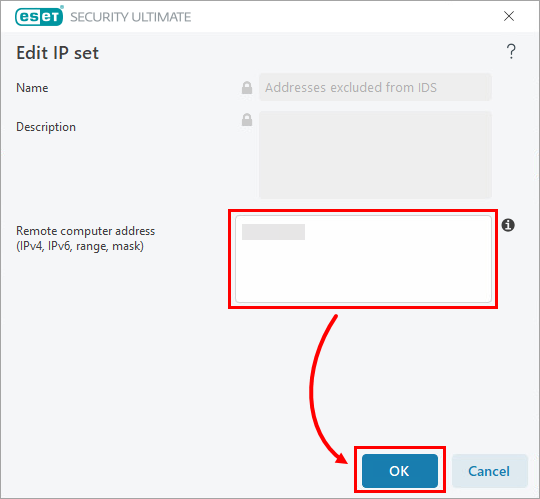
Figure 2-3 -
Click OK → OK to save the changes and exit Advanced setup.
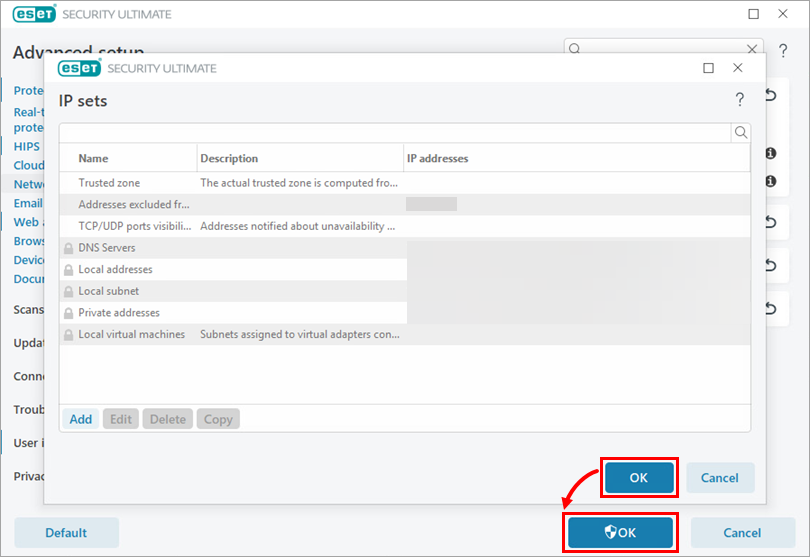
Figure 2-4
Resolve issues with Apple TV
If you are experiencing issues using your Apple TV with the ESET Personal firewall, first complete the steps above to create the necessary firewall rules and then see the instructions below to allow Inbound/Outbound communications on the ports used by Apple TV (TCP 123, TCP 3689, UDP 5353).
-
Press the F5 key to open Advanced setup.
-
Click Protections → Network access protection. Expand Firewall and click Edit next to Rules.
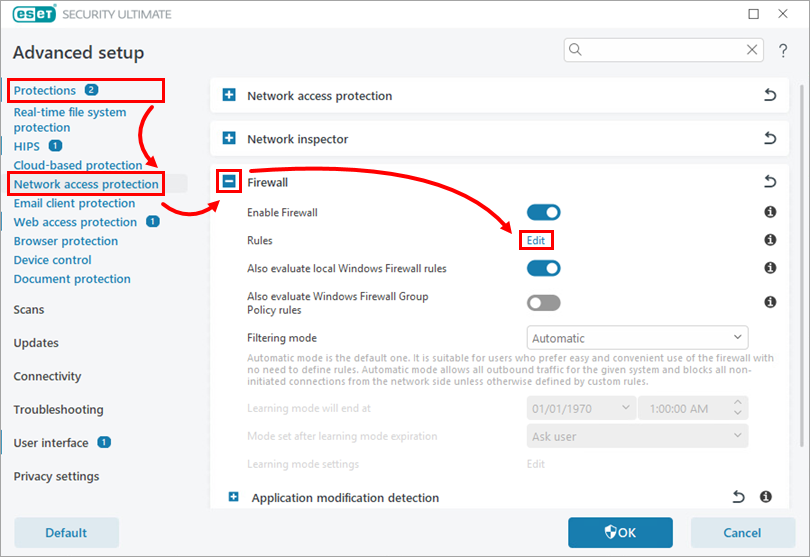
Figure 3-1 -
Click Add.
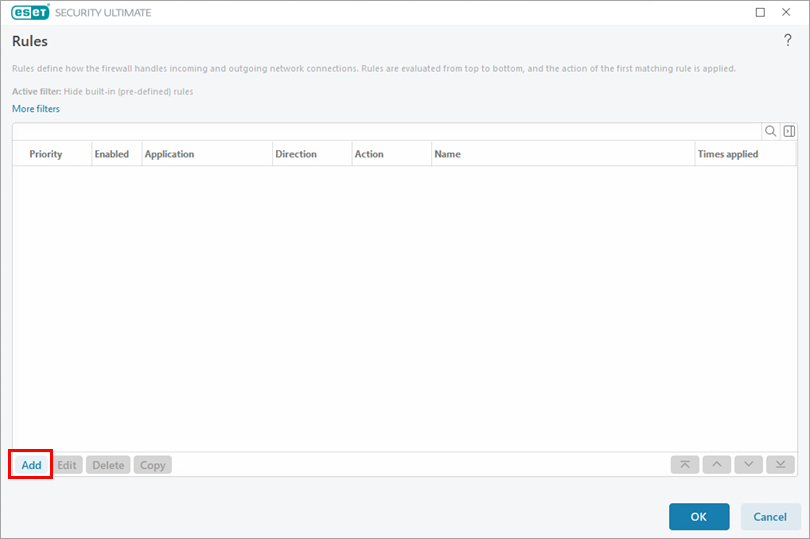
Figure 3-2 -
Type a rule name. Select Allow next to Action.

Figure 3-3 -
Expand Direction and select Both.
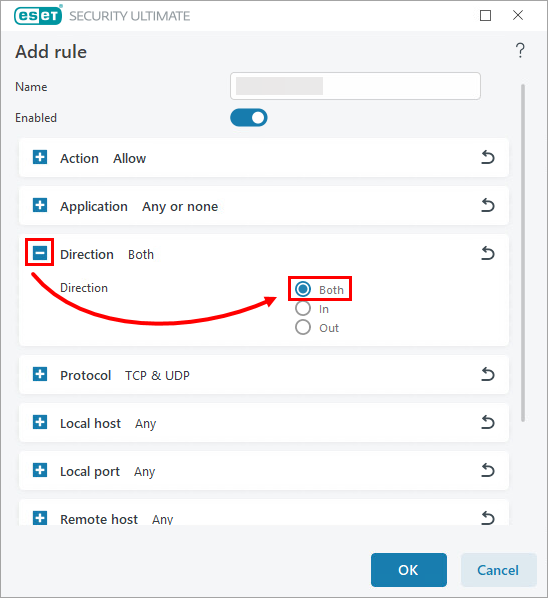
Figure 3-4 -
Expand Protocol and select TCP & UDP from the drop-down menu.
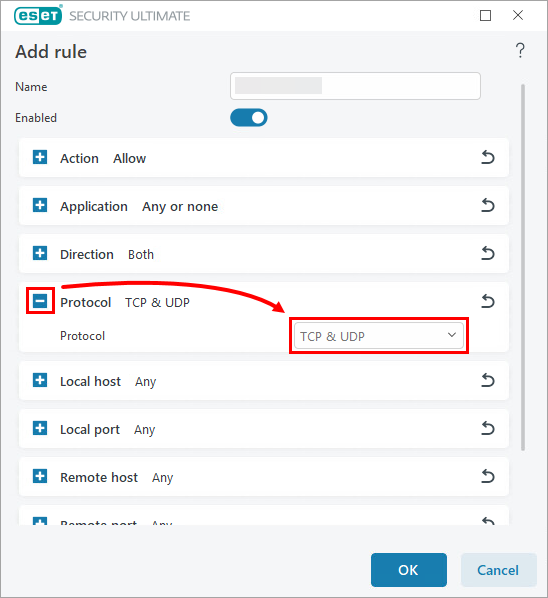
Figure 3-5 -
Expand Local port and type
123, 3689, 5353into the Port field. Click OK.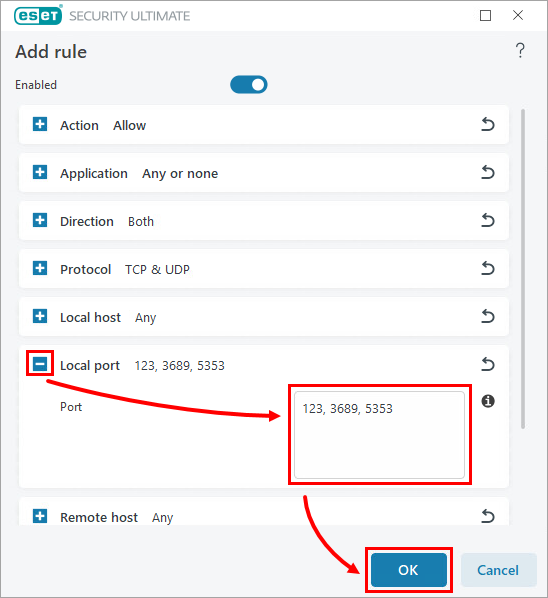
Figure 3-6 -
Click OK → OK to save the changes and exit Advanced setup.
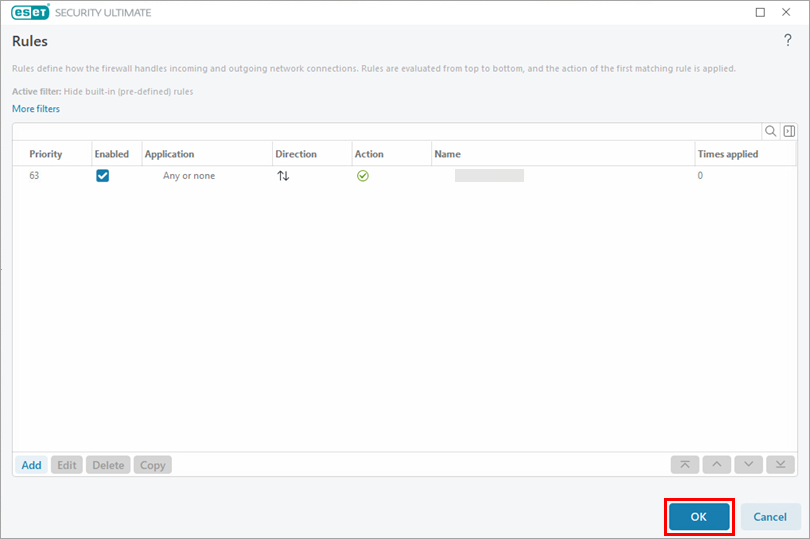
Figure 3-7
Resolve issues with QuickBooks
A. Exclude ports used by QuickBooks
-
Press the F5 key to open Advanced setup.
-
Click Protections → Network access protection. Expand Firewall and click Edit next to Rules.
Figure 4-1 -
Click Add.
Figure 4-2 -
Type a rule name. Select Allow next to Action.
Figure 4-3 -
Expand Direction and select Both.
Figure 4-4 -
Expand Protocol and select TCP & UDP from the drop-down menu.
Figure 4-5 -
Expand Local port. In the Port field, type the port number for your version of QuickBooks. Click OK. If you have multiple versions of QuickBooks installed on your system, add each version's corresponding ports in the following format:
8019, XXXXX, XXXXX, XXXXX, XXXXX.- QuickBooks 2017: 8019, 56727, 55373-55377
- QuickBooks 2016: 8019, 56726, 55368-55372
- QuickBooks 2015: 8019, 56725, 55363-55367
- QuickBooks 2014: 8019, 56724, 55358-55362
- QuickBooks 2013: 8019, 56723, 55353-55357
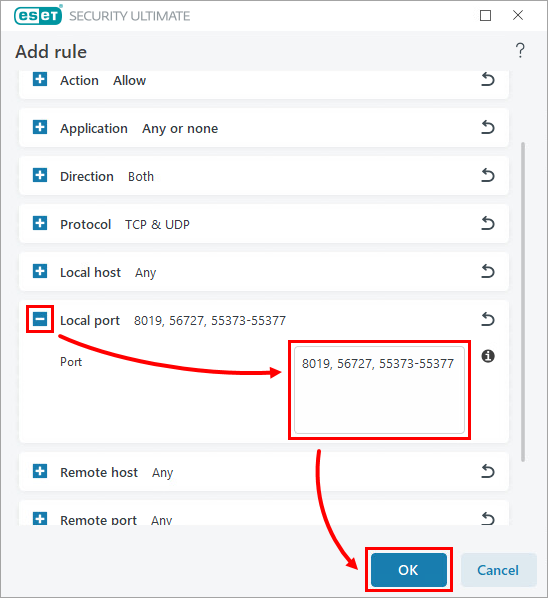
Figure 4-6 -
Click OK → OK to save the changes and close Advanced setup. Continue to Part B.
Figure 4-7
B. Exclude the following executables used by QuickBooks
-
Exclude files or folders from scanning in ESET Windows home products.
-
Type in the following file paths into the blank field and press Enter after each one.
C:\Program Files (x86)\Intuit\YOUR QUICKBOOKS YEAR\AutoBackupExe.exe C:\Program Files (x86)\Intuit\YOUR QUICKBOOKS YEAR\Dbmlsync.exeC:\Program Files (x86)\Intuit\YOUR QUICKBOOKS YEAR\DBManagerExe.exeC:\Program Files (x86)\Intuit\YOUR QUICKBOOKS YEAR\FileManagement.exeC:\Program Files (x86)\Intuit\YOUR QUICKBOOKS YEAR\FileMovementExe.exeC:\Program Files (x86)\Common Files\Intuit\Sync\IntuitSyncManager.exeC:\Program Files (x86)\Common Files\Intuit\QuickBooks\QBCFMonitorService.exeC:\Program Files (x86)\Intuit\YOUR QUICKBOOKS YEAR\QBDBMgrN.exeC:\Program Files (x86)\Intuit\YOUR QUICKBOOKS YEAR\QBGDSPlugin.exeC:\Program Files (x86)\Common Files\Intuit\QuickBooks\QBLaunch.exeC:\Program Files (x86)\Common Files\Intuit\QuickBooks\QBServerUtilityMgr.exeC:\Program Files (x86)\Intuit\YOUR QUICKBOOKS YEAR\QBW32.exeC:\Program Files (x86)\Common Files\Intuit\QuickBooks\QBUpdate\QBUpdate.exeC:\Program Files (x86)\Intuit\YOUR QUICKBOOKS YEAR\QuickBooksMessaging.exeC:\Program Files (x86)\QuickBooks Online Backup\OnlineBackup.exe
Resolve issues with TWAIN
If your ESET product is conflicting with your TWAIN device, you need to add the IP of the TWAIN device to the Excluded IP addresses list in your business product.