Issue
- You want to configure additional HIPS rules in the following ESET business products for Windows or create a policy in ESET PROTECT or ESET PROTECT On-Prem with additional HIPS settings to protect against ransomware malware (filecoder)
- ESET Endpoint Security
- ESET Endpoint Antivirus
- ESET Mail Security for Microsoft Exchange Server
- ESET Server Security for Microsoft Windows Server
- Manually create an ESET PROTECT Policy/configure the settings in ESET business products
- Download and import the ESET PROTECT Policy
Click an image to open the ESET Knowledgebase article for anti-ransomware best practices and additional product configurations:
Details
Click to expand
ESET's Host-based Intrusion Prevention System (HIPS) is included in ESET Endpoint Security, ESET Endpoint Antivirus, ESET Mail Security for Microsoft Exchange Server, and ESET Server Security for Microsoft Windows Server. HIPS monitors system activity and uses a pre-defined set of rules to recognize suspicious system behavior.
When this type of activity is identified, the HIPS self-defense mechanism stops the offending program or process from carrying out a potentially harmful activity. By prohibiting the standard execution of JavaScript and other scripts, ransomware cannot download or execute. To further help prevent ransomware malware on your Windows systems, create the following rules in the latest ESET business products with HIPS, or create and apply an ESET PROTECT Policy.
Solution
Manually create an ESET PROTECT Policy/configure the settings in ESET business products
- Open the ESET PROTECT or ESET PROTECT On-Prem. In the Quick Links drop-down menu, click Create New Policy....
If you are using an ESET business product without remote management, open the main program window of your ESET Windows product and press the F5 key to access Advanced setup. Proceed to step 3.
- Click Settings, and in the Select product... drop-down menu, select one of the following ESET business products with HIPS:
-
- ESET Endpoint for Windows.
- ESET File Security for Windows Server (V6+).
- ESET Mail Security for Microsoft Exchange (V6+).
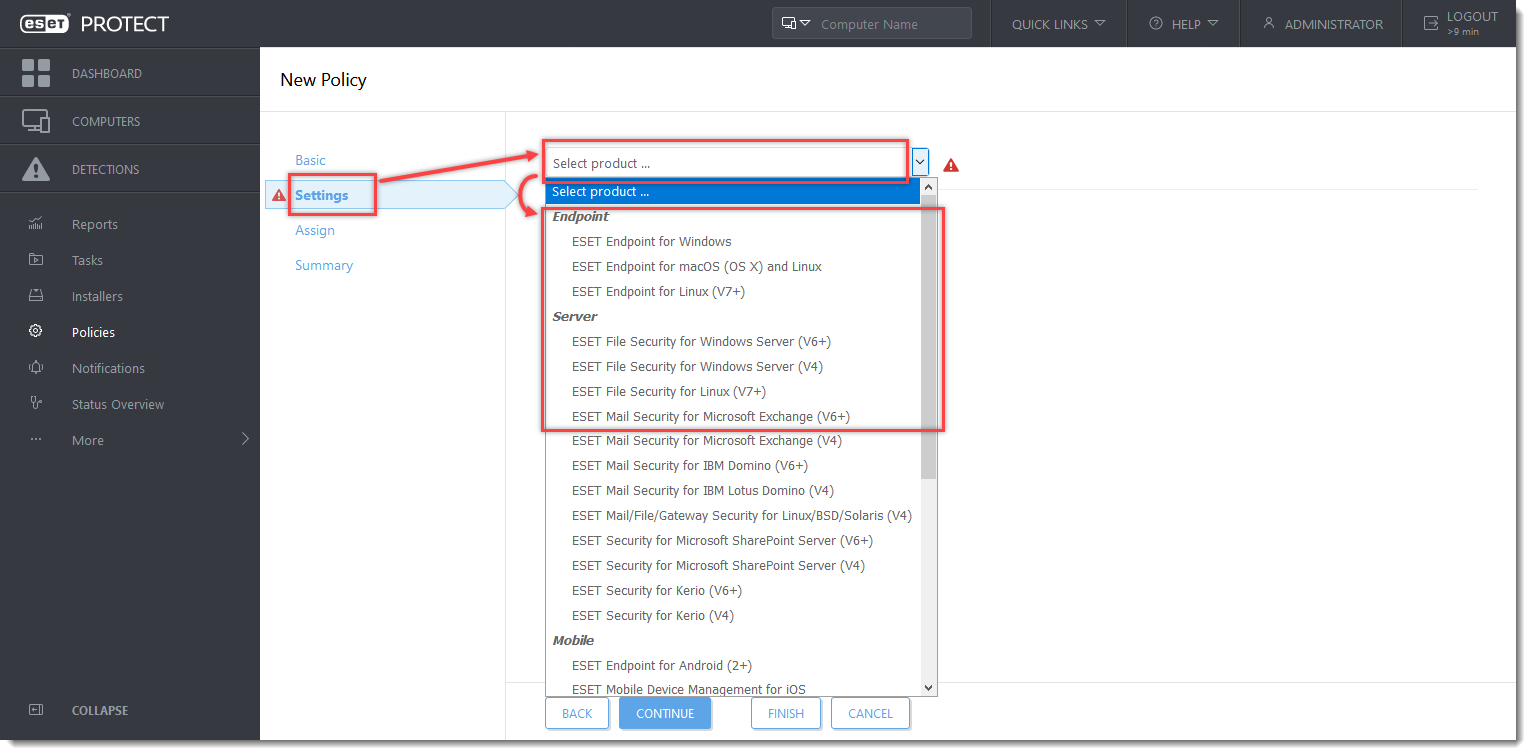
Click the image to view larger in the new window
- Click Detection Engine (Computer in ESET Mail Security for Microsoft Exchange Server) → HIPS. Click Edit next to Rules.
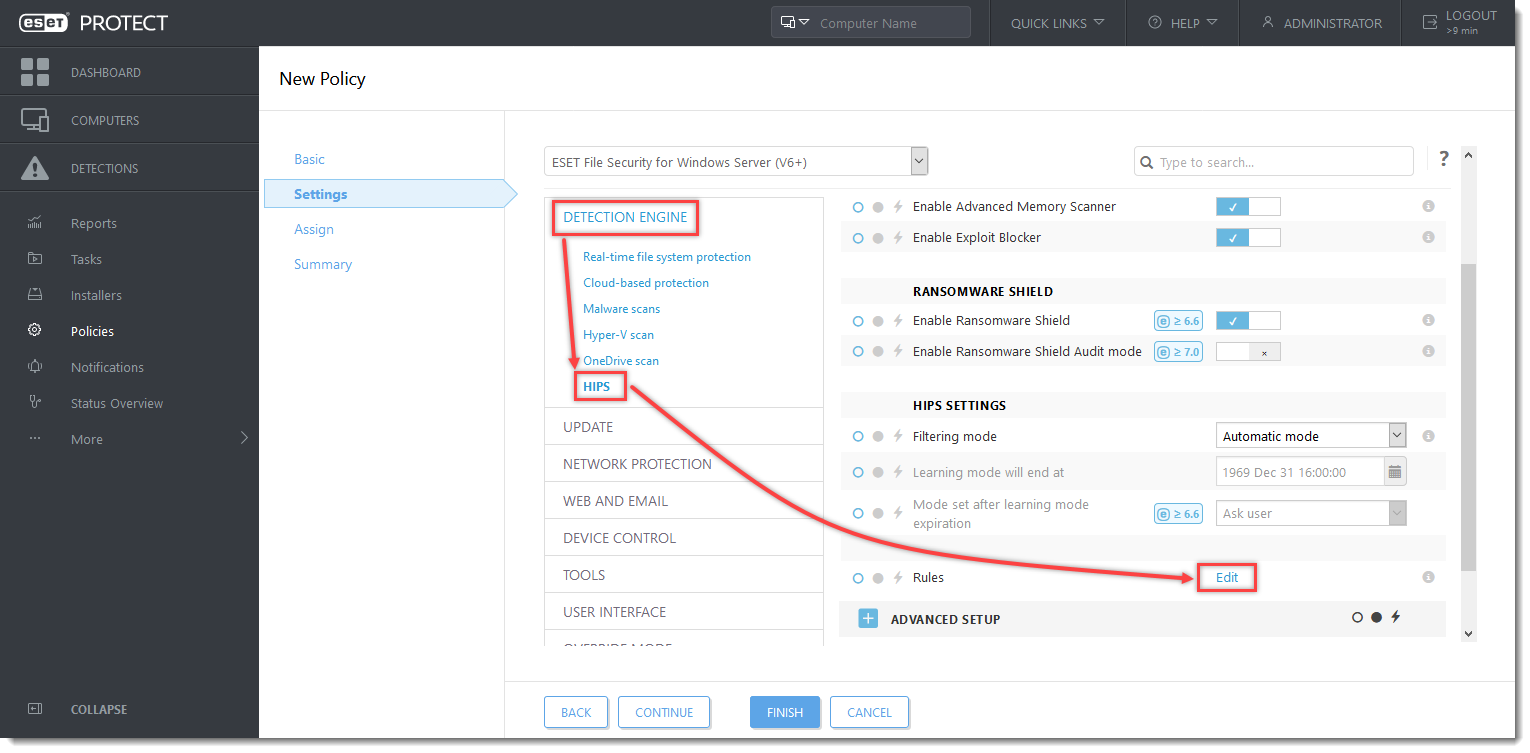
Click the image to view larger in the new window
Click the option (I. to VII.) to expand each section below to create the HIPS rules for the suggested processes.
I. Deny processes from script executables
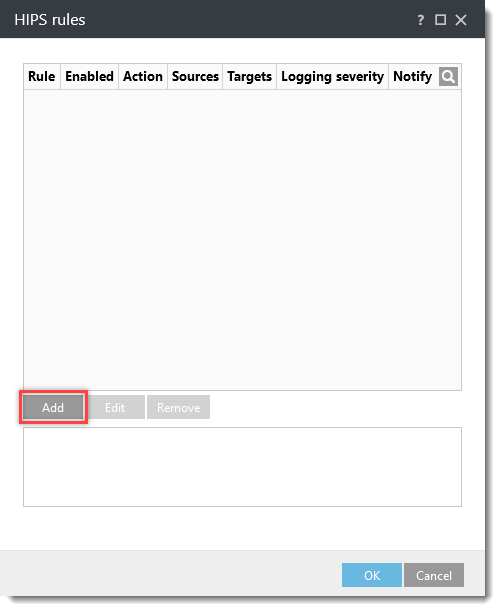
- In the HIPS rules window, click Add.
-
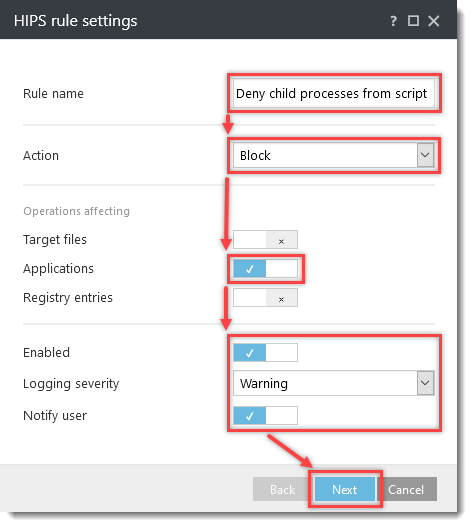
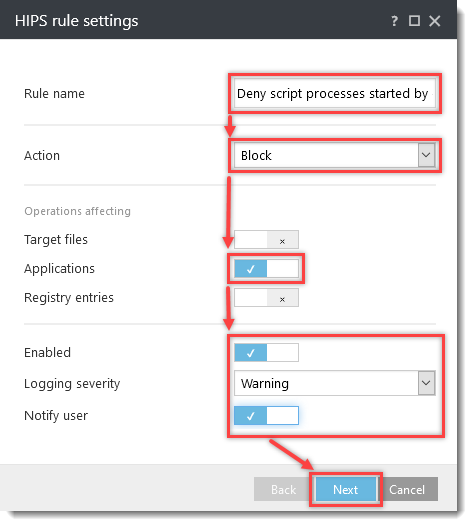
Type Deny child processes from script executables into the Rule name field. From the Action drop-down menu, select Block. Click the toggle next to Applications, Enabled, and Notify user to enable these settings. From the Logging severity drop-down menu, select Warning and click Next.
-
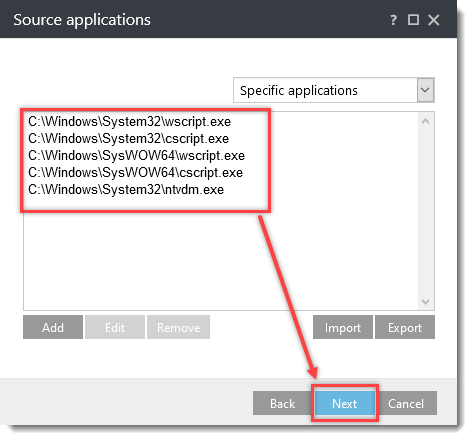
In the Source applications window, click Add and type in the following names, clicking OK → Add after each one:
C:\Windows\System32\wscript.exeC:\Windows\System32\cscript.exeC:\Windows\SysWOW64\wscript.exeC:\Windows\SysWOW64\cscript.exeC:\Windows\System32\ntvdm.exe
Click Next.
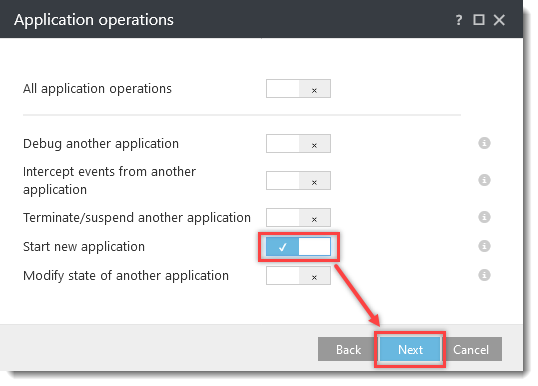
- In the Application operations window, click the toggle next to Start new application to enable it and click Next.
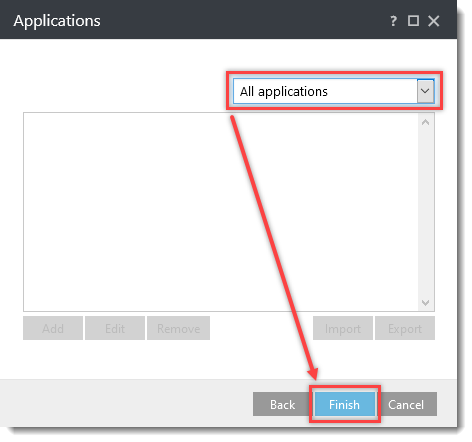
- Select All applications from the drop-down menu and click Finish.
- Leave the HIPS rules window open and continue to the next section.
II. Deny script processes started by explorer
- In the HIPS rules window, click Add.
-
Type Deny script processes started by explorer into the Rule name field.
From the Action drop-down menu, select Block.
Click the toggle next to:
From the Logging severity drop-down menu, select Warning and click Next.
- In the Source applications window click Add, type C:\Windows\explorer.exe into the Specify file path field, and then click OK → Next.
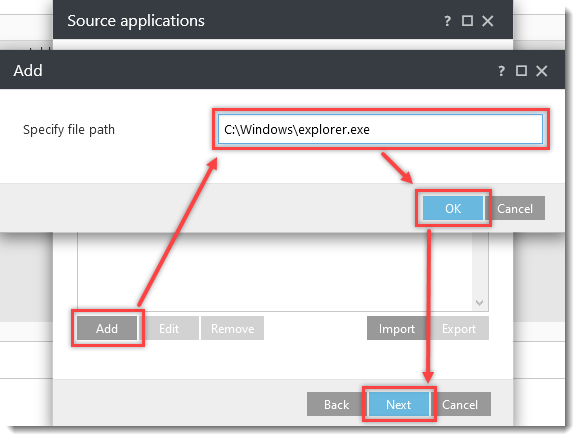
- In the Application operations window, click the toggle next to Start new application to enable it and click Next.
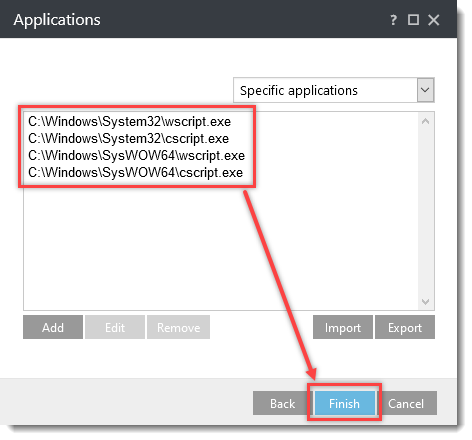
-
In the Applications window, click Add and type in the following names, clicking OK → Add after each one:
C:\Windows\System32\wscript.exeC:\Windows\System32\cscript.exeC:\Windows\SysWOW64\wscript.exeC:\Windows\SysWOW64\cscript.exe
Click Finish.
- Leave the HIPS rules window open and continue to the next section.
III. Deny child processes from Office 2013/2016 processes
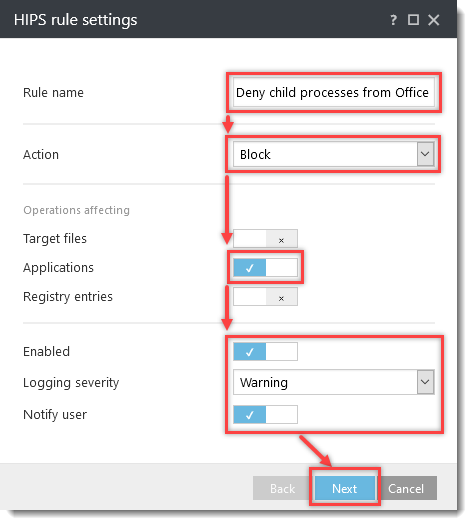
- In the HIPS rules window, click Add.
-
Type Deny child processes from Office 2013 processes into the Rule name field. From the Action drop-down menu, select Block. Click the toggle next to Applications, Enabled, and Notify user to enable these settings. From the Logging severity drop-down menu, select Warning and click Next.
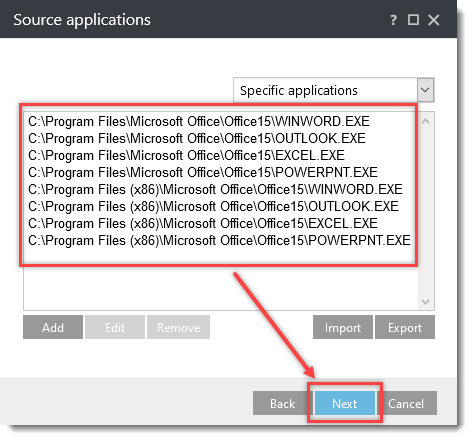
-
In the Source applications window, click Add and type in the following names, clicking OK → Add after each one:
C:\Program Files\Microsoft Office\Office15\WINWORD.EXEC:\Program Files\Microsoft Office\Office15\OUTLOOK.EXEC:\Program Files\Microsoft Office\Office15\EXCEL.EXEC:\Program Files\Microsoft Office\Office15\POWERPNT.EXEC:\Program Files (x86)\Microsoft Office\Office15\WINWORD.EXEC:\Program Files (x86)\Microsoft Office\Office15\OUTLOOK.EXEC:\Program Files (x86)\Microsoft Office\Office15\EXCEL.EXEC:\Program Files (x86)\Microsoft Office\Office15\POWERPNT.EXE
Click Next.
- In the Application operations window, click the toggle next to Start new application to enable it and click Next.
-
In the Applications window, click Add and type in the following names, clicking OK → Add after each one:
C:\Windows\System32\cmd.exeC:\Windows\SysWOW64\cmd.exeC:\Windows\System32\wscript.exeC:\Windows\SysWOW64\wscript.exeC:\Windows\System32\cscript.exeC:\Windows\SysWOW64\cscript.exeC:\Windows\System32\ntvdm.exeC:\Windows\System32\WindowsPowerShell\v1.0\powershell.exeC:\Windows\SysWOW64\WindowsPowerShell\v1.0\powershell.exeC:\Windows\System32\regsvr32.exeC:\Windows\SysWOW64\regsvr32.exeC:\Windows\System32\rundll32.exeC:\Windows\SysWOW64\rundll32.exe
Click Finish.
-
Add additional Office versions as needed, repeating the same instructions as above.
- 2016 = Office16 (C:\Program Files (x86)\Microsoft Office\Root\Office16\...)
- 2010 = Office14
-
Leave the HIPS rules window open and continue to the next section.
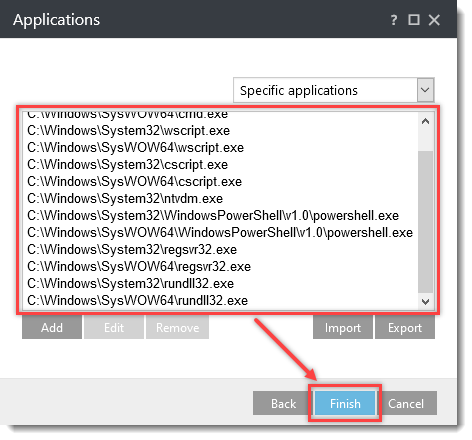
IV. Deny child processes for regsrv32.exe
- In the HIPS rules window, click Add.
-
Type Deny child processes for regsrv32.exe into the Rule name field.
From the Action drop-down menu, select Block.
Click the toggle next to the following settings to enable them:
- Applications
- Enabled
- Notify user
From the Logging severity drop-down menu, select Warning and click Next.

-
In the Source applications window, click Add and type in the following names, clicking OK → Add after each one:
C:\Windows\System32\regsvr32.exeC:\Windows\SysWOW64\regsvr32.exe
Click Next.
- In the Application operations window, click the toggle next to Start new application to enable it and click Next.
-
In the Applications window, click Add and type in the following names, clicking OK → Add after each one:
C:\Windows\System32\cmd.exeC:\Windows\SysWOW64\cmd.exeC:\Windows\System32\wscript.exeC:\Windows\SysWOW64\wscript.exeC:\Windows\System32\cscript.exeC:\Windows\SysWOW64\cscript.exeC:\Windows\System32\ntvdm.exeC:\Windows\System32\WindowsPowerShell\v1.0\powershell.exeC:\Windows\SysWOW64\WindowsPowerShell\v1.0\powershell.exe
Click Finish.
- Leave the HIPS rules window open and continue to the next section.
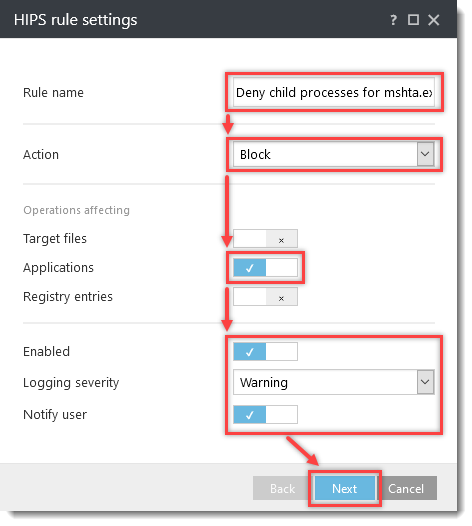
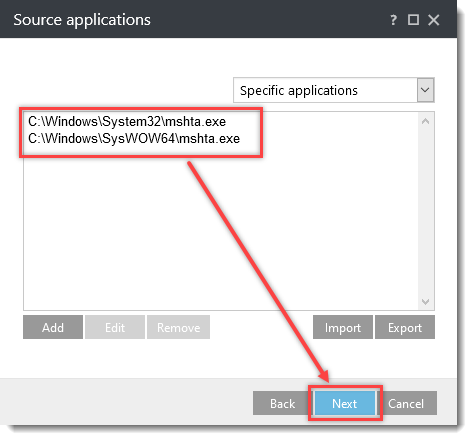
V. Deny child processes for mshta.exe
- In the HIPS rules window, click Add.
-
Type Deny child processes for mshta.exe into the Rule name field.
From the Action drop-down menu, select Block.
Click the toggle next to the following settings to enable them:
- Applications
- Enabled
- Notify user
From the Logging severity drop-down menu, select Warning and click Next.
-
In the Source applications window, click Add and type in the following names, clicking OK → Add after each one:
C:\Windows\System32\mshta.exeC:\Windows\SysWOW64\mshta.exe
Click Next.
- In the Application operations window, click the toggle next to Start new application to enable it and click Next.
- Select All applications from the drop-down menu and click Finish.
- Leave the HIPS rules window open and continue to the next section.
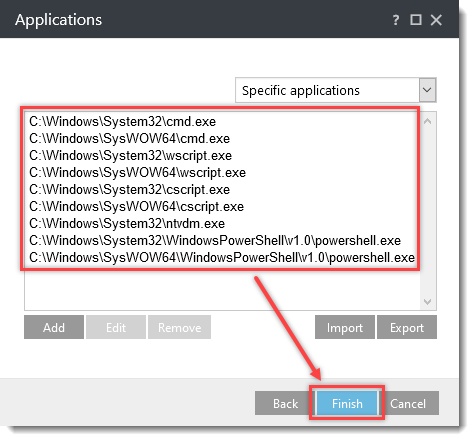
VI. Deny child processes for rundll32.exe
- In the HIPS rules window, click Add.
-
Type Deny child processes for rundll32.exe into the Rule name field.
From the Action drop-down menu, select Block.
Click the toggle next to the following settings to enable them:
- Applications
- Enabled
- Notify user
From the Logging severity drop-down menu, select Warning and click Next.
- In the Source applications window, click Add, type
C:\Windows\System32\rundll32.exeinto the Specify file path field, and then click OK → Next.
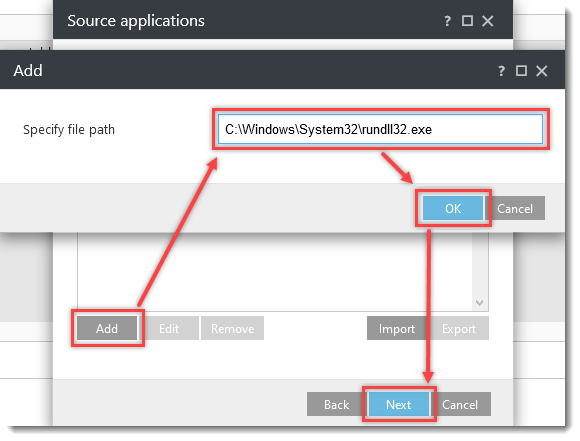
- In the Application operations window, click the toggle next to Start new application to enable it and click Next.
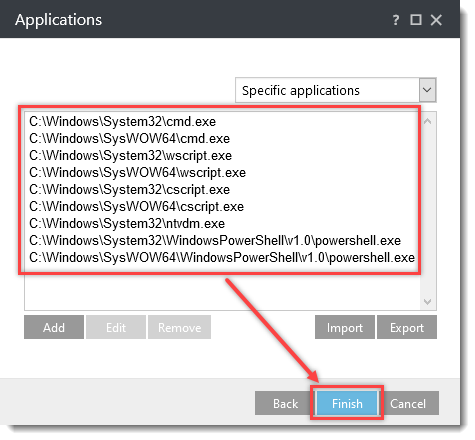
-
In the Applications window, click Add and type in the following names, clicking OK → Add after each one:
C:\Windows\System32\cmd.exeC:\Windows\SysWOW64\cmd.exeC:\Windows\System32\wscript.exeC:\Windows\SysWOW64\wscript.exeC:\Windows\System32\cscript.exeC:\Windows\SysWOW64\cscript.exeC:\Windows\System32\ntvdm.exeC:\Windows\System32\WindowsPowerShell\v1.0\powershell.exeC:\Windows\SysWOW64\WindowsPowerShell\v1.0\powershell.exe
Click Finish.
- Leave the HIPS rules window open and continue to the next section.
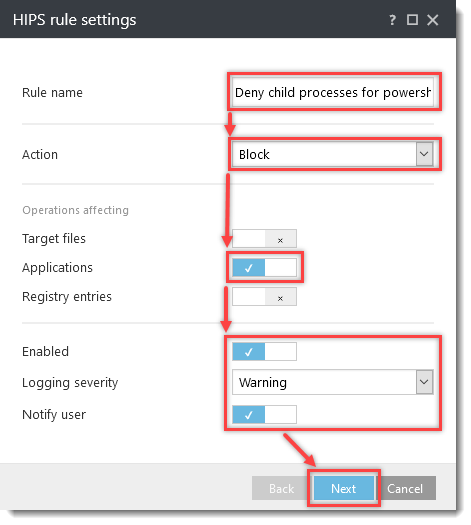
VII. Deny child processes for powershell.exe
- In the HIPS rules window, click Add.
-
Type Deny child processes for powershell.exe into the Rule name field.
From the Action drop-down menu, select Block.
Click the toggle next to the following settings to enable them:
- Applications
- Enabled
- Notify user
From the Logging severity drop-down menu, select Warning and click Next.
-
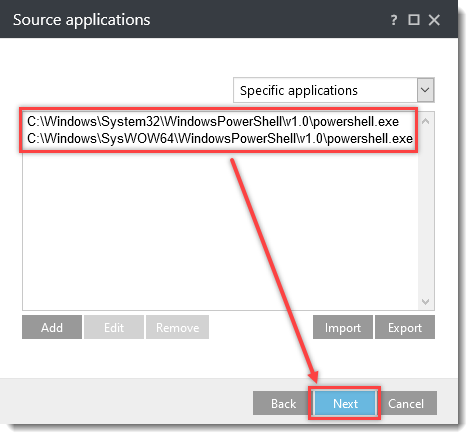
In the Source applications window, click Add and type in the following names, clicking OK → Add after each one:
C:\Windows\System32\WindowsPowerShell\v1.0\powershell.exeC:\Windows\SysWOW64\WindowsPowerShell\v1.0\powershell.exe
Click Next.
- In the Application operations window, click the toggle next to Start new application to enable it and click Next.
- Select All applications from the drop-down menu and click Finish.
- In the HIPS rules window, click OK. Expand Assign to assign the policy to a client or group; otherwise, click Finish in the New Policy – Settings screen. If assigned, your policy settings will be applied to the target groups or client computers once they check in to ESET PROTECT or ESET PROTECT On-Prem.
If you are using an ESET business product without remote management, Click OK twice.
Download and import the ESET PROTECT Policy
The ESET PROTECT Policy for ESET business products with additional HIPS settings to protect against ransomware malware (filecoder) can be downloaded and imported from the links below. The ESET PROTECT Policy is available only for the latest version of ESET products. Compatibility with earlier versions cannot be guaranteed.
-
Download the Additional HIPS Protection ESET PROTECT Policy for:
-
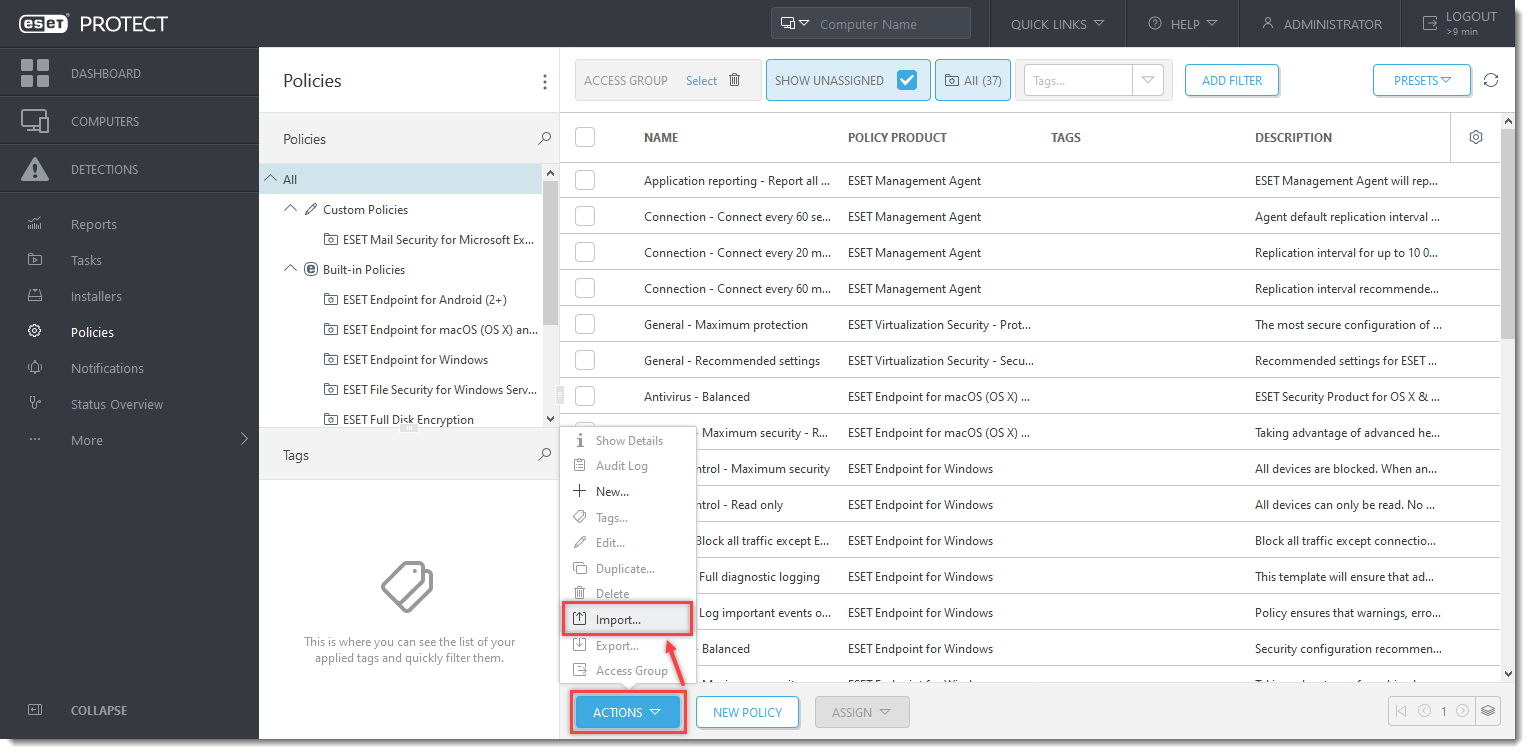
Open the ESET PROTECT or ESET PROTECT On-Prem. In the main menu, click Policies.
- Click Actions → Import....
Click the image to view larger in the new window
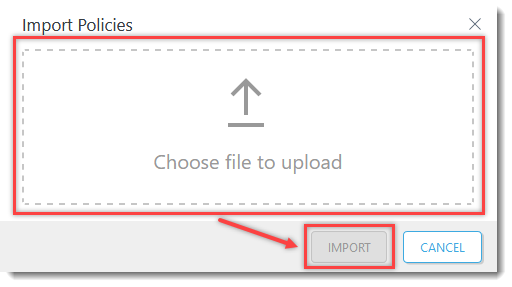
- Click Choose file to upload, select the downloaded policy, and click Import.
- Assign the policy to a client or assign the policy to a group. Policy settings will be applied to the target groups or client computers once they check in to ESET PROTECT or ESET PROTECT On-Prem.