Issue
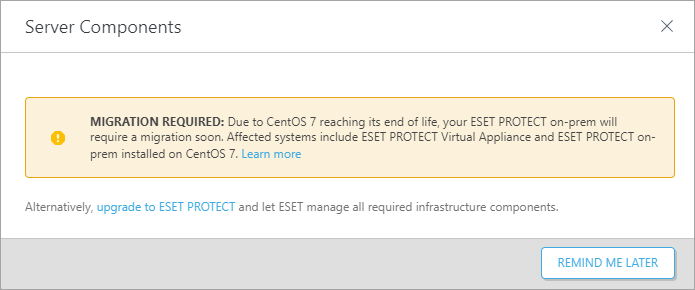
- You receive a "Migration required" notification in your ESET PROTECT Virtual Appliance or ESET PROTECT On-Prem
- Migrate ESET PROTECT Virtual Appliance to ESET PROTECT On-Prem on a Linux Server
Solution
- Prerequisites
- Create a certificate with connection information
- Set a new ESET PROTECT Server hostname and assign the policy
- Create database backup and export the database
- Install a new database on Linux and import the VA database
- ESET PROTECT Server Setup
- Create a new policy and set a hostname for a new ESET PROTECT Server
I. Prerequisites
- ESET PROTECT Virtual Appliance.
- Before the migration, ensure you have the latest version of ESET PROTECT Virtual Appliance.
- See what version of ESET PROTECT Virtual Appliance you have.
- If you are on an earlier version, follow the recommended upgrade instructions for ESET PROTECT Virtual Appliance.
- Before the migration, ensure you have the latest version of ESET PROTECT Virtual Appliance.
- New MySQL database using the default name era_db and username root.
II. Create a certificate with connection information
Open ESET PROTECT Virtual Appliance Web Console and log in.
Click More → Peer Certificates → New → Certificate.
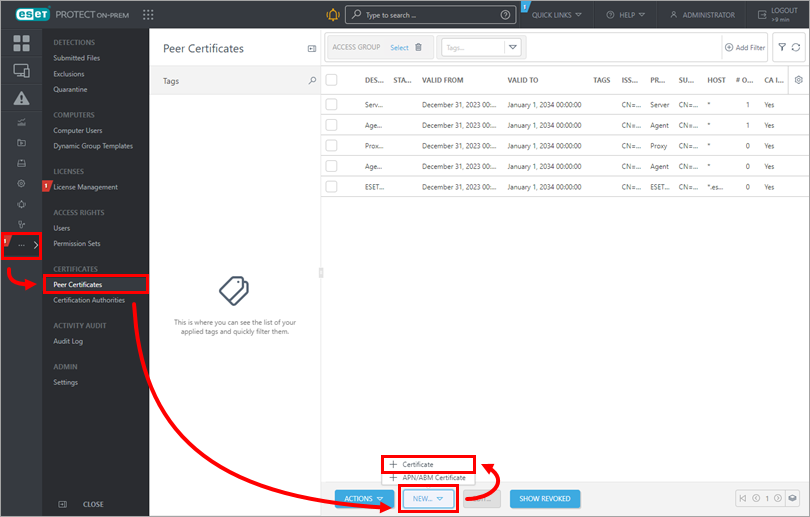
Figure 1-1 Type the certificate description into the Description field and select Server from the Product drop-down menu. The Host field is pre-set to the default value (*), but we recommend using a real hostname. Leave the Passphrase and Confirm passphrase fields empty. Click Continue.
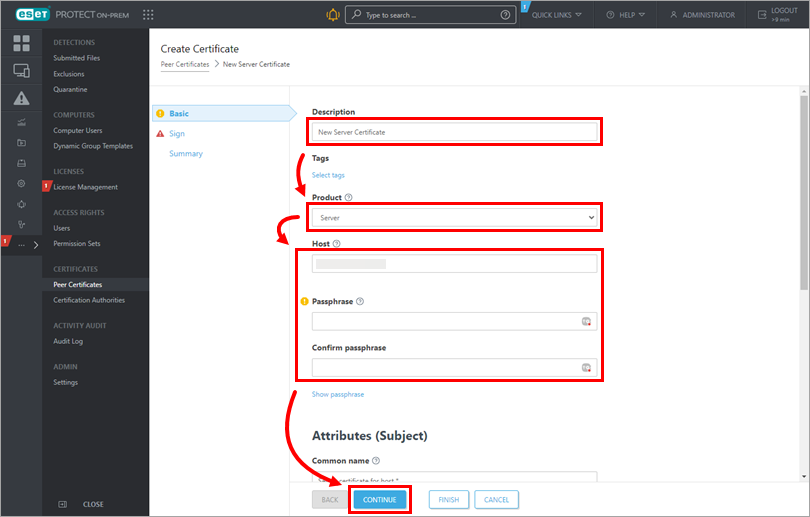
Figure 1-2 Verify that the radio button next to Certification authority under Signing method is selected and click Select certification authority. A new window will open. Select the certification authority you want to use to sign a new certificate and click OK to confirm and return to the previous window. Type the Certification Authority passphrase in the respective field. In this case, you use the same password you use to log into ESET PROTECT Virtual Appliance Management Console. Click Finish.
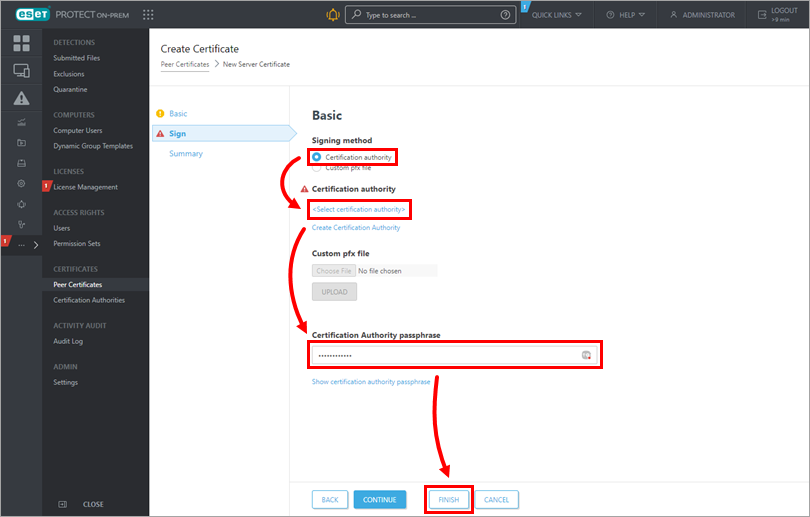
Figure 1-3
III. Set a new ESET PROTECT Server hostname and assign the policy
Open ESET PROTECT Virtual Appliance Web Console and log in.
Click Policies → New Policy.
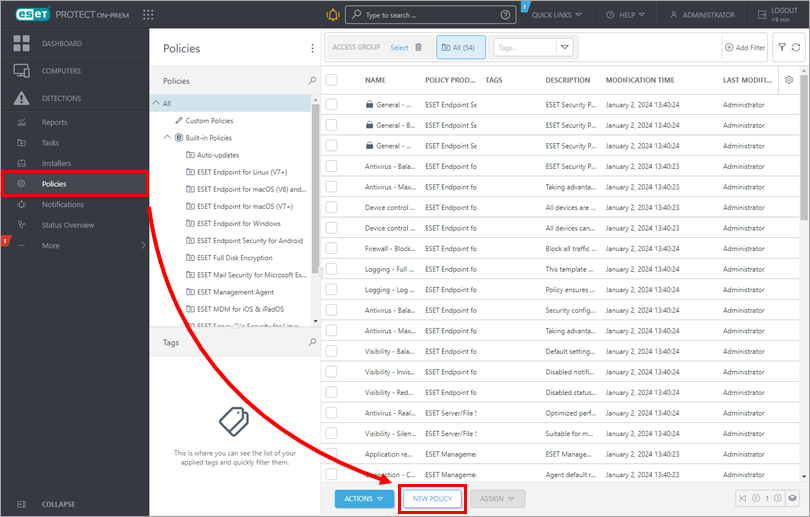
Figure 2-1 In the Basic section, type a name for your policy.
Click Settings, select ESET Management Agent from the drop-down menu, and click Edit server list.
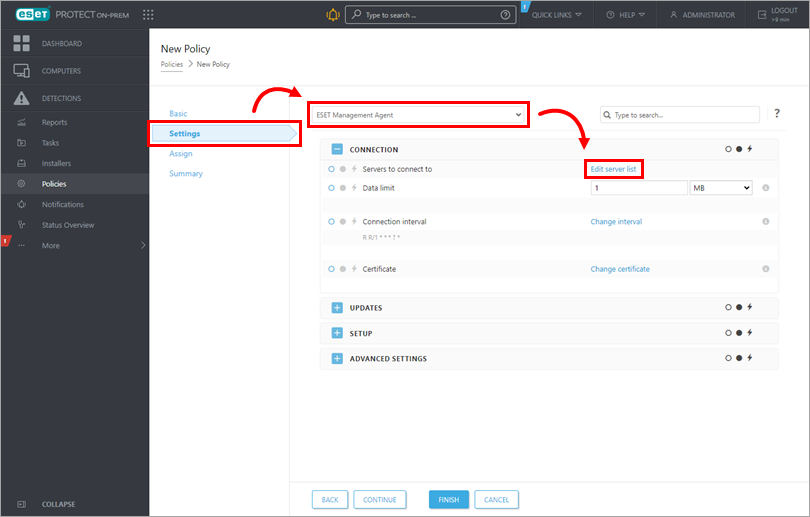
Figure 2-2 In the Servers window, click Add. In the host field, type the hostname of your new ESET PROTECT Server. If you use a port other than the default ESET PROTECT Server port 2222, specify your custom port number. Click OK. Ensure that your new ESET PROTECT Server hostname is listed first and click Save.
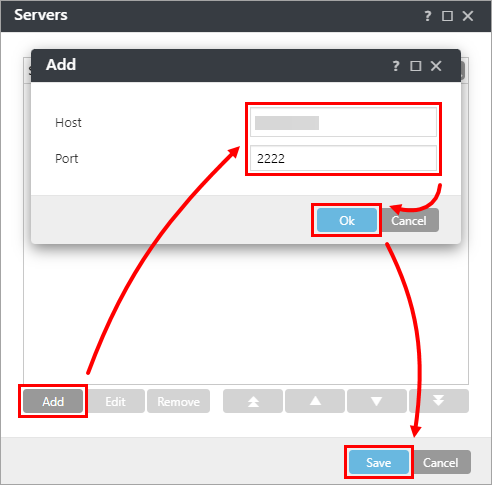
Figure 2-3 Select Append from the drop-down menu next to Edit server list.
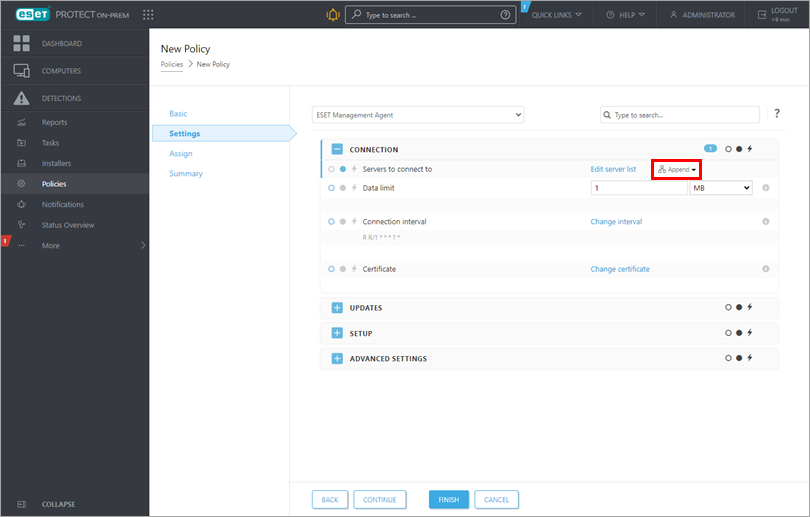
Figure 2-4 Click Assign → Assign to display a new popup window with all Static and Dynamic Groups.
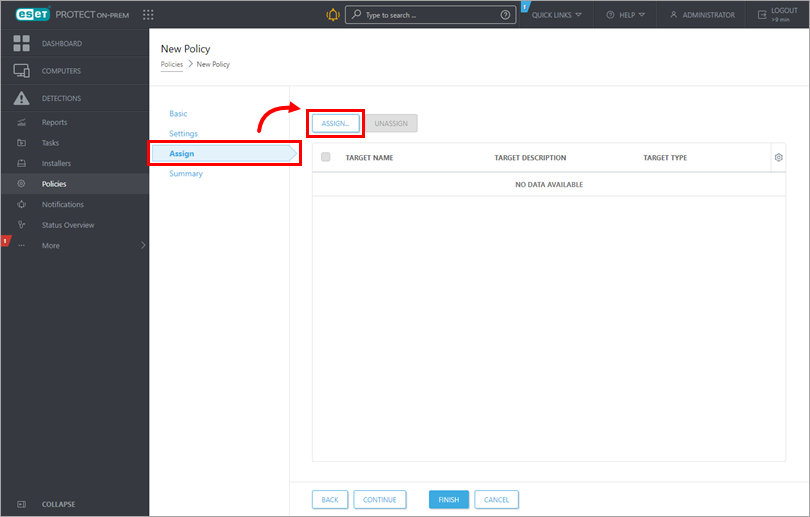
Figure 2-5 Select the checkbox next to the groups of computers you want to assign the policy and click OK. We recommend applying the policy in batches to different groups of computers.
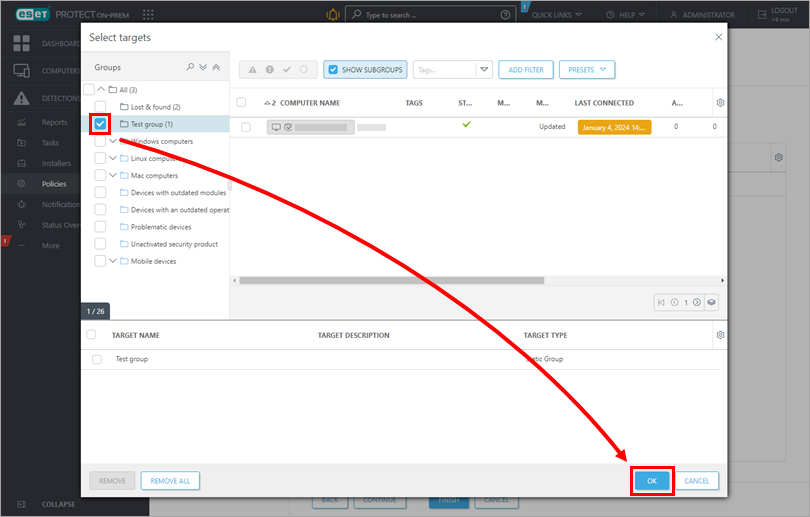
Figure 2-6 Review the settings for this policy and click Finish to apply. The time to apply the policy will vary depending on your ESET PROTECT Virtual Appliance replication interval.
Open ESET PROTECT Virtual Appliance and create a database backup.
Create database backup
In the ESET PROTECT Server Appliance window, press the Enter key to access the management mode menu.
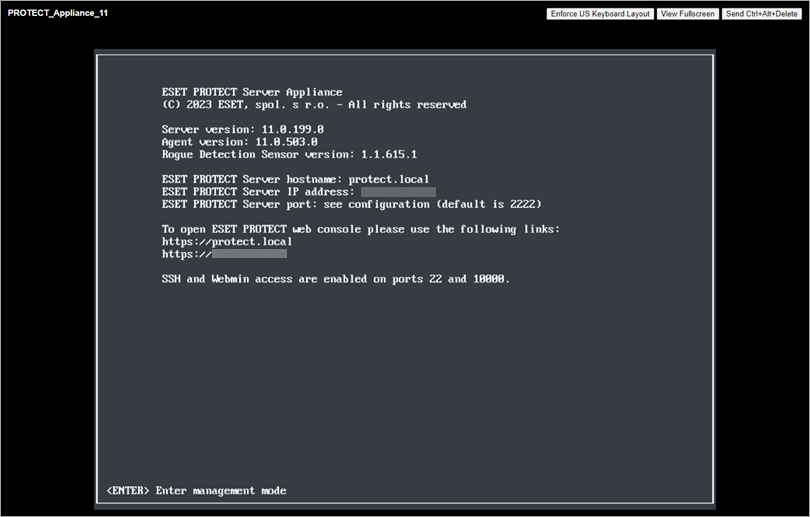
Figure 3-1 Log in and select Backup database.

Figure 3-2 Type your password (note that there will be no visible characters indicating you are typing) and press the Enter key. Wait until the database backup is created and review the message. Press the Enter key to continue.
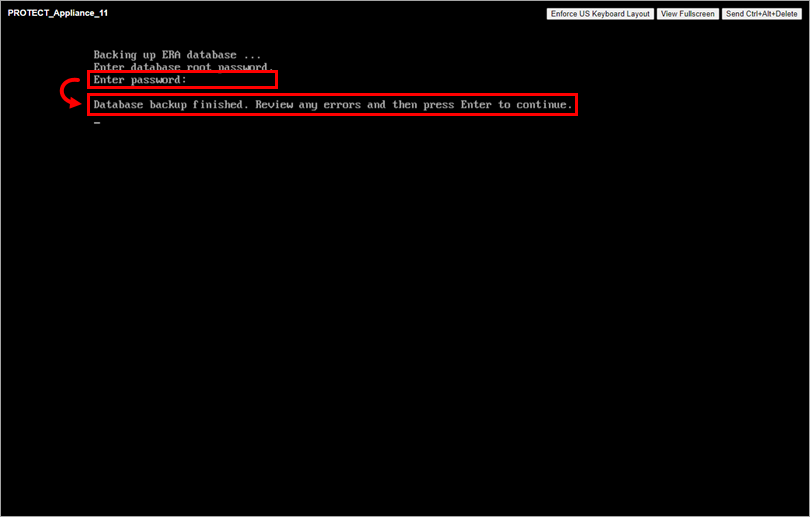
Figure 3-3
Export the database
In the ESET PROTECT Server Appliance management mode menu, select Enable/Disable Webmin interface to enable the Webmin Management Interface.
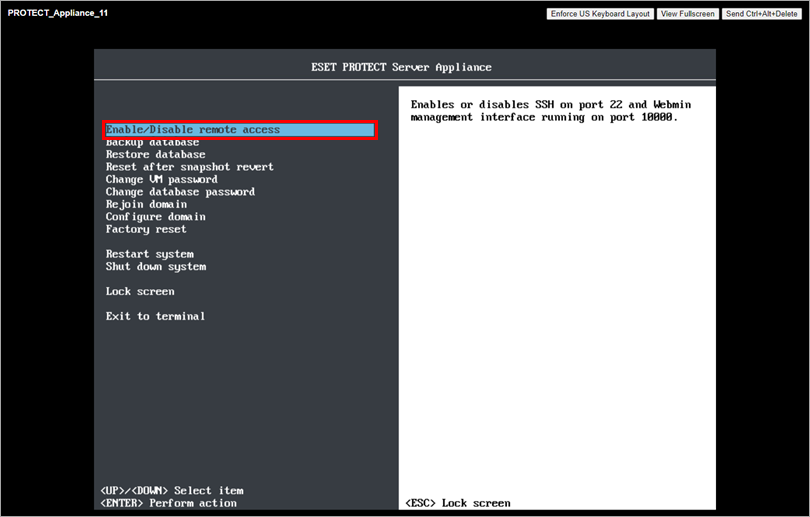
Figure 3-4 Connect to the Webmin interface using a web browser with the IP address of ESET PROTECT Virtual Appliance and port 10000. A sample address:
https://xxx.xxx.xxx.xxx:10000.Log into the Webmin interface. Type the ESET PROTECT Virtual Appliance credentials where root is the login and click Sign in.

Figure 3-5 Expand Tools and click File Manager. Click the root folder, right-click era-backup.sql file and select Download from the context menu. Save the file to a local drive and copy it to a location accessible from the target Windows machine.

Figure 3-6 Return to the ESET PROTECT Virtual Appliance window, press the Enter key to access the management mode, log in and select Shut down system.

Figure 3-7
V. Install a new database on Linux and import the ESET PROTECT Server Appliance database
On the target Linux Server, prepare a clean installation of MySQL Server. When you are prompted by the MySQL installer to create a Root Account Password, we recommend that you use the same password you used in ESET PROTECT Server Appliance.
Follow the migration process for MySQL Server (if you have already created a database backup as described in section IV, start with step 3).
Skip step 7 (Connect the ESET PROTECT Server to the database) and follow the steps in section VI below.
VI. ESET PROTECT Server Setup
Download the ESET PROTECT Server component and begin the installation.
Open ESET PROTECT On-Prem in your web browser and log in using your password.
VII. Create a new policy and set a hostname for a new ESET PROTECT Server
Click Policies → New Policy.
In the Basic section, type a name for your policy.
Click Settings, select ESET Management Agent from the drop-down menu, and click Edit server list.
In the Servers window, click Add. In the host field, type the hostname of your new ESET PROTECT Server. If you use a port other than the default ESET PROTECT Server port 2222, specify your custom port number. Click OK. Make sure your new ESET PROTECT Server hostname is listed first, and click Save.
Click Assign → Assign to display a new popup window with all Static and Dynamic Groups.
Select the checkbox next to the groups of computers you want to assign the policy and click OK. We recommend applying the policy in batches to different groups of computers.
Review the settings for this policy and click Finish to apply. The time to apply the policy will vary depending on your ESET PROTECT Virtual Appliance replication interval.
When the new policy is applied, and there is no problem with the new ESET PROTECT Server, delete the old policy with two hostnames you created in section III.