Issue
- Use Jamf Pro to deploy the latest version of ESET Endpoint Security for macOS
- Troubleshooting issues after using Jamf Pro to upgrade to the latest version of ESET Endpoint Security for macOS
Solution
Follow the instructions below to deploy ESET Endpoint Security for macOS using Jamf Pro to manage using ESET PROTECT.
- Configure System Extensions, Privacy Preference Policy Control (PPPC), VPN, and Content Filter profile
- Create Policies
- Additional Options
I. Configure System Extensions, PPPC, VPN, and Content Filter profile
-
To set the approval for System Extensions, PPPC, VPN, and Content Filter, open Jamf Pro and click Computers → Configuration Profiles → New to add a new configuration profile (one configuration profile can contain all the settings).
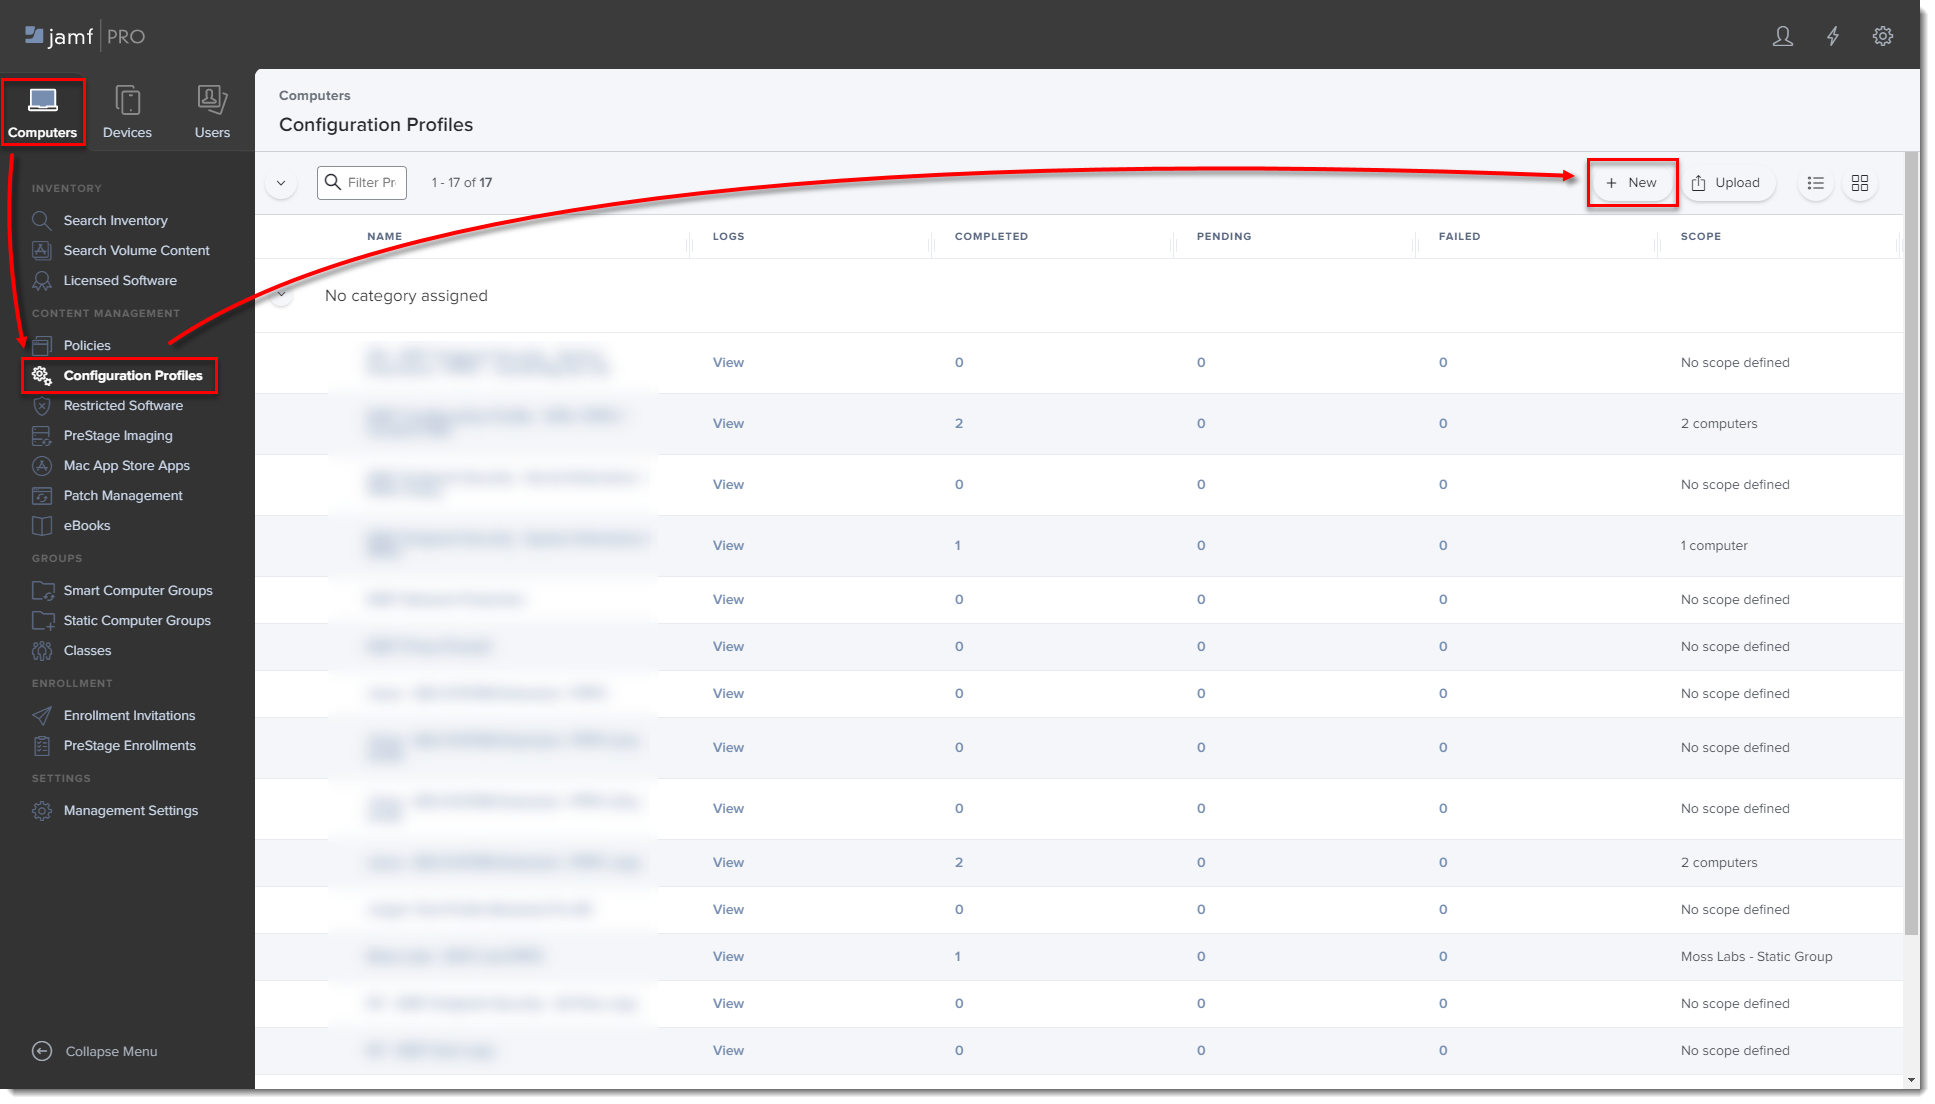
Figure 1-1
Click the image to view larger in new window
-
Type a Name for the profile.
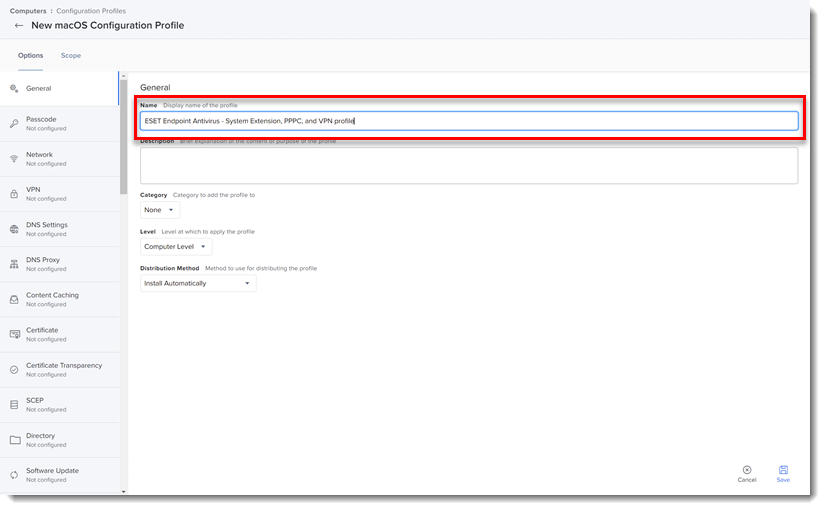
Figure 1-2
-
In the Options tab, click System Extensions → Configure.
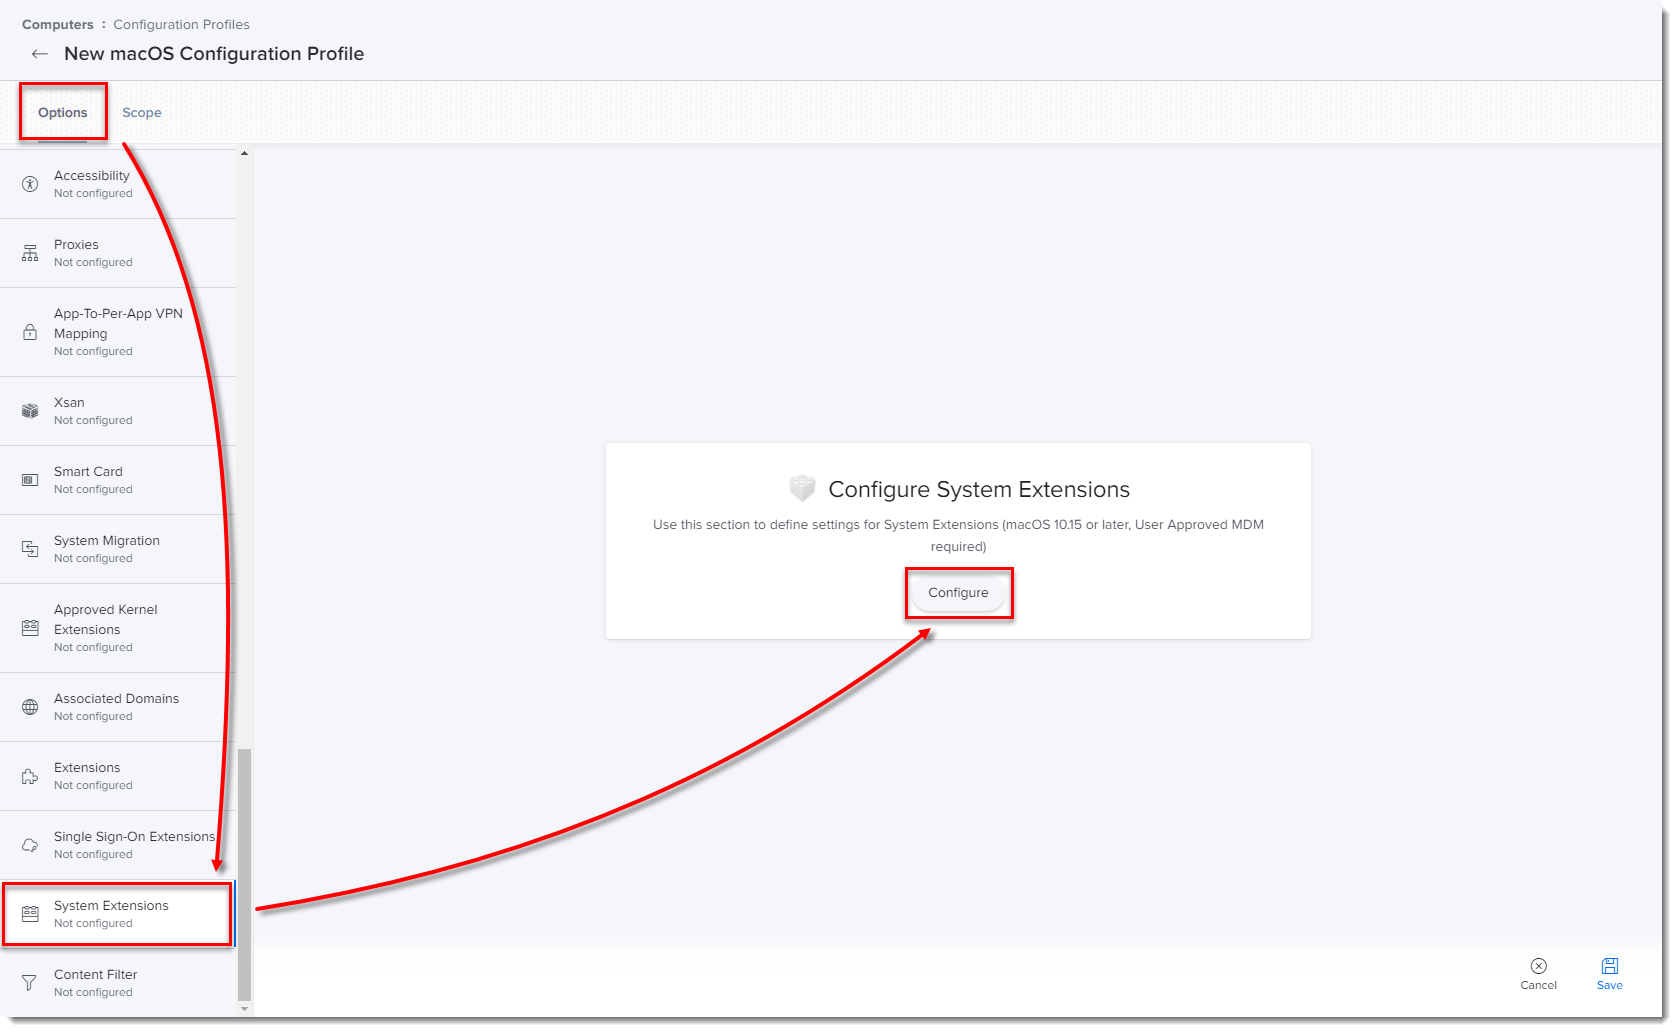
Figure 1-3
Click the image to view larger in new window -
In the Allowed TEAM IDs and System Extensions section, type the following information:
- Display Name: ESET SEXT [you can choose any name you want]
- System Extension Types: Allowed System Extensions
- Team Identifier: P8DQRXPVLP
- Allowed System Extensions:
com.eset.endpoint
com.eset.network
com.eset.firewall
com.eset.devices
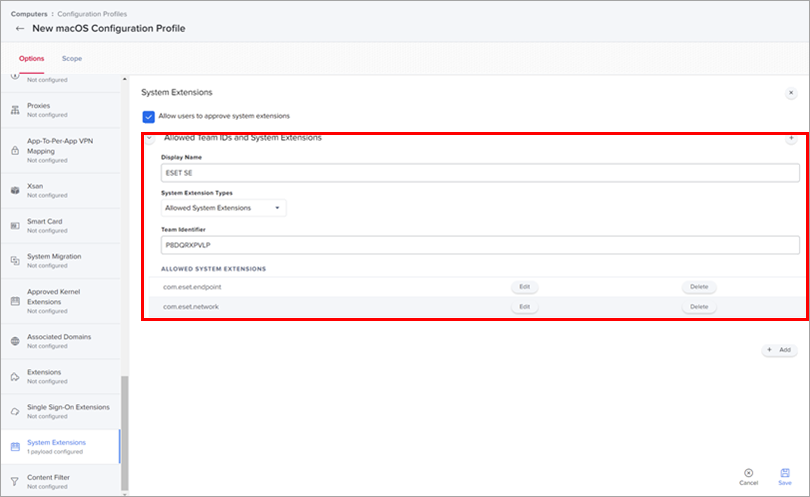
Figure 1-4
Click the image to view larger in new window -
In the Options tab, click Privacy Preferences Policy Control → Configure.
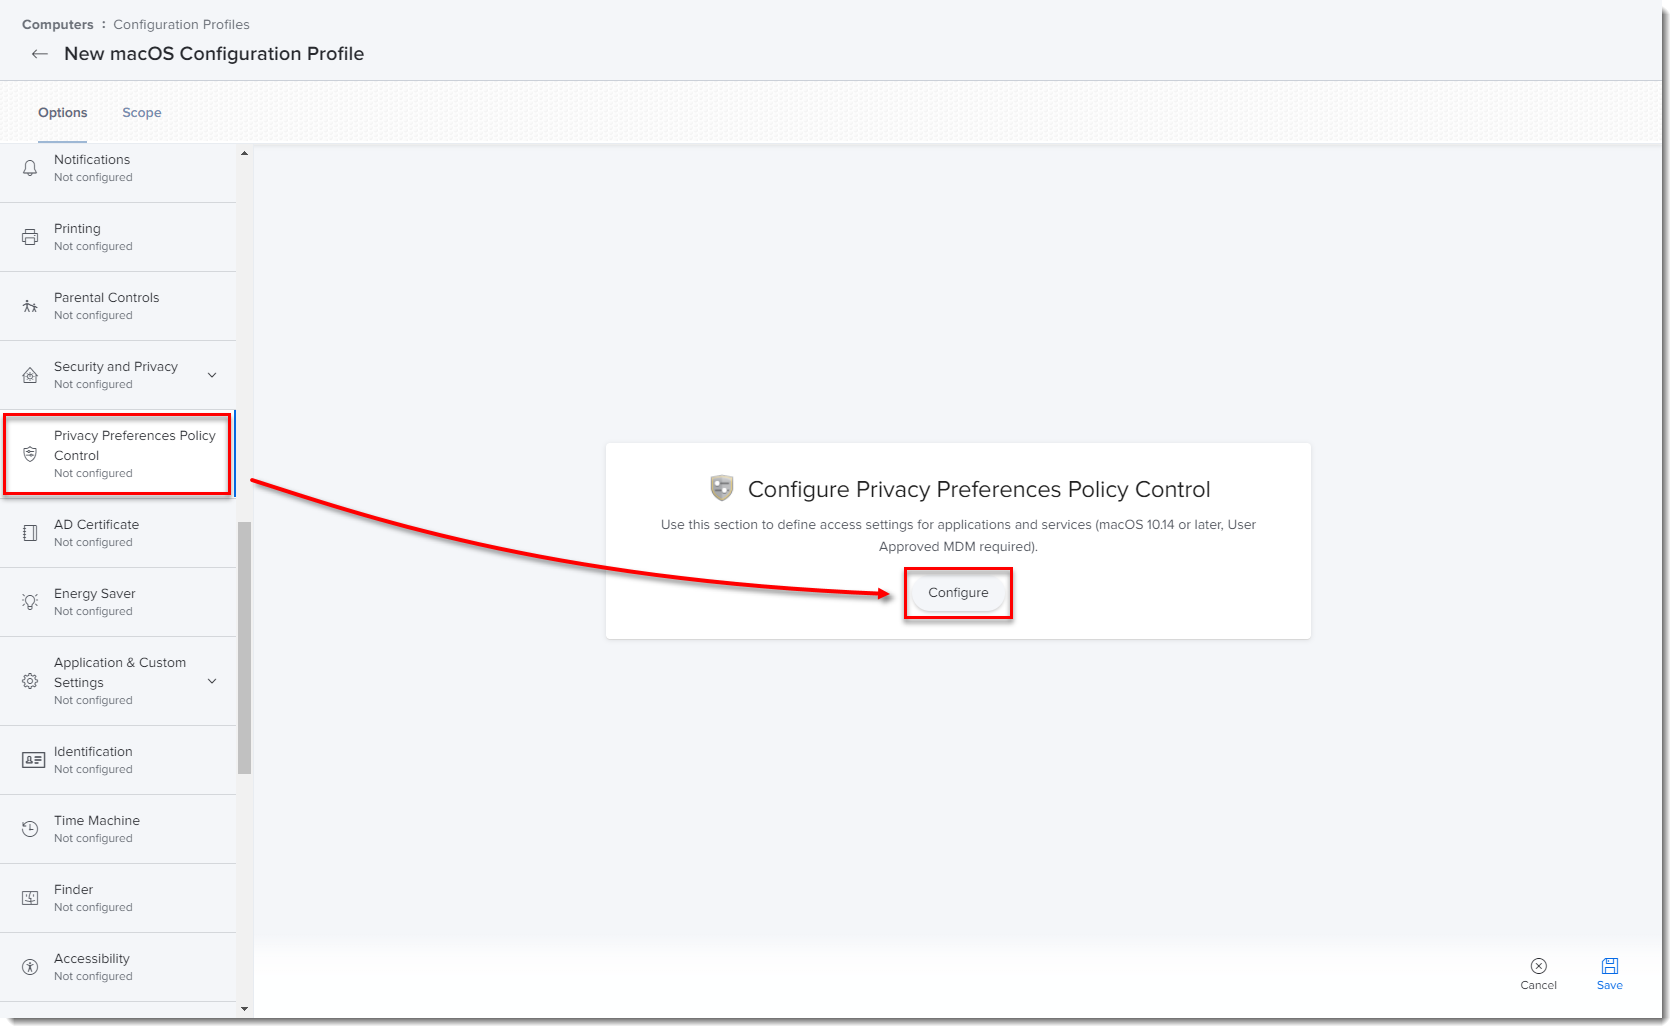
Figure 1-5
Click the image to view larger in new window -
Add in the following information:
- Main product identifier EES:
- Identifier: com.eset.ees.g2
- Identifier Type: Bundle ID
- Code Requirement:
identifier "com.eset.ees.g2" and anchor apple generic and certificate 1[field.1.2.840.113635.100.6.2.6] /* exists */ and certificate leaf[field.1.2.840.113635.100.6.1.13] /* exists */ and certificate leaf[subject.OU] = P8DQRXPVLP - App or Service: SystemPolicyAllFiles
- Access: Allow
- Realtime identifier:
- Identifier: com.eset.endpoint
- Identifier Type: Bundle ID
- Code Requirement:
identifier "com.eset.endpoint" and anchor apple generic and certificate 1[field.1.2.840.113635.100.6.2.6] /* exists */ and certificate leaf[field.1.2.840.113635.100.6.1.13] /* exists */ and certificate leaf[subject.OU] = P8DQRXPVLP - App or Service: SystemPolicyAllFiles
- Access: Allow
- Network identifier:
- Identifier: com.eset.network
- Identifier Type: Bundle ID
- Code Requirement:
identifier "com.eset.network" and anchor apple generic and certificate 1[field.1.2.840.113635.100.6.2.6] /* exists */ and certificate leaf[field.1.2.840.113635.100.6.1.13] /* exists */ and certificate leaf[subject.OU] = P8DQRXPVLP - App or Service: SystemPolicyAllFiles
- Access: Allow
- Firewall identifier:
- Identifier: com.eset.firewall
- Identifier Type: Bundle ID
- Code Requirement:
identifier "com.eset.firewall" and anchor apple generic and certificate 1[field.1.2.840.113635.100.6.2.6] /* exists */ and certificate leaf[field.1.2.840.113635.100.6.1.13] /* exists */ and certificate leaf[subject.OU] = P8DQRXPVLP - App or Service: SystemPolicyAllFiles
- Access: Allow
- Uninstaller identifier:
- Identifier: com.eset.Uninstaller
- Identifier Type: Bundle ID
- Code Requirement:
identifier "com.eset.app.Uninstaller" and anchor apple generic and certificate 1[field.1.2.840.113635.100.6.2.6] /* exists */ and certificate leaf[field.1.2.840.113635.100.6.1.13] /* exists */ and certificate leaf[subject.OU] = P8DQRXPVLP - App or Service: SystemPolicyAllFiles
- Access: Allow
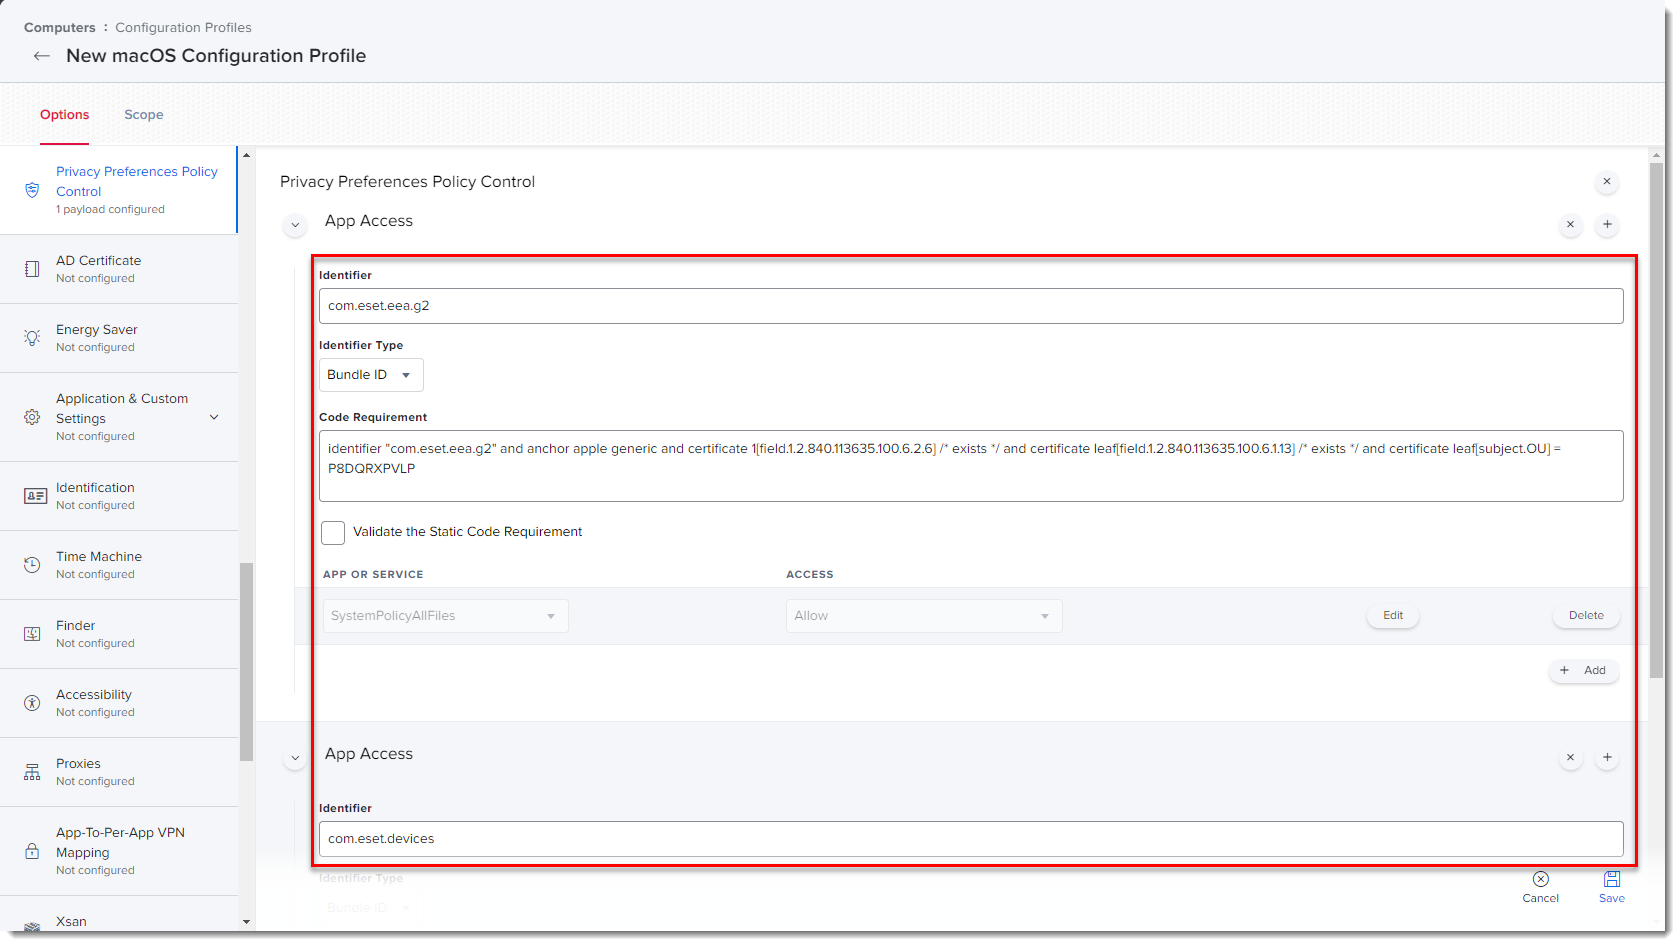
Figure 1-6
Click the image to view larger in new window - Main product identifier EES:
-
In the Options tab, click VPN → Configure.
-
Create a configuration profile for ESET Web and Email Protection with the following settings:
In the General section, fill in the following:
- Name: for example, ESET Web&Email Protection
- Level: Computer level
- Distribution method: Install automatically
In the VPN section, fill in the following:
- VPN Type: VPN
- Connection type: Custom SSL
- Identifier: com.eset.network.manager
- server: localhost
- Provider Bundle Identifier: com.eset.network
- User Authentication: Certificate
- Provider Type: App-proxy
- Provider Designated Requirement:
identifier "com.eset.network" and anchor apple generic and certificate 1[field.1.2.840.113635.100.6.2.6] /* exists */ and certificate leaf[field.1.2.840.113635.100.6.1.13] /* exists */ and certificate leaf[subject.OU] = P8DQRXPVLP - Identity Certificate: None
- Idle Timer: Do not disconnect
- Proxy Setup: None
-
To add firewall configuration to system settings remotely, create a content filter configuration profile for the firewall before the installation/upgrade. Use the following settings:
- Identifier: com.eset.firewall.manager
- Filter order: Firewall
- Socket filter: com.eset.firewall
- Socket filter designated requirement:
identifier "com.eset.firewall" and anchor apple generic and certificate 1[field.1.2.840.113635.100.6.2.6] /* exists */ and certificate leaf[field.1.2.840.113635.100.6.1.13] /* exists */ and certificate leaf[subject.OU] = P8DQRXPVLP
For more information, see the Online Help guide.
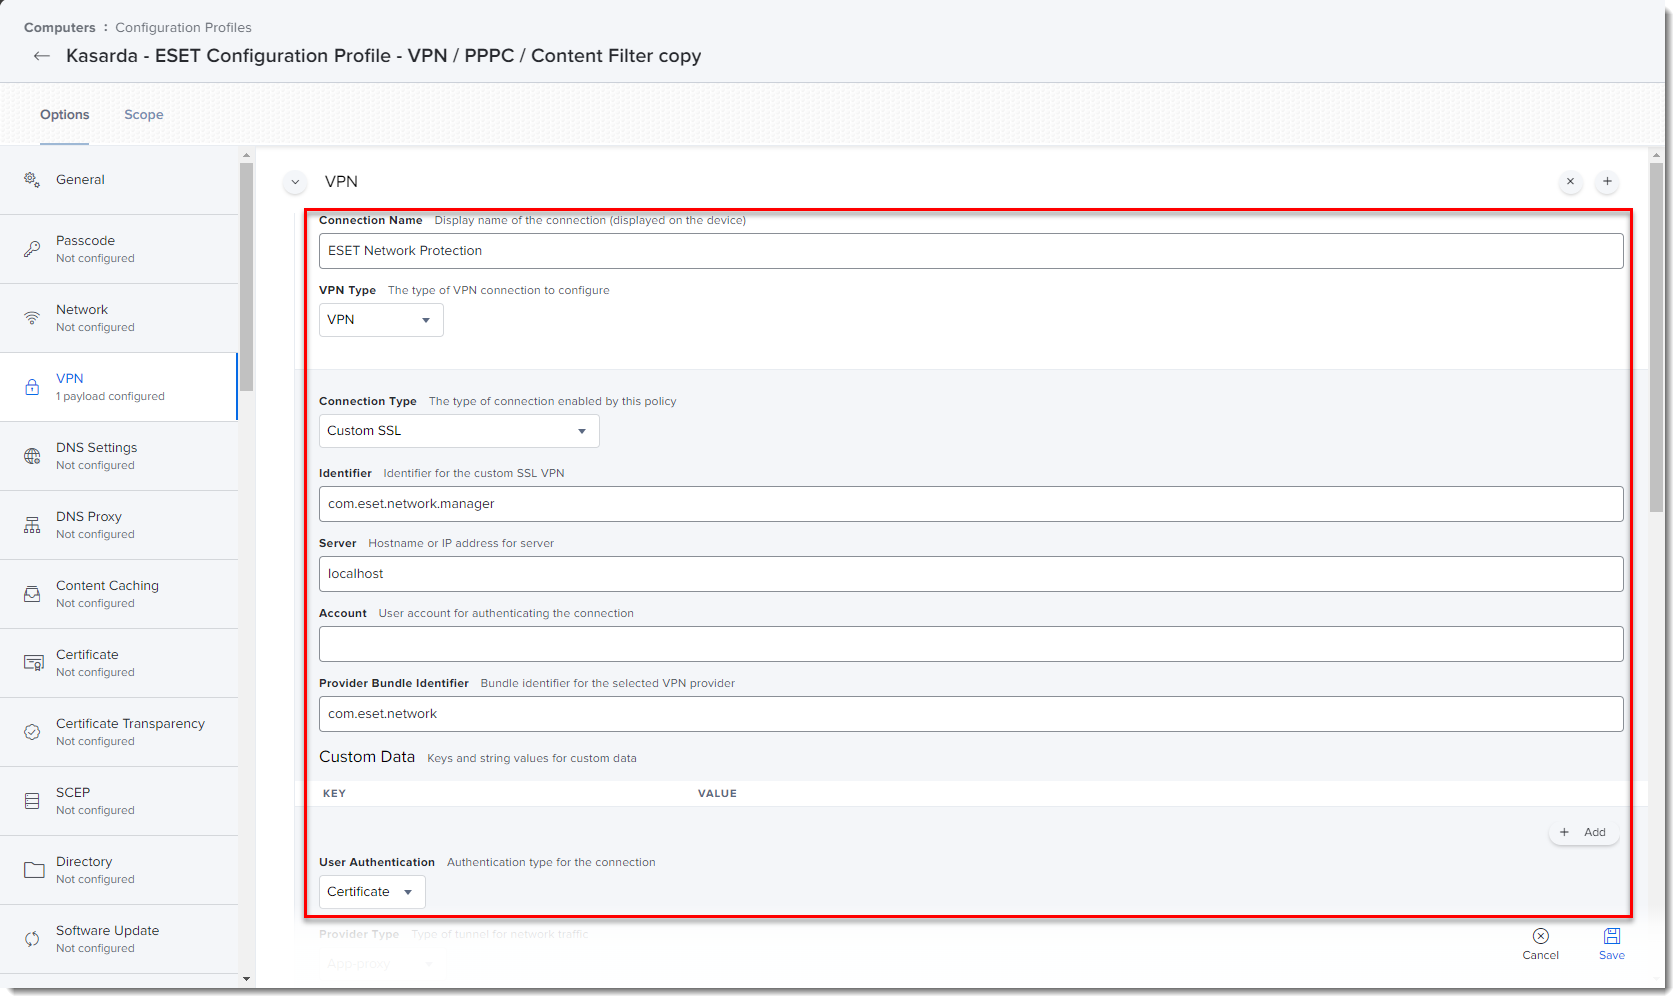
Figure 1-7
Click the image to view larger in new window -
Click the Scope tab and click Add.
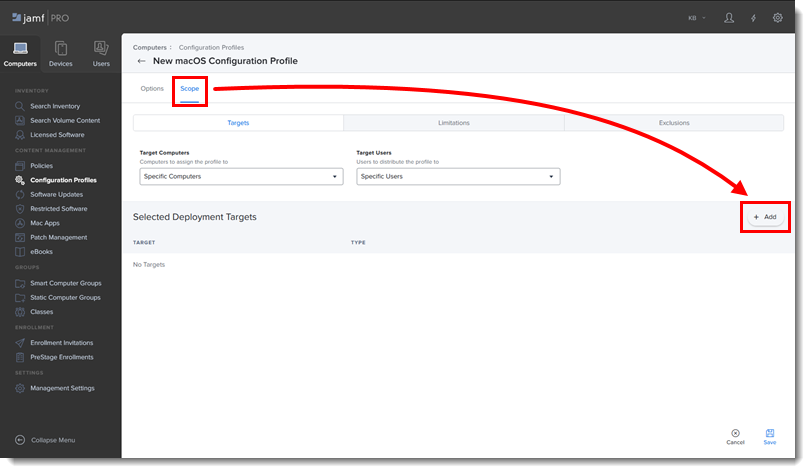
Figure 1-8 -
In the Add Deployment Targets section, select the computers (or Computer Groups) to which you want to apply the policy by clicking Add, and then click Done.
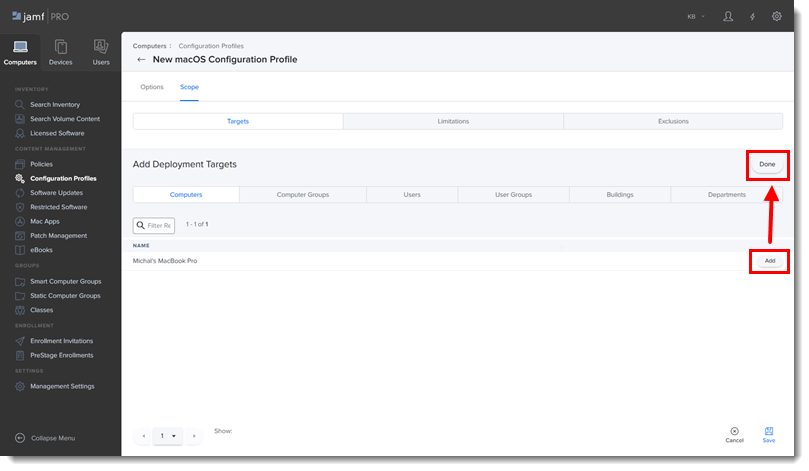
Figure 1-9 -
Click Save to apply your changes.
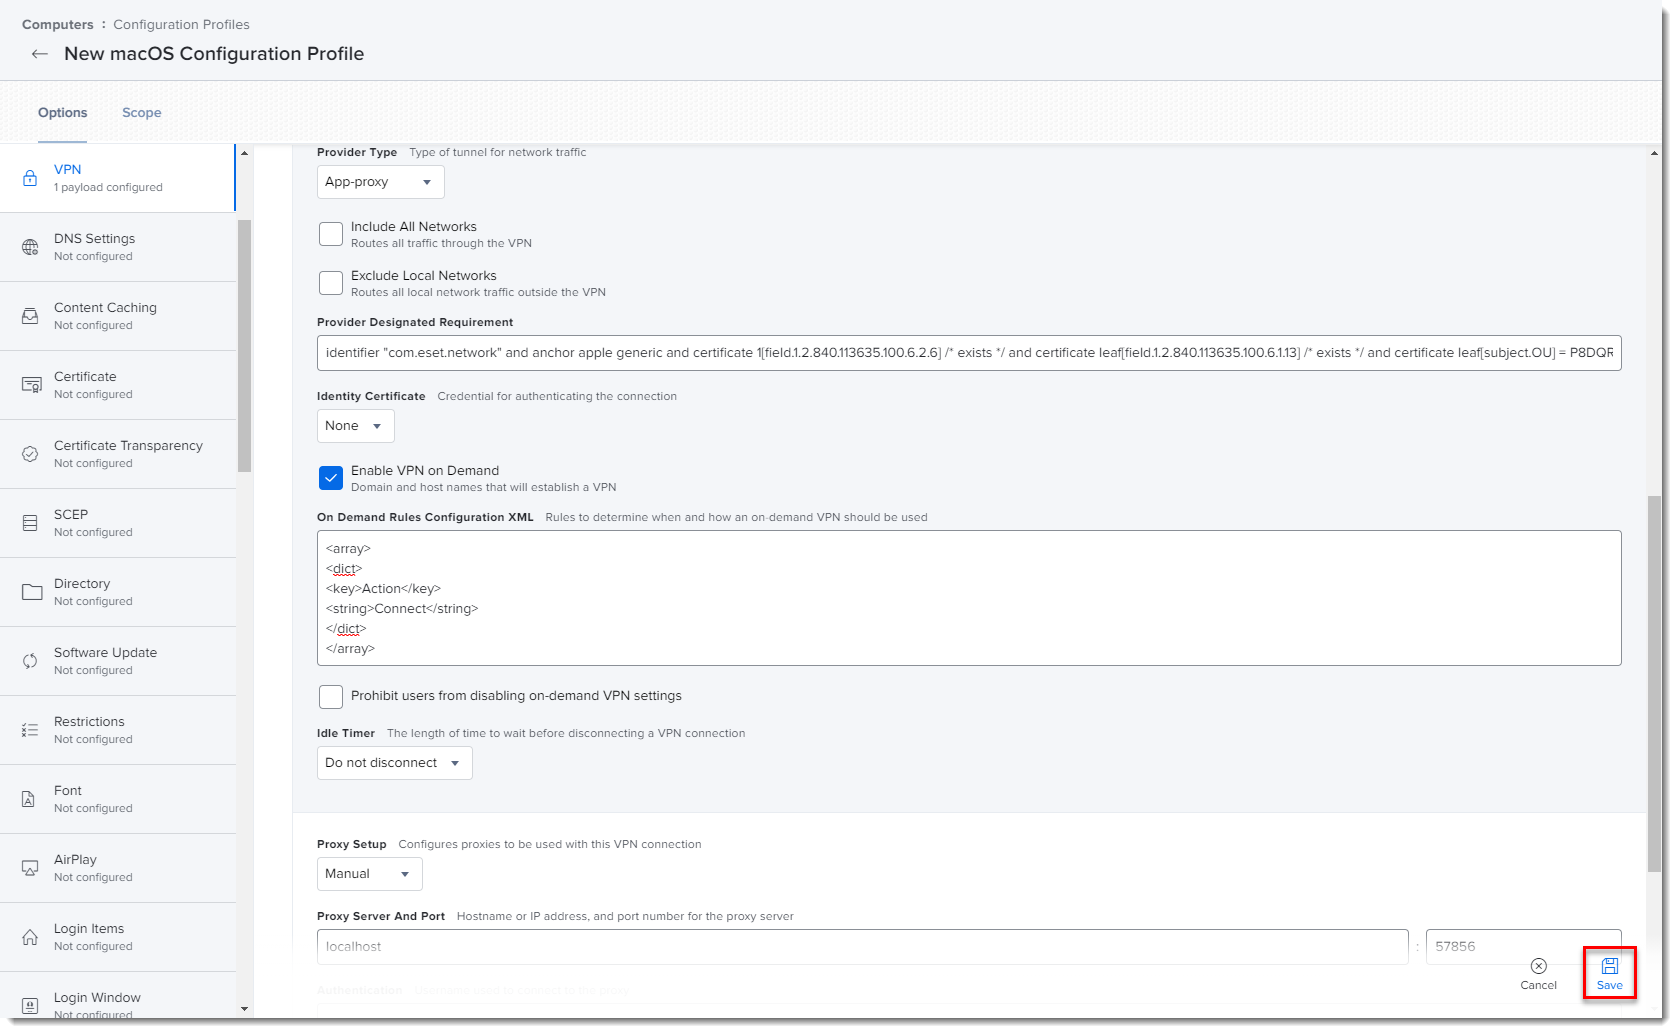
Figure 1-10
Click the image to view larger in new window
II. Create policies
-
Click Policies in the left menu and click New.
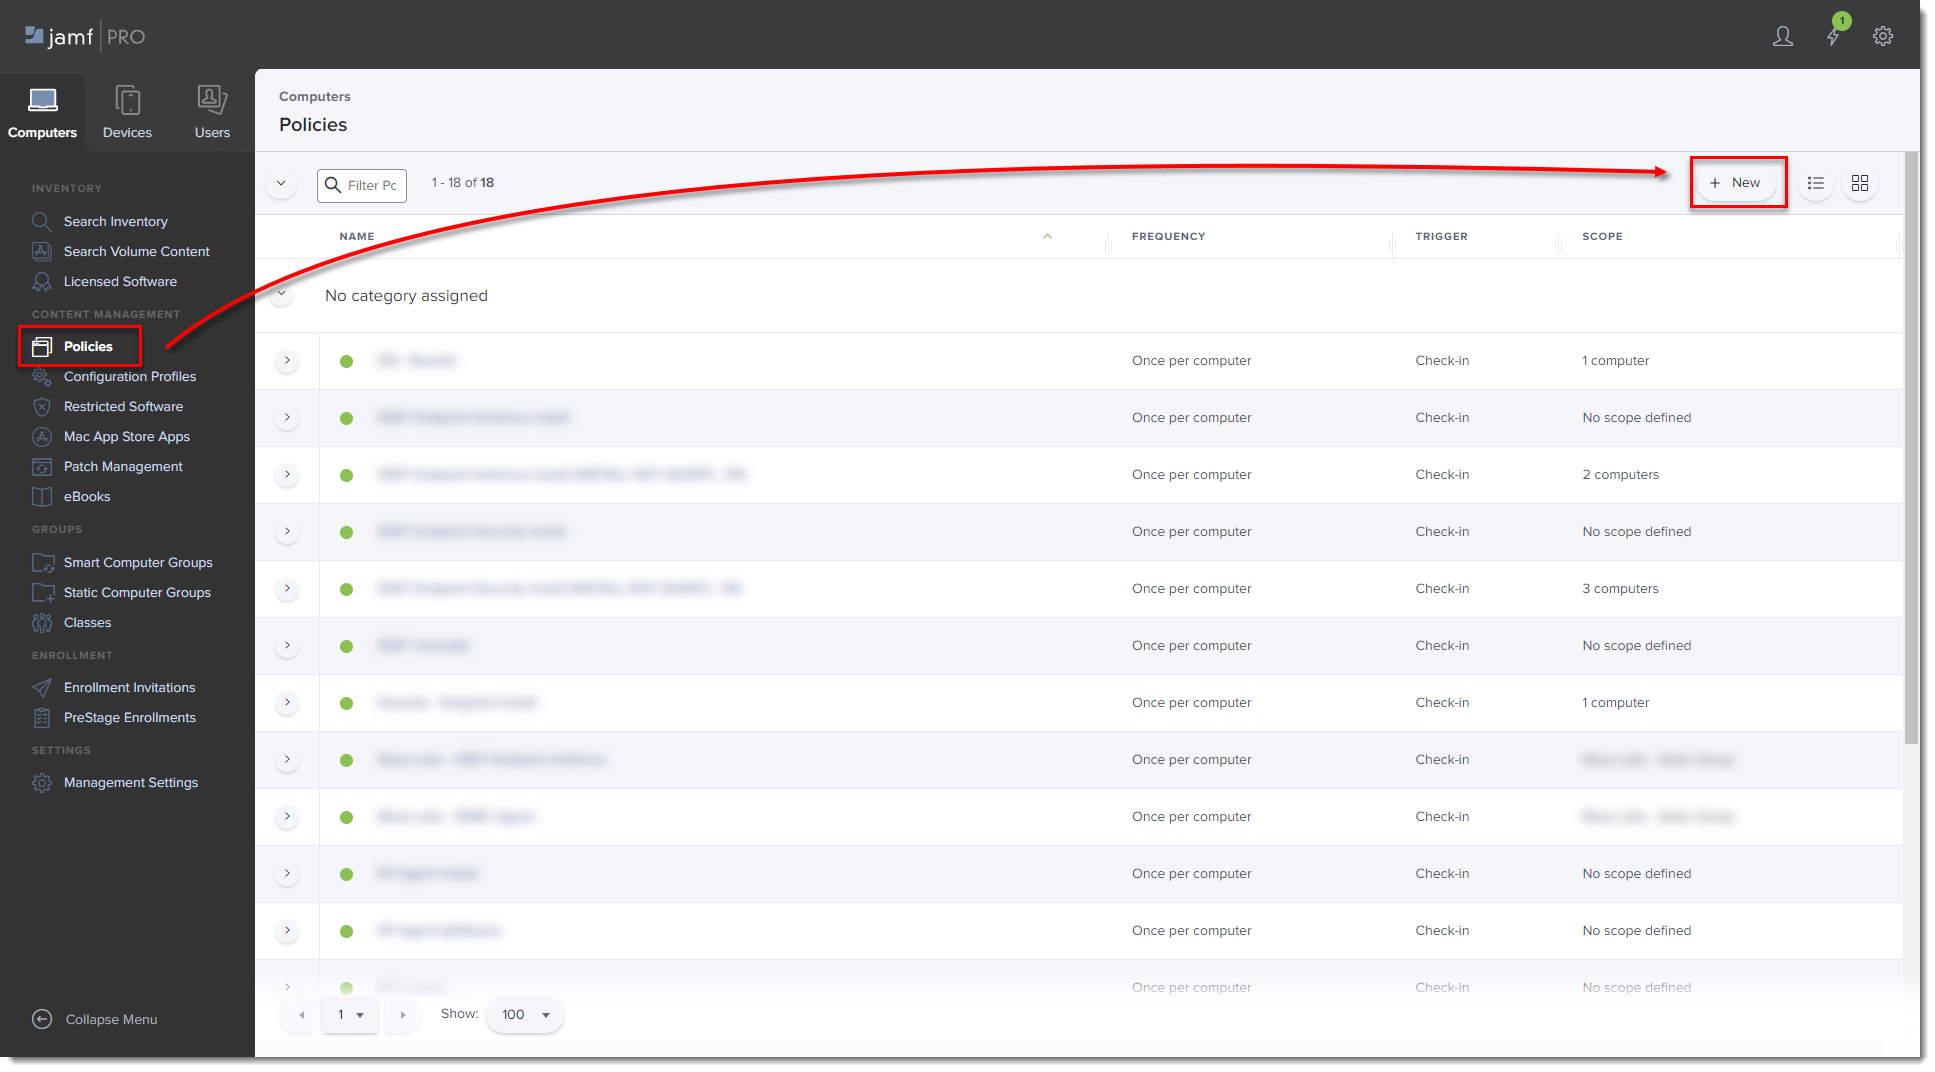
Figure 2-1
Click the image to view larger in new window -
Type a Display Name for the policy, and in the Trigger section, select the Recurring Check-in check box.
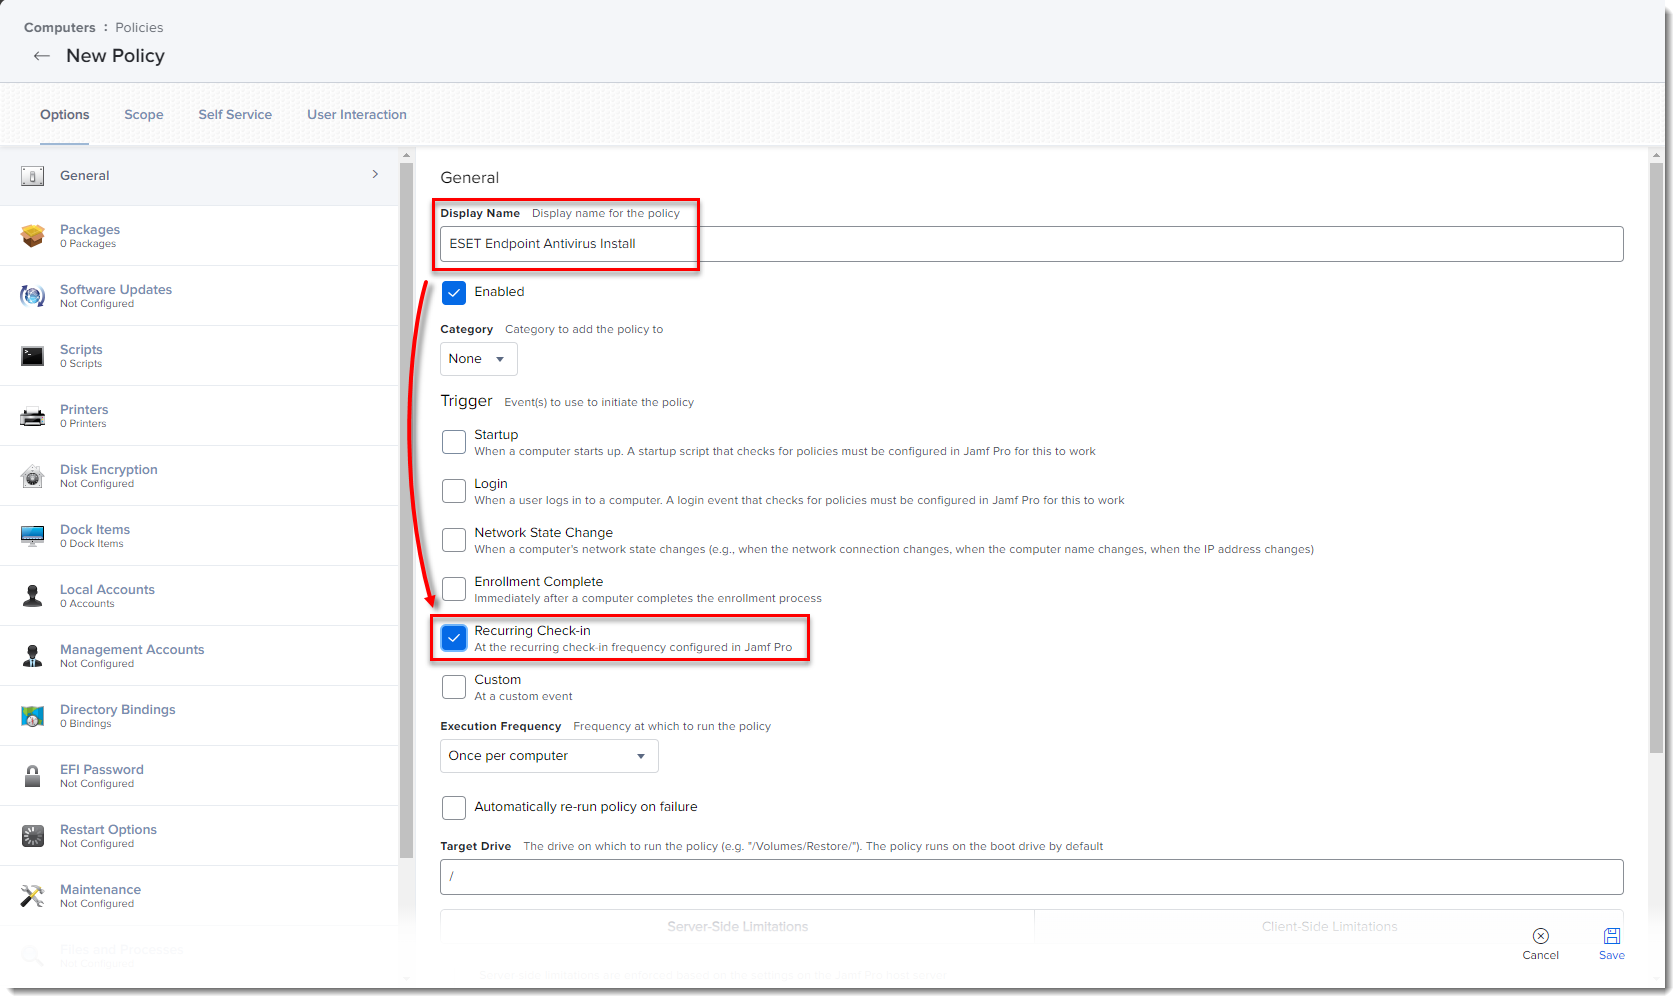
Figure 2-2
Click the image to view larger in new window -
ESET Management Agent installation script: Create the Agent Live Installer and download the PROTECTAgentinstaller.sh file from ESET PROTECT On-Prem.
-
After downloading the scripts, follow the steps in the Jamf Pro Administrator's Guide to add them to Jamf.
-
From the Options tab, click Scripts and then click Configure.
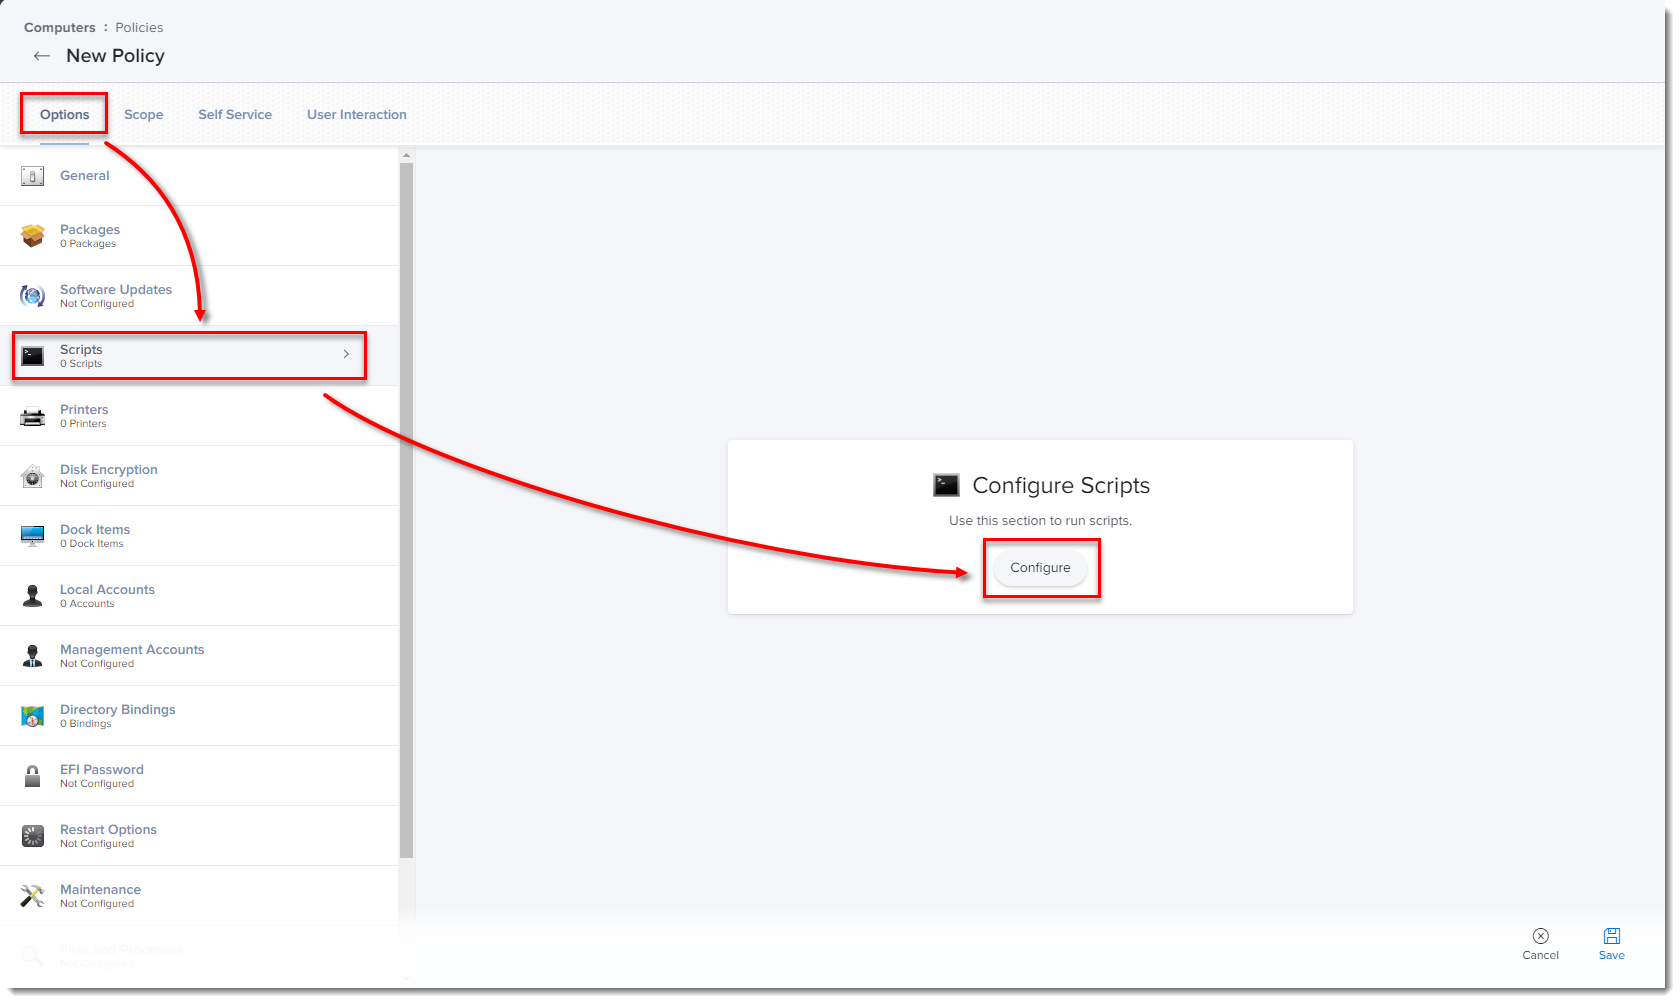
Figure 2-3
Click the image to view larger in new window -
Click Add to select the scripts to add to the policy.
-
Click the Scope tab and click Add.
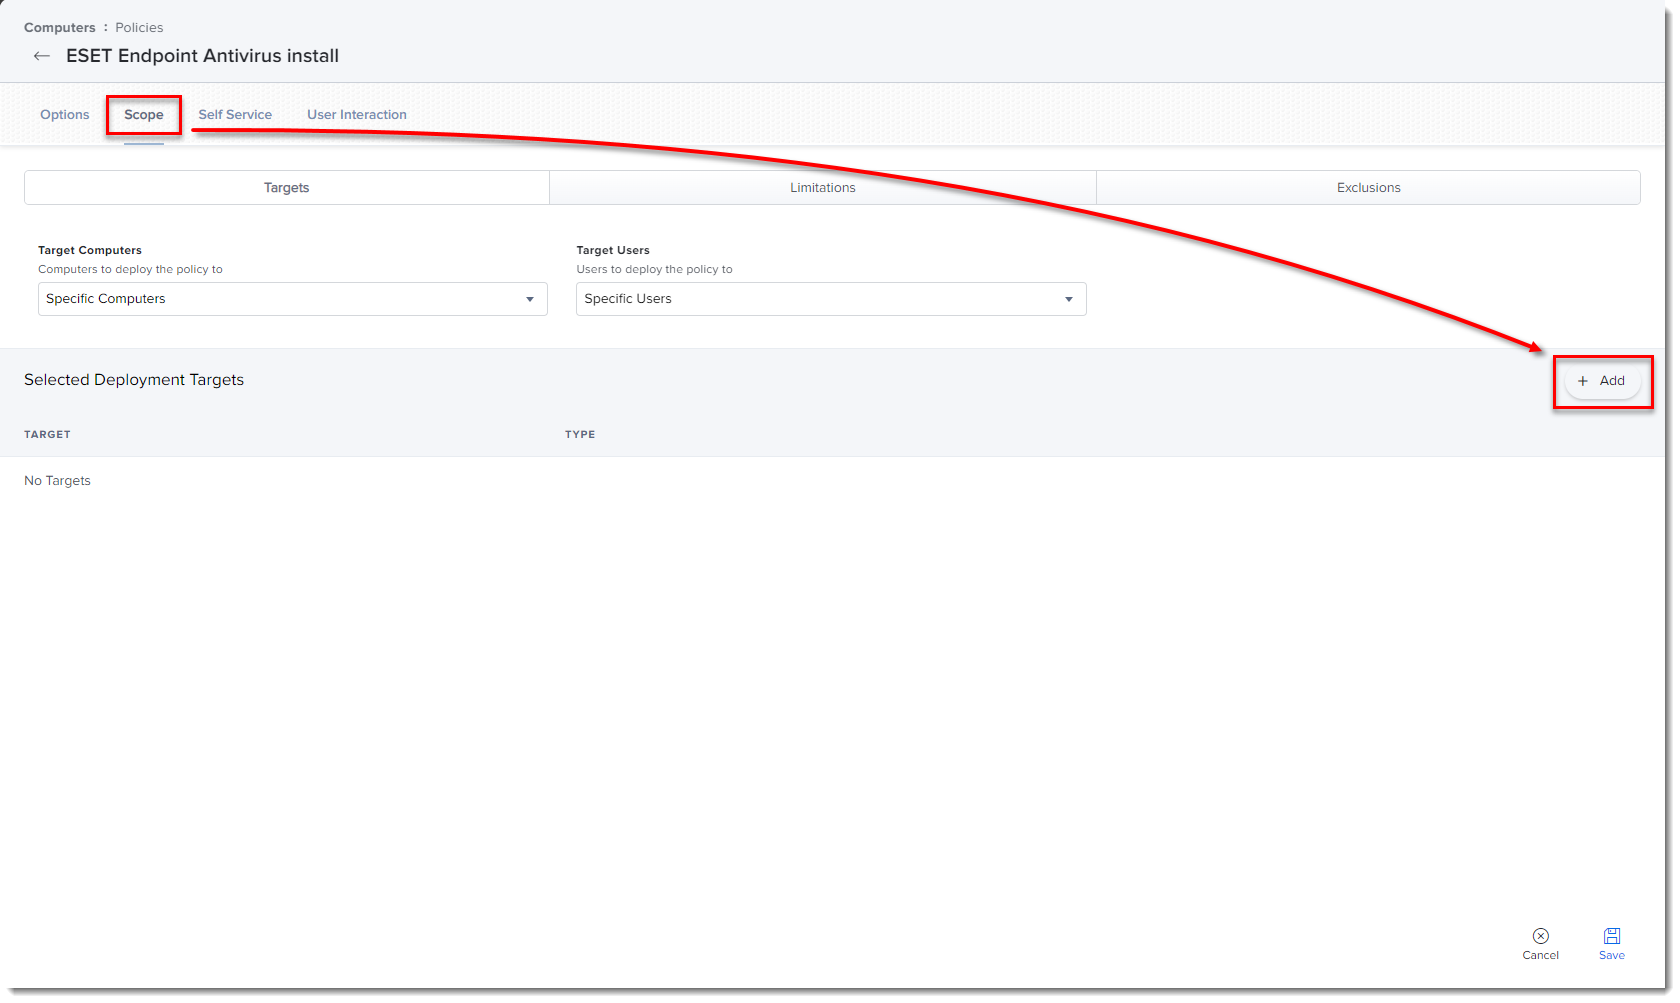
Figure 2-4
Click the image to view larger in new window -
In the Add Deployment Targets section, select the computers (or Computer Groups) to which you want to apply the policy by clicking Add, and then click Done.
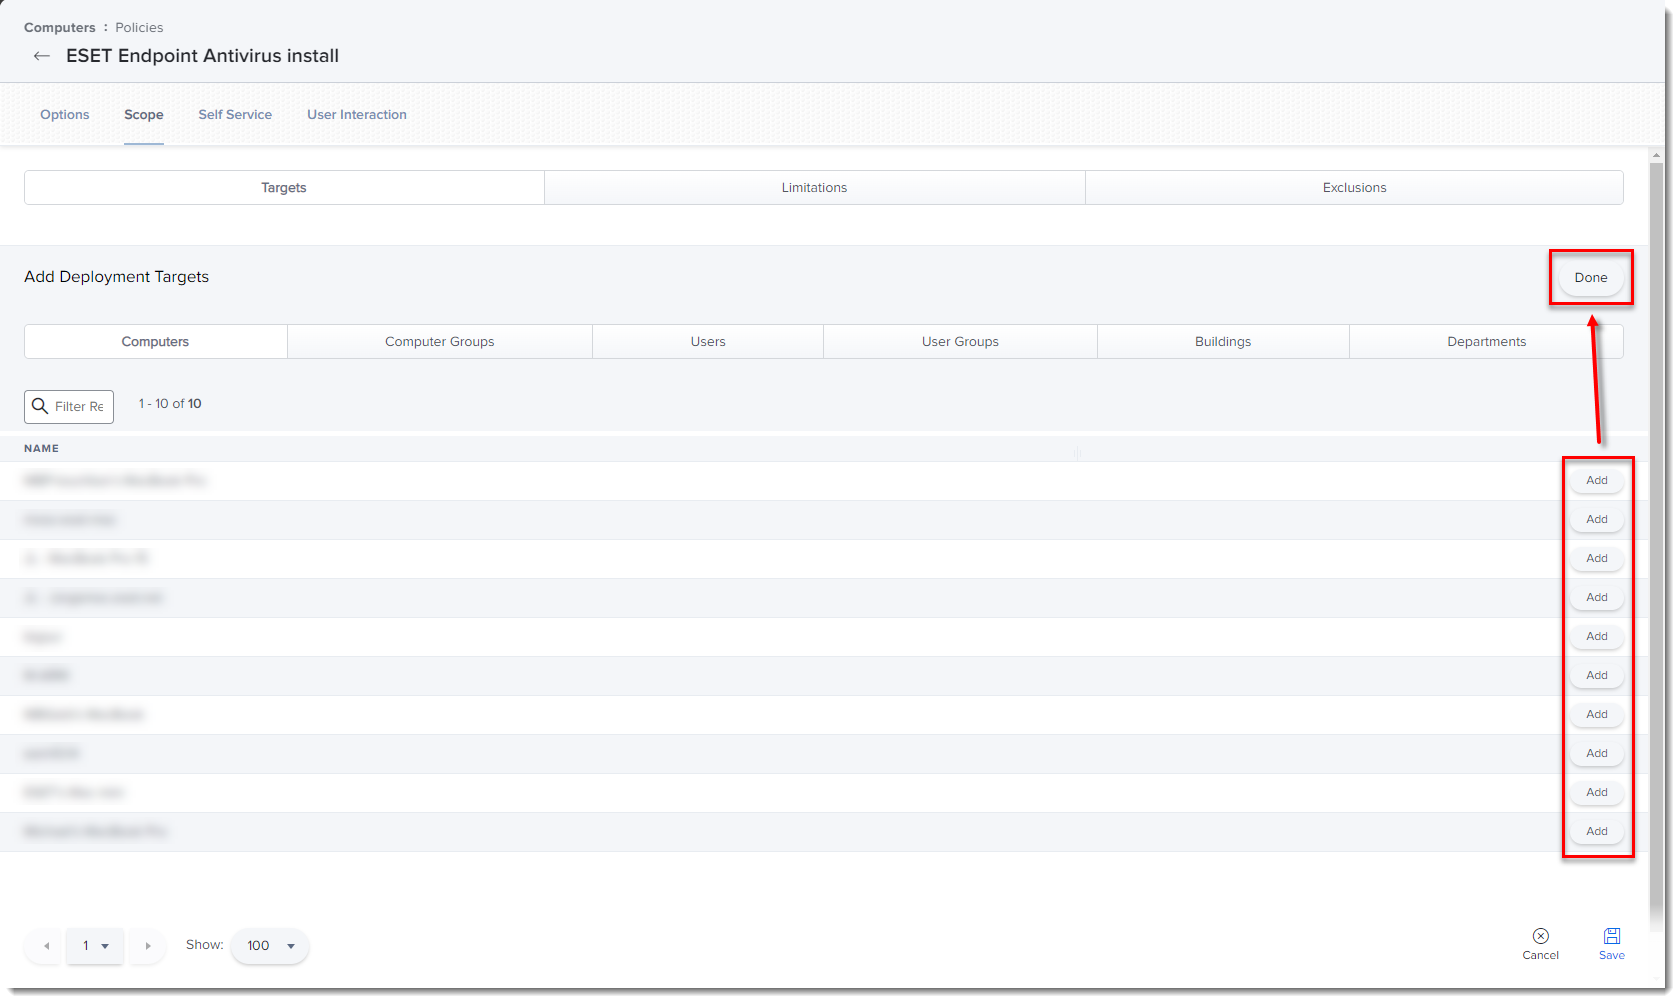
Figure 2-5
Click the image to view larger in new window -
Click Save to apply your changes.
III. Additional options
- Verify you can manage the ESET Endpoint using ESET PROTECT On-Prem: Open the ESET PROTECT Web Console, click Computers and verify that the Jamf endpoint is displayed in the All Group.
- If you did not type the Activation Key or Security Admin during the install scripts, you can activate the ESET products using ESET PROTECT.
- Extension Attributes: Extension Attributes show information regarding ESET products in the Computer details → Search Inventory → General section.
Follow the instructions below to add the Extension Attribute:
-
Open Jamf pro and click the All Settings gear icon → Computer Management → Extension attributes.
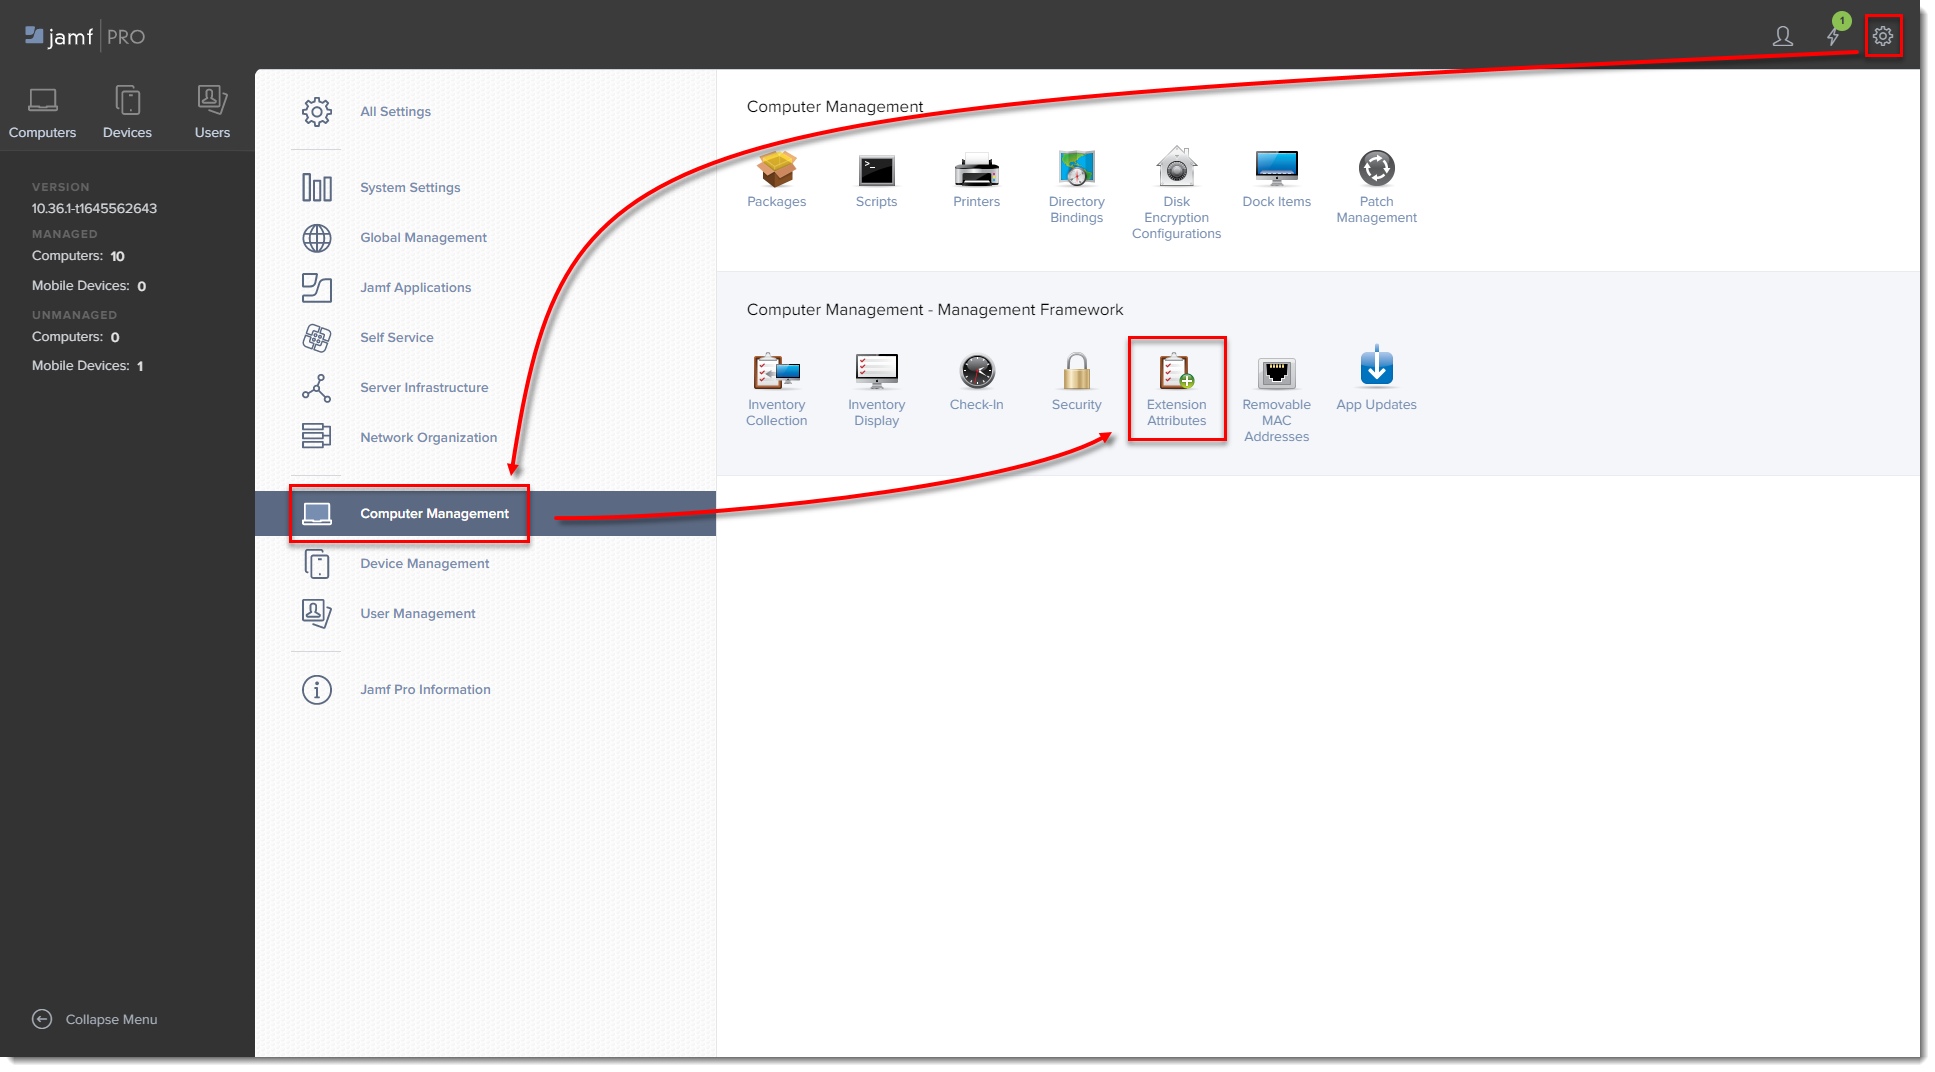
Figure 3-1
Click the image to view larger in new window -
Click New to create a new extension attribute.
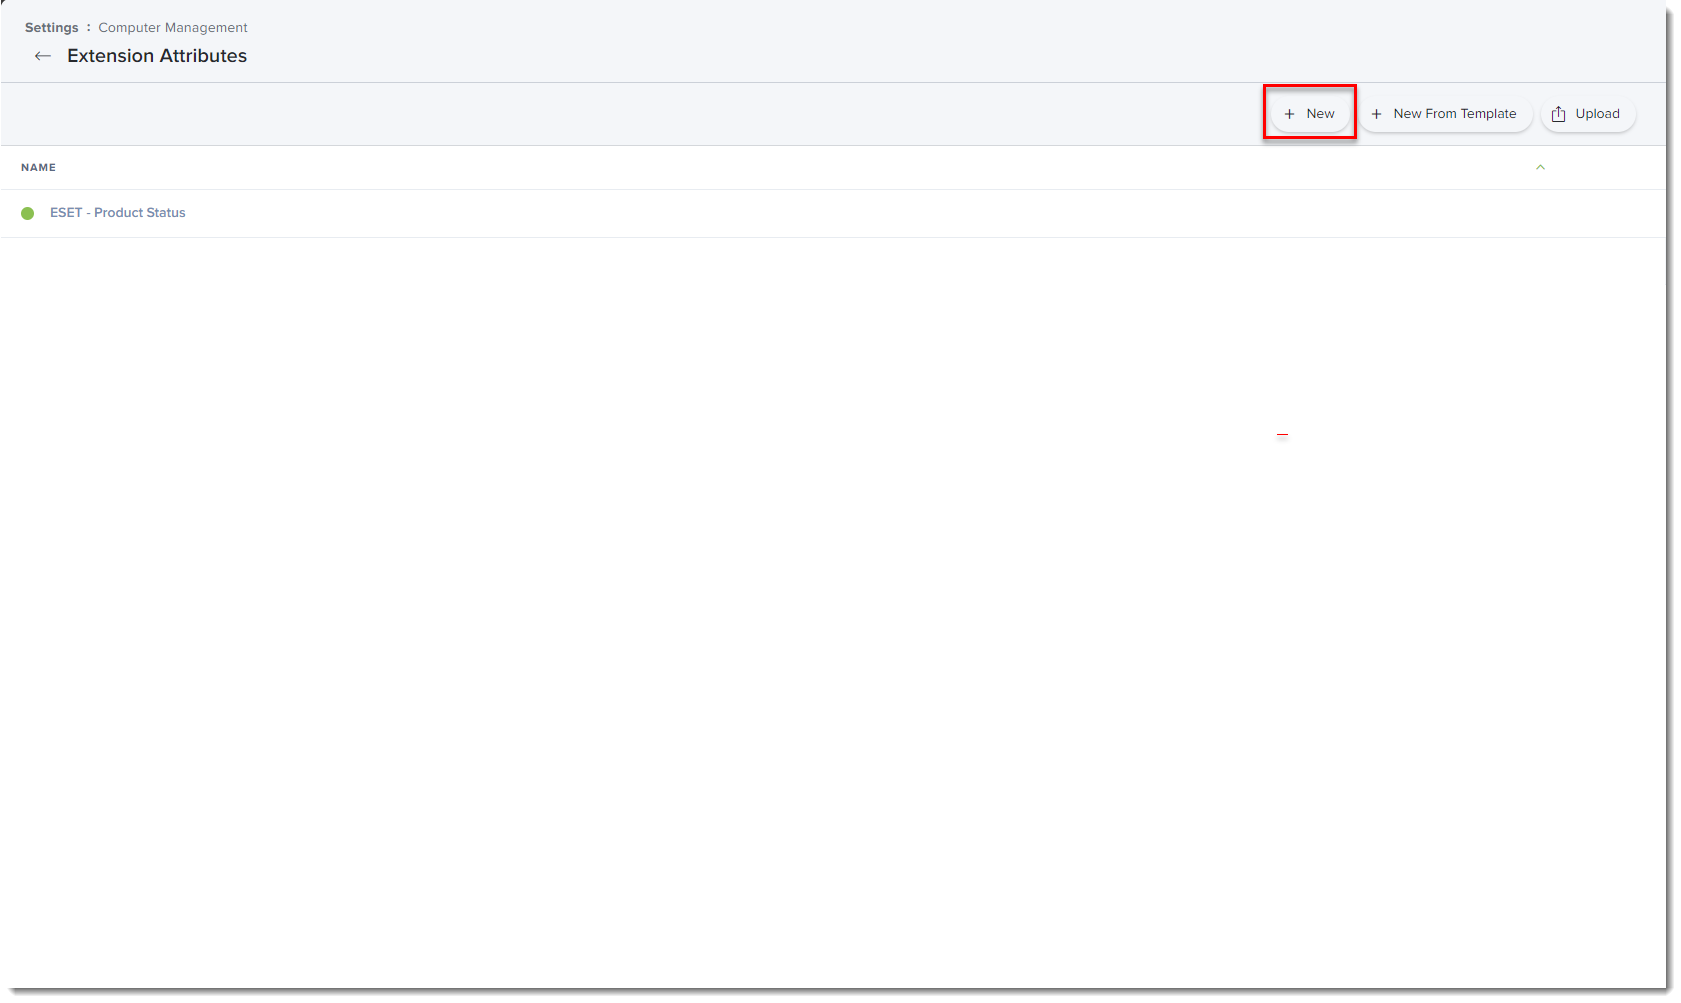
Figure 3-2
Click the image to view larger in new window -
In Display Name type a name for the extension attribute, select Script in the Input Type drop-down menu and then paste the ESETstatusEA.sh (right-click and select Save link as) script into the Shell field and click Save.
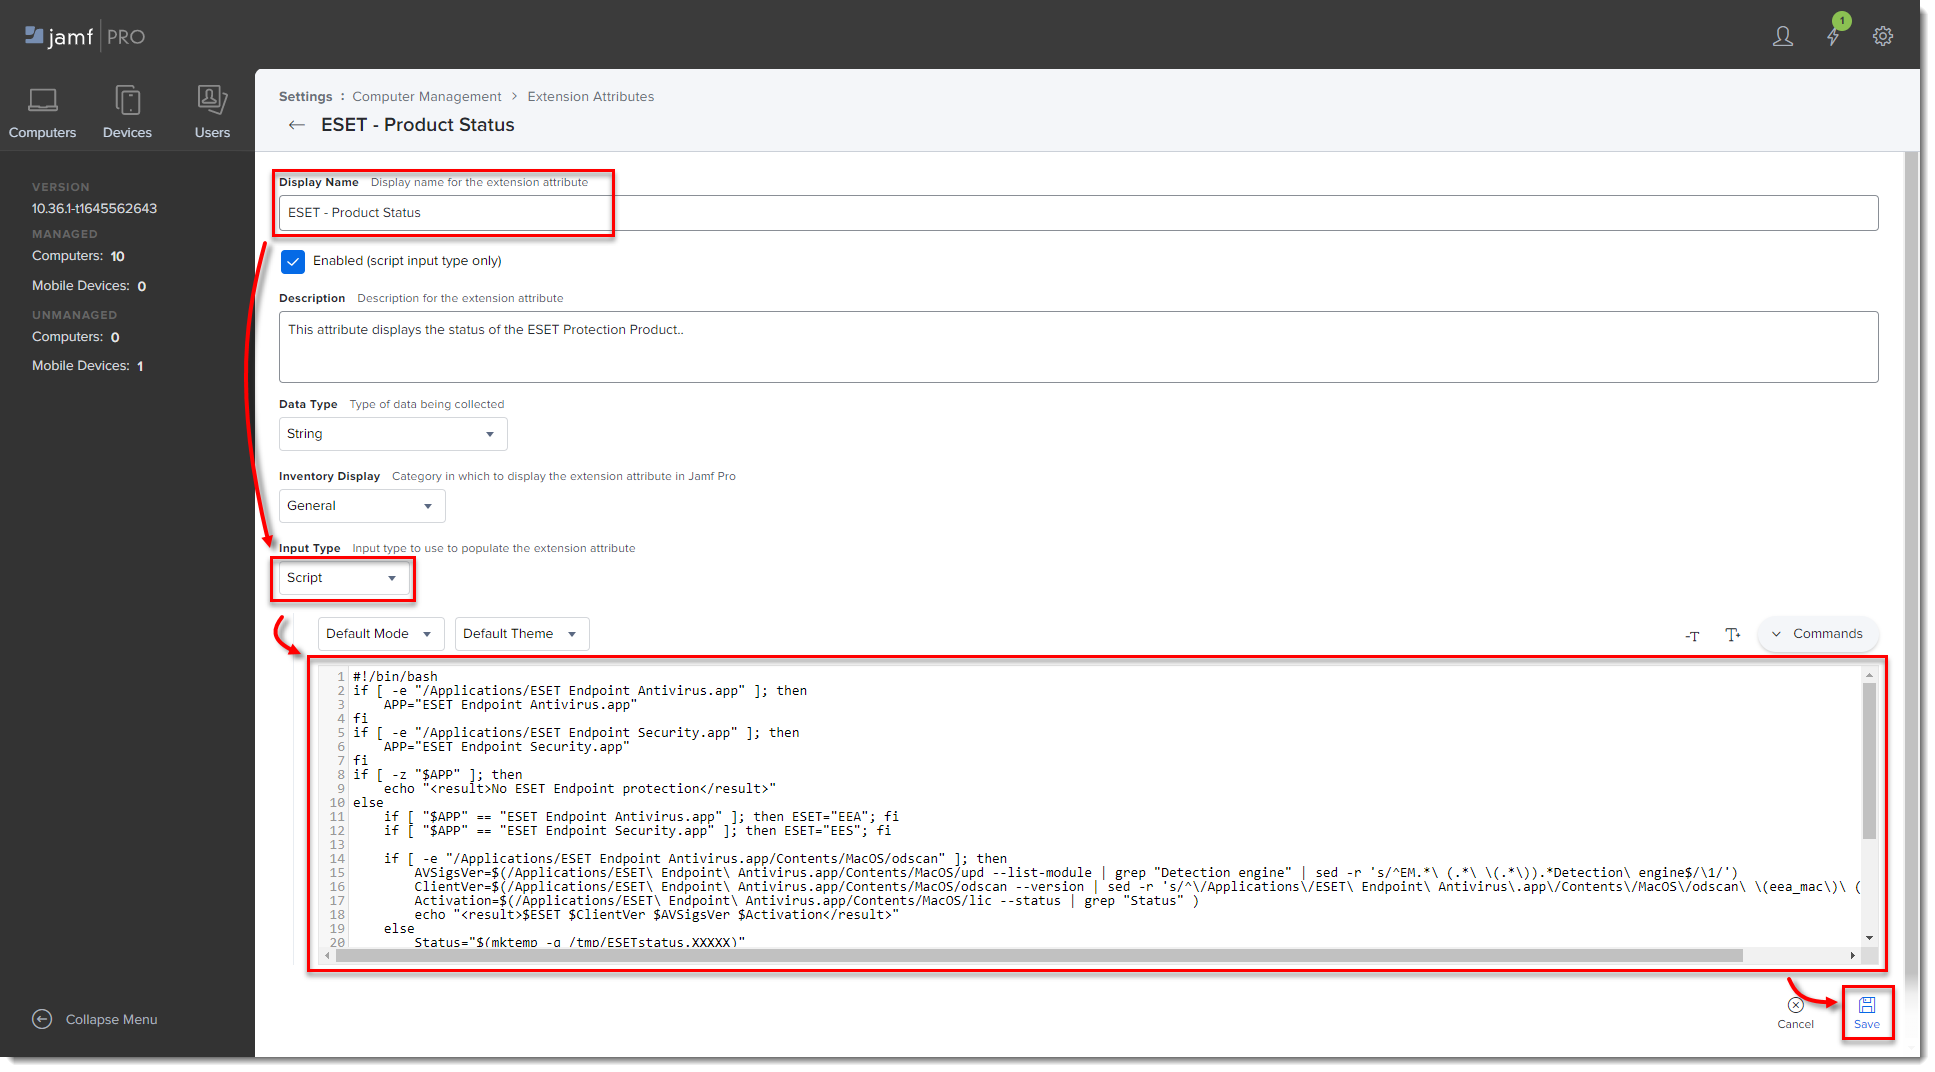
Figure 3-3
Click the image to view larger in new window -
The extension attribute will be automatically set to all computer groups. Click a computer and in the General section, it will display the extension attribute.
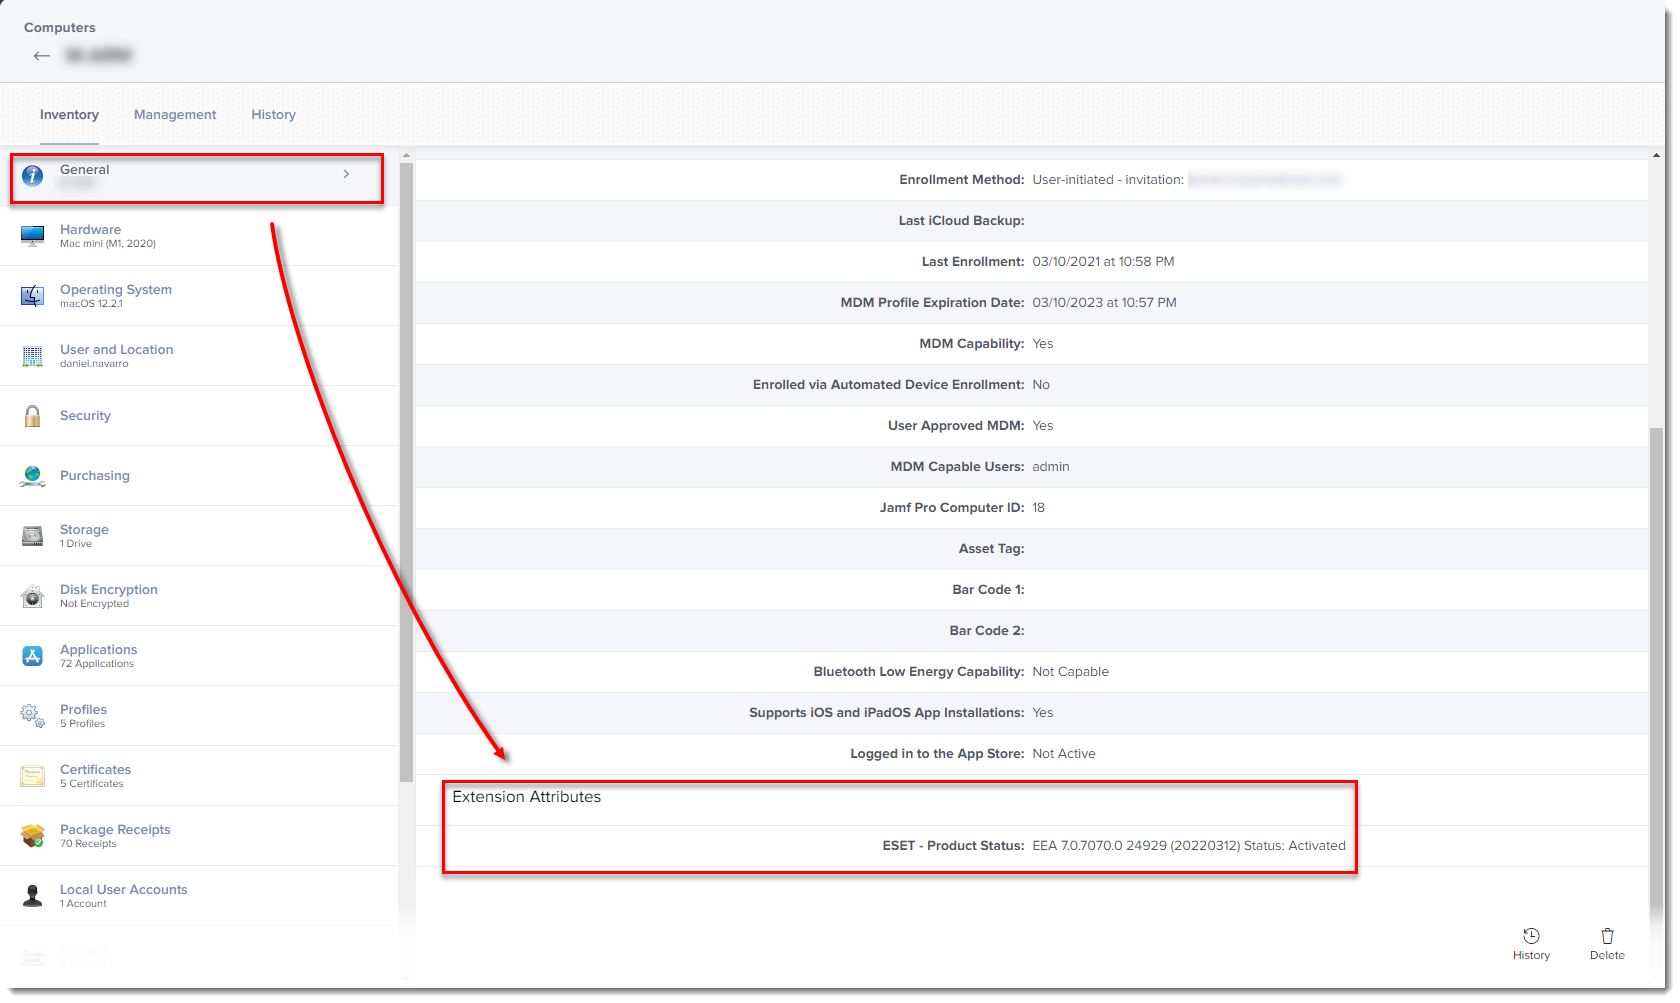
Figure 3-4
Click the image to view larger in new window
Troubleshooting issues after upgrading to the latest version
Approve system extensions via MDM
The steps below will resolve the system extension issue in environments with a remote management tool such as JAMF or Kandji. If you currently use ESET endpoint product for macOS version 7 without automatic updates enabled, follow these steps before upgrading to the latest version to avoid system extension conflicts.
-
Download the configuration profile .plist from the Endpoint Security User Guide.
-
Change the file extension from
.plistto.mobileconfig(for example,ESET_enable_all.mobileconfig). -
In Jamf, navigate to computers → configuration profiles → select upload and select the file from step 2. In other management platforms, use the appropriate functionality to upload the configuration profile from step 2.
-
Assign the computers to the configuration profile scope and then click save. Extension alerts should begin to resolve within minutes.
-
Unassign the previously used configuration profiles(s) in JAMF or the management client. Only the latst version configuration profile should be used with the latest version.
ESET Endpoint Security for macOS Firewall is Automatically Enabled
With the upgrade to the latest version, the firewall feature will be present and enabled upon installation.
To disable the Firewall via an ESET PROTECT policy in environments where a firewall solution is already in place, follow these steps:
-
In ESET PROTECT, navigate to Settings in the Common Features policy that is applied to macOS devices. In the Common Features policy, the macOS logo is missing but still applies.
-
Navigate to Settings → Network Access Protection → Firewall.
-
Click the toggle next to Enable Firewall to disable the setting.
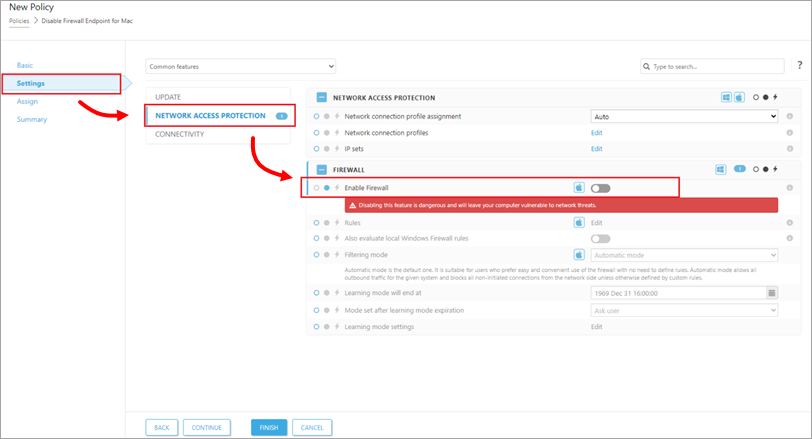
Figure 4-1 -
Click Finish.