Problem
- ESET Communication Protocol (ECP) Protokolle von Ihrer fehlgeschlagenen Produktaktivierung wurden vom technischen Support von ESET angefordert
- Sie konnten Ihr ESET Windows Home oder Small Office Produkt nicht aktivieren
- Aktivieren Sie die erweiterte Protokollierung der Produktaktivierung
- Erzeugen Sie Produktaktivierungsprotokolle mit infoWebClientFlags.zip
Lösung
Verwandte Lösungen: Geschäftskunden
Aktivieren der erweiterten Protokollierung der Produktaktivierung
-
Öffnen Sie das Hauptprogrammfenster Ihres ESET Windows Home oder Small Office Produkts.
-
Drücken Sie die Taste F5, um die erweiterten Einstellungen aufzurufen.
-
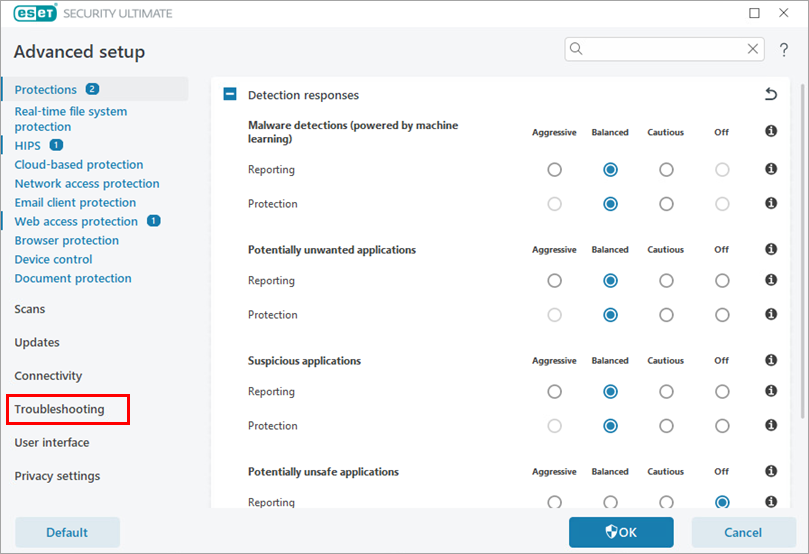
Klicken Sie auf Problembehandlung.
-
Erweitern Sie Erweiterte Protokollierung. Klicken Sie auf das Kästchen neben Lizenzierung aktivieren und dann auf OK.

-
Versuchen Sie erneut, Ihr ESET-Produkt zu aktivieren, um den Fehler zu reproduzieren und das Protokoll zu erstellen.
-
Navigieren Sie zum ECP-Ordner, der sich unter
C:\ProgramData\ESET\ESETSecurity\Diagnostics\ECP.Möglicherweise müssen Sie Verborgene Elemente sichtbar machen, um den Ordner anzuzeigen. -
Wählen Sie alle Protokolldateien aus und klicken Sie sie mit der rechten Maustaste an. Wählen Sie im angezeigten Kontextmenü Komprimieren in → ZIP-Datei, um eine
ZIP-Dateizu erstellen. -
Geben Sie die
.zip-Protokolldateian den technischen Support von ESET weiter. Wir werden die Dateien überprüfen und Sie über die beste Vorgehensweise beraten.- Wenn Sie bereits eine Anfrage an den technischen Support von ESET gestellt haben, antworten Sie auf die E-Mail des technischen Supports von ESET und fügen Sie die
.zip-Protokolldateibei. - Wenn Sie sich noch nicht an den technischen Support von ESET gewandt haben, öffnen Sie einen Fall und hängen Sie die
.zip-Protokolldateian den Fall an.
- Wenn Sie bereits eine Anfrage an den technischen Support von ESET gestellt haben, antworten Sie auf die E-Mail des technischen Supports von ESET und fügen Sie die
Generieren von Produktaktivierungsprotokollen mit infoWebClientFlags.zip
-
Öffnen Sie das Hauptprogrammfenster Ihres ESET Windows Home oder Small Office Produkts.
-
Drücken Sie die Taste F5, um die erweiterten Einstellungen aufzurufen.
-
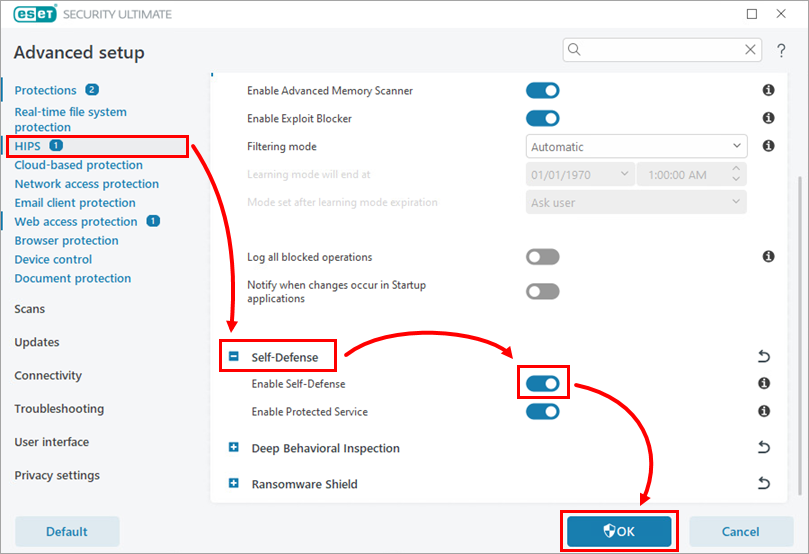
Klicken Sie auf HIPS und erweitern Sie Self-Defense. Klicken Sie auf das Kästchen neben Selbstverteidigung aktivieren, um sie zu deaktivieren, und klicken Sie auf OK.
-
Starten Sie Ihren Computer neu.
-
Doppelklicken Sie auf die heruntergeladene Datei
infoWebClientFlags.zip. Doppelklicken Sie dann auf die DateiinfoWebClientFlagsEnable.regund klicken Sie auf Ausführen.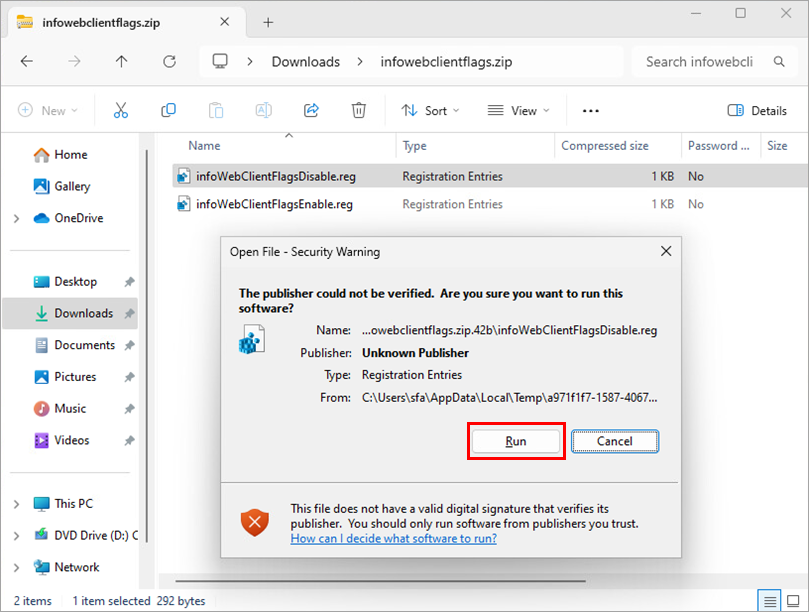
-
Starten Sie Ihren Computer neu.
-
Versuchen Sie erneut, Ihr ESET-Produkt zu aktivieren, um den Fehler zu reproduzieren und das Protokoll zu erstellen.
-
Doppelklicken Sie auf die heruntergeladene Datei
infoWebClientFlags.zip. Doppelklicken Sie dann auf die DateiinfoWebClientFlagsDisable.regund klicken Sie auf Ausführen. -
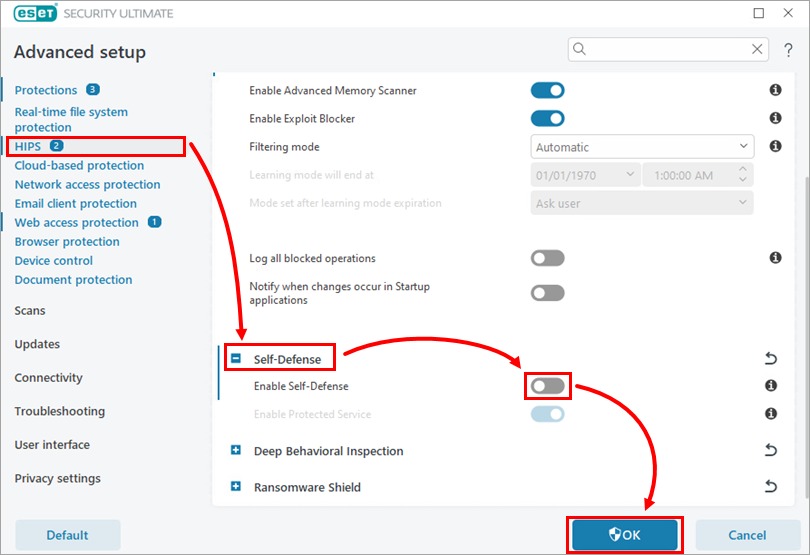
Aktivieren Sie Self-Defense wieder: Drücken Sie im Hauptprogrammfenster Ihres ESET-Produkts die F5-Taste, klicken Sie auf HIPS, erweitern Sie Self-Defense, aktivieren Sie das Kästchen neben Enable Self-Defense und klicken Sie auf OK. Starten Sie dann Ihren Computer neu.
-
Navigieren Sie zum ECP-Ordner, der sich unter
C:\ProgramData\ESET\ESETSecurity\Diagnostics\ECP befindet.Möglicherweise müssen Sie Verborgene Elemente sichtbar machen eingeben, um den Ordner zu sehen. -
Wählen Sie alle Protokolldateien aus und klicken Sie sie mit der rechten Maustaste an. Wählen Sie im angezeigten Kontextmenü Komprimieren in → ZIP-Datei, um eine
ZIP-Dateizu erstellen. -
Geben Sie die
.zip-Protokolldateian den technischen Support von ESET weiter. Wir werden die Dateien überprüfen und Sie über die beste Vorgehensweise beraten.- Wenn Sie bereits eine Anfrage an den technischen Support von ESET gestellt haben, antworten Sie auf die E-Mail des technischen Supports von ESET und fügen Sie die
.zip-Protokolldateibei. - Wenn Sie sich noch nicht an den technischen Support von ESET gewandt haben, öffnen Sie einen Fall und hängen Sie die
.zip-Protokolldateian den Fall an.
- Wenn Sie bereits eine Anfrage an den technischen Support von ESET gestellt haben, antworten Sie auf die E-Mail des technischen Supports von ESET und fügen Sie die