Issue
- An application is not working or is having connectivity issues after installing ESET Cyber Security or ESET Cyber Security Pro
- Review the basics of firewall rules and application rules
- Create a rule to block or allow incoming or outgoing internet communications for an application in ESET Cyber Security
- Create a rule to block or allow incoming or outgoing internet communications for an application in ESET Cyber Security Pro
- Troubleshooting
Details
The ESET firewall controls all network traffic to and from the system by allowing or denying individual network connections based on specified filtering rules. It provides protection against attacks from remote computers and enables blocking of some services.
Solution
Review the basics of firewall rules and application rules
Firewall rules
The firewall recognizes three types of network connections:
- Outbound connections
- Inbound connections
- Trusted inbound connections - inbound connections originating from a trusted network
When a rule matches the current communication, that rule is applied, and no further rules are processed for that connection.
To modify firewall settings, from the macOS menu bar, click ESET Cyber Security → Settings and then click Firewall under Protections.
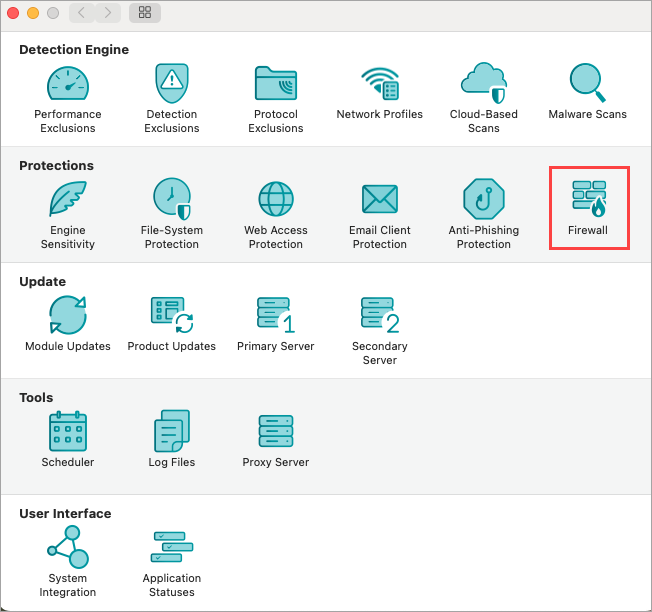
Figure 1-1
The firewall processes rules in order from the top of the rule stack, which is shown in the firewall preferences.
- Global rules are applied first if allowed.
- Application rules are next if defined. When an application rule exists, it matches the application path and then applies the rule’s conditions to the application’s communication.
- Fallback rules are processed last.
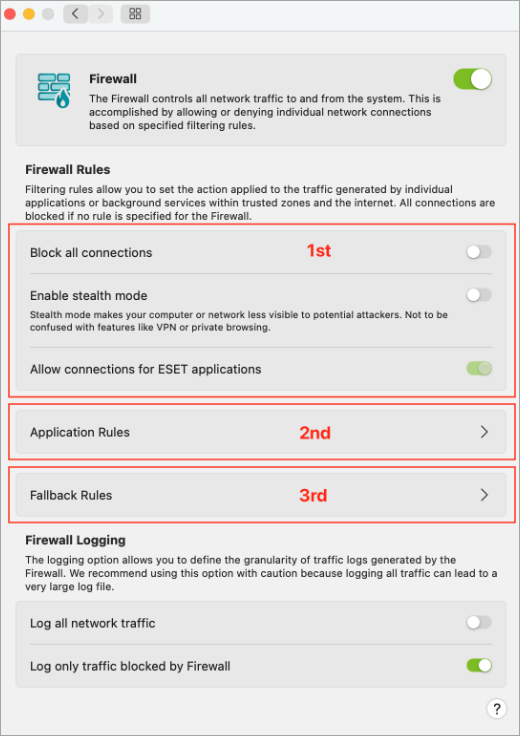
Figure 1-2
By default, the home firewall enables outbound connections and inbound connections are specifically for Apple applications. Click Fallback Rules to modify the settings.
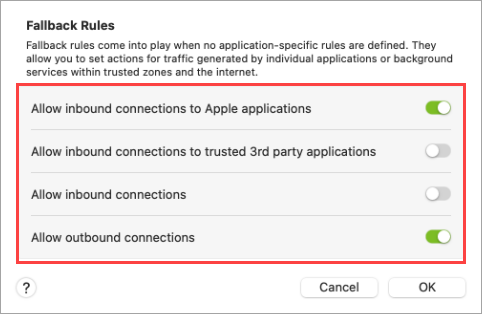
Figure 1-3
Application rules
The firewall primarily uses application-specific rules, in addition to global and fallback rules. Application rules are based on the application's path and specify settings for both inbound and outbound communication for that application.
Users can define application rules through several options:
From the context menu in the Applications table under the Tools section of the main interface.
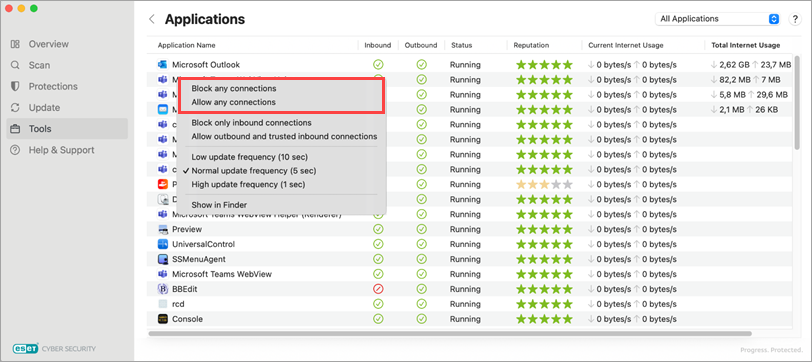
Figure 1-4 From the Finder context menu.

Figure 1-5 From the Application Rules setup menu within the Firewall settings.

Figure 1-6 The context menu in Firewall Logs under the Logs subsection of the Tools section in the main interface.
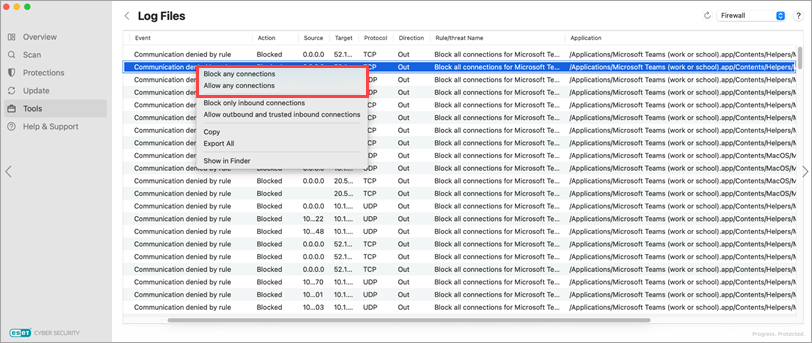
Figure 1-7
Create a rule for the ESET firewall to block or allow incoming or outgoing internet communications for an application in ESET Cyber Security
From the macOS menu bar, click ESET Cyber Security → Settings and then click Firewall under Protections.

Figure 2-1 Click Application Rules.

Figure 2-2 Click the + (add) icon to add an application rule.
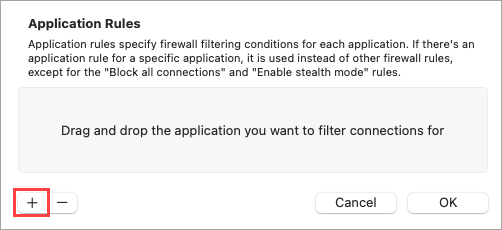
Figure 2-3 Select the application from the Applications menu and click Open.
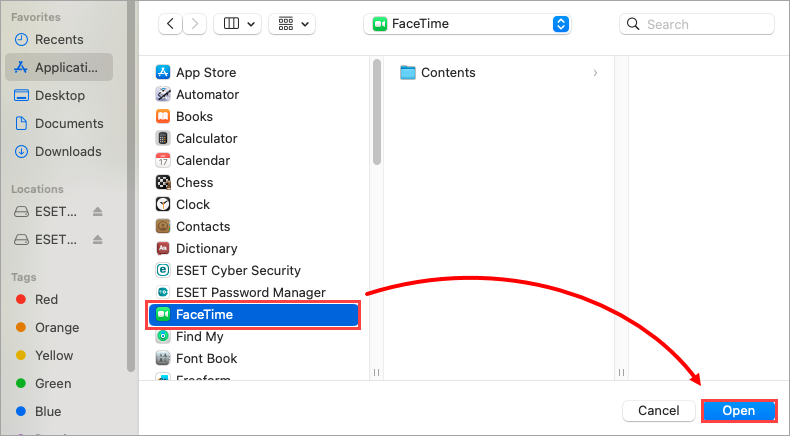
Figure 2-4 Select a filtering option for the inbound and outbound settings and click OK. the rule is now saved.
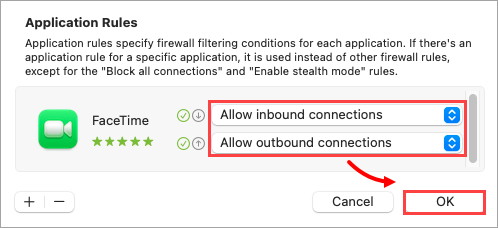
Figure 2-5 To remove the rule, select the rule from the Application Rules list, click the - (remove) icon and click OK.
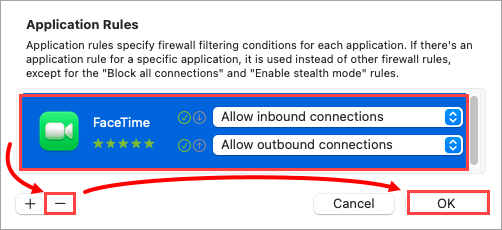
Figure 2-6
Create a rule to allow or block an application in ESET Cyber Security Pro
- Open ESET Cyber Security Pro.
- Click Setup → Firewall.
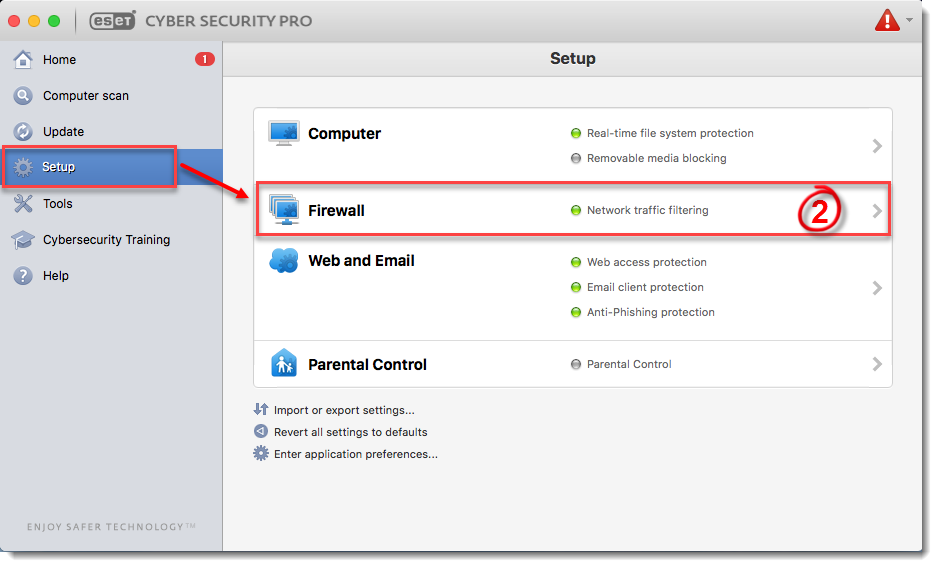
Figure 3-1
Click Setup.
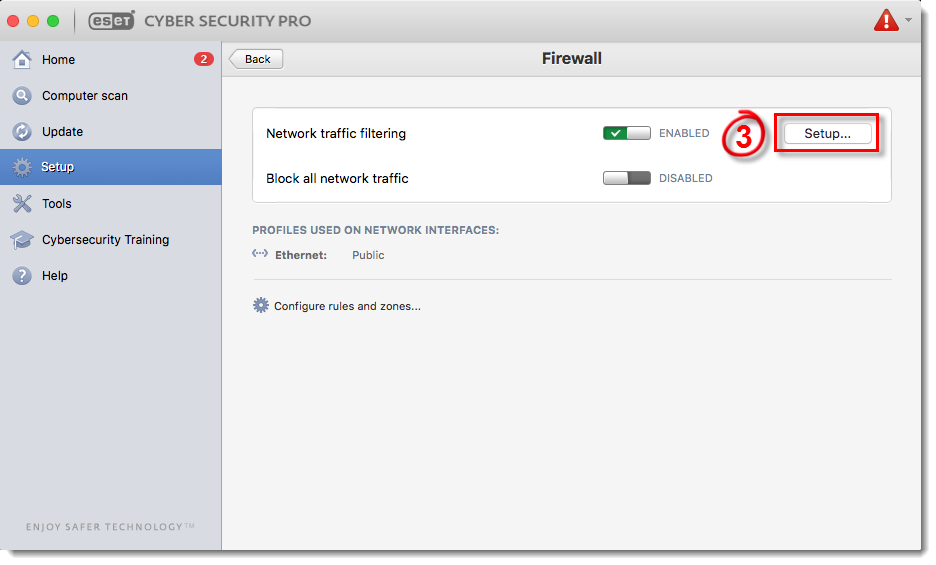
Figure 3-2
Make sure that Auto with exceptions is selected from the Filtering Mode drop-down menu and click Add.
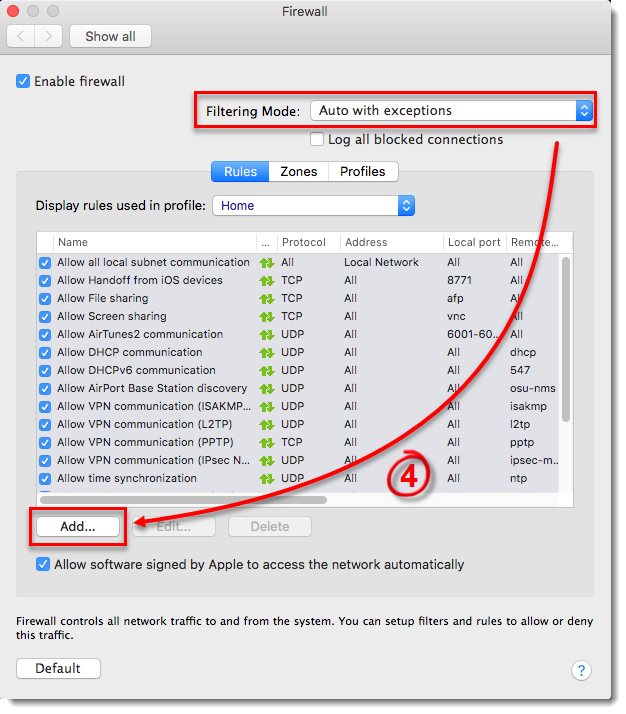
Figure 3-3
- Click Browse.
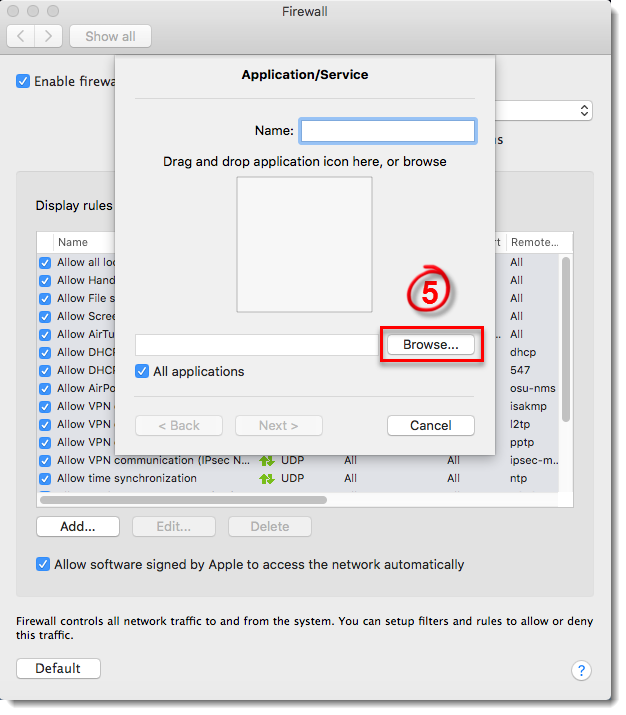
Figure 3-4
- Select the application that you want to create an exception for and then click Select. This example demonstrates creating a rule to allow all online communications for iTunes. You can create an exception for any application on your device.
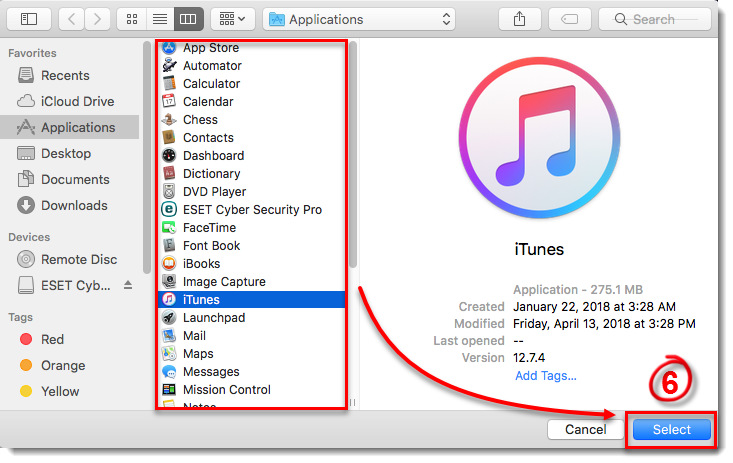
Figure 3-5
- Type a name for your new rule in the Name field and click Next.
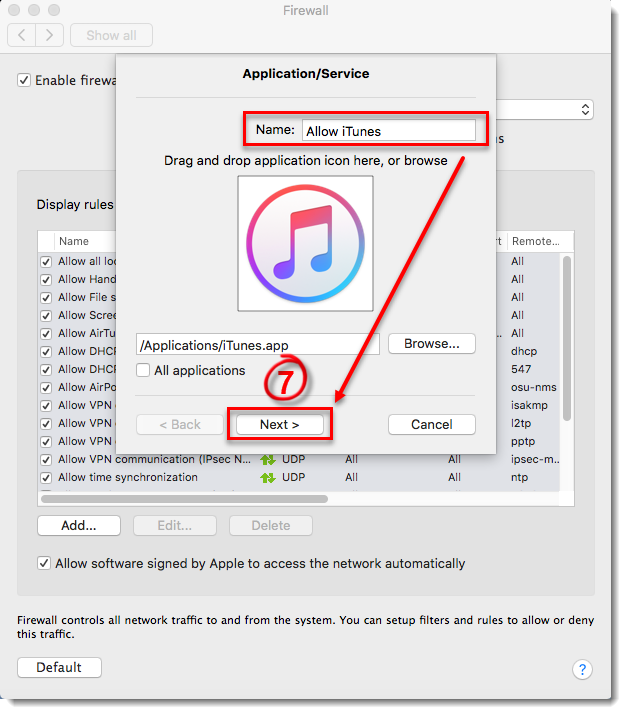
Figure 3-6
- Select Allow from the Action drop-down menu, select Both from the Direction drop-down menu (you can also select In or Out to create a rule that only allows incoming or outgoing communications) and click Next.
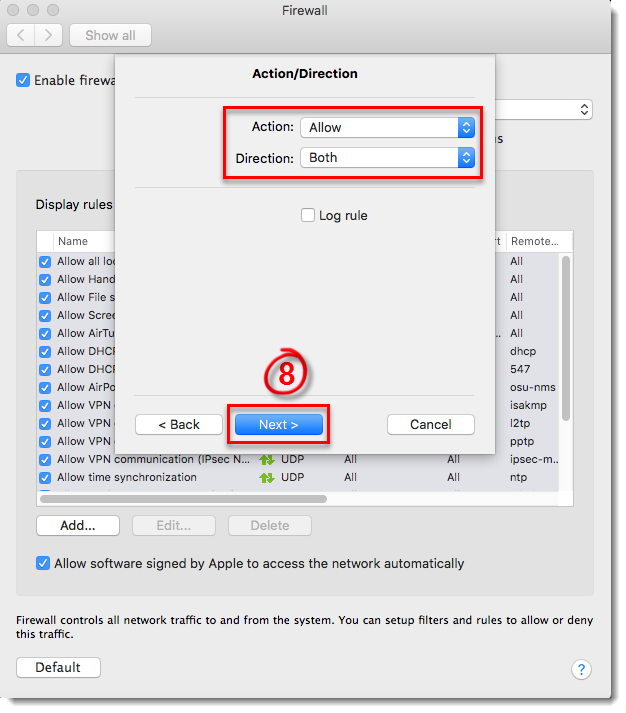
Figure 3-7
- To create a rule to always allow the application, select TCP & UDP from the Protocol drop-down menu, select Both from the Ports drop-down menu and then select All from the Local Port and Remote Port drop-down menus. You can achieve more custom rules using different combinations of the Protocol and Port settings. Once you are finished, click Next.
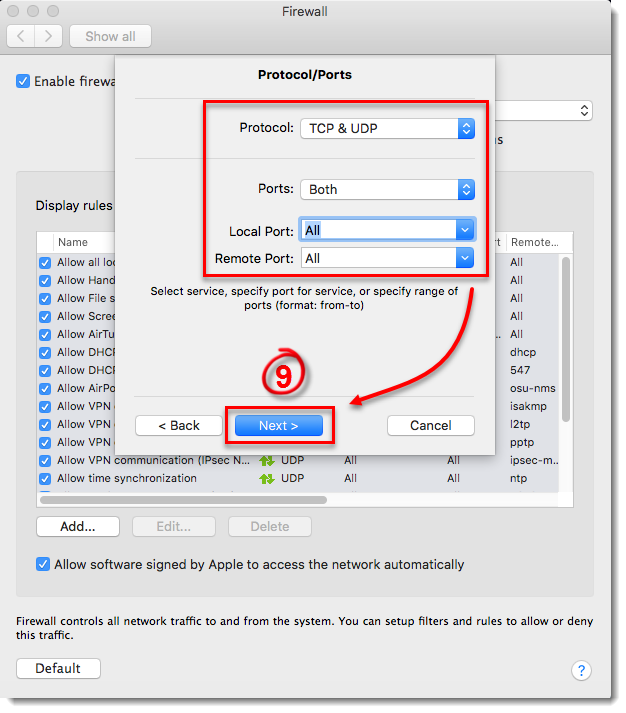
Figure 3-8
- Next to Destination, select where your rule will be applied: to the entire Internet, to your local network, or to a specific subnet or IP address range. Select Entire Internet to create a rule that will be applied everywhere so that your application will always be allowed. Click Finish to create your new rule, and then close the Firewall window to return to the main program window.
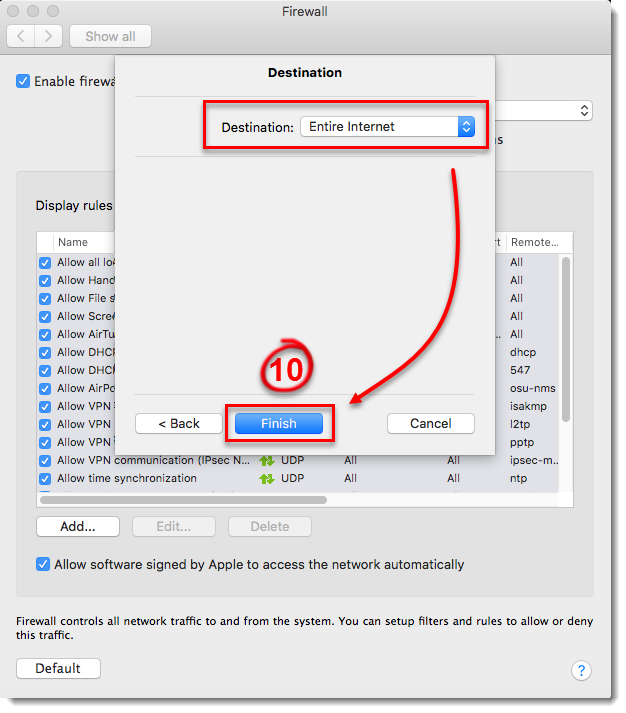
Figure 3-9
Create a rule to block an application in ESET Cyber Security Pro
- Open ESET Cyber Security Pro.
- Click Setup → Firewall.

Figure 4-1
Click Setup.

Figure 4-2
- Make sure that Auto with exceptions is selected from the Filtering Mode drop-down menu and click Add.

Figure 4-3
- Click Browse.

Figure 4-4
Select the application that you want to block and then click Select. This example demonstrates creating a rule to deny all online communications for FaceTime. You can create a rule to block any application on your device.
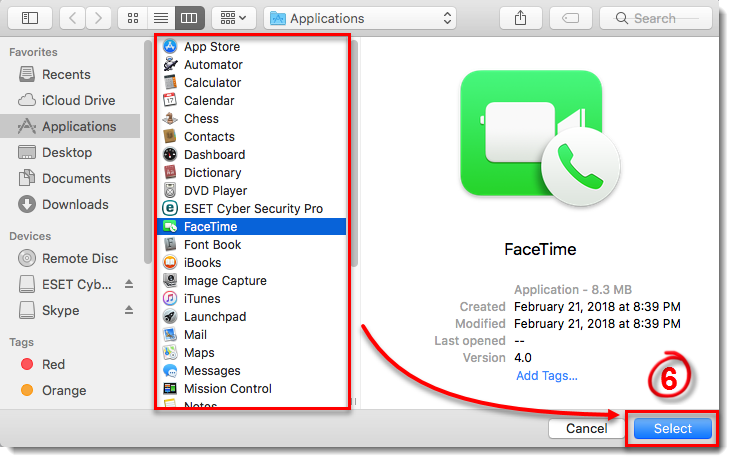
Figure 4-5
- Type a name for your new rule into the Name field and click Next.
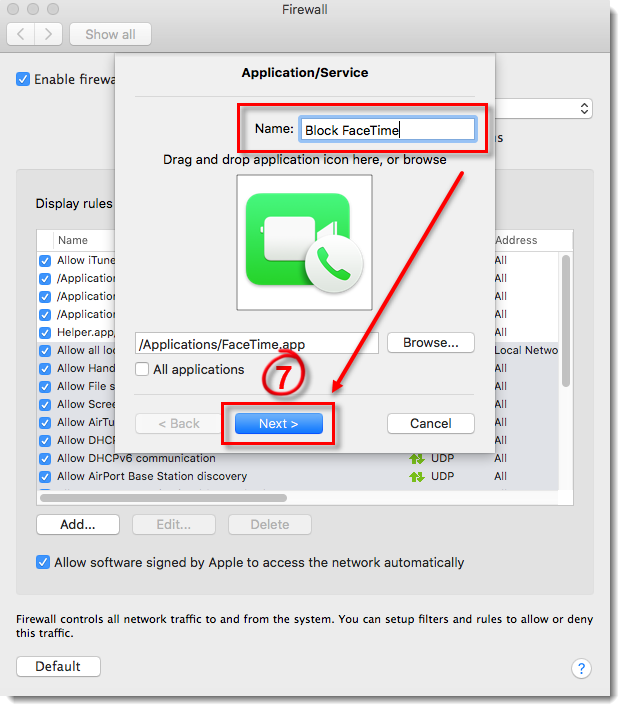
Figure 4-6
- Select Deny from the Action drop-down menu, select Both from the Direction drop-down menu (you can also select In or Out to create a rule that only blocks incoming or outgoing communications) and click Next.
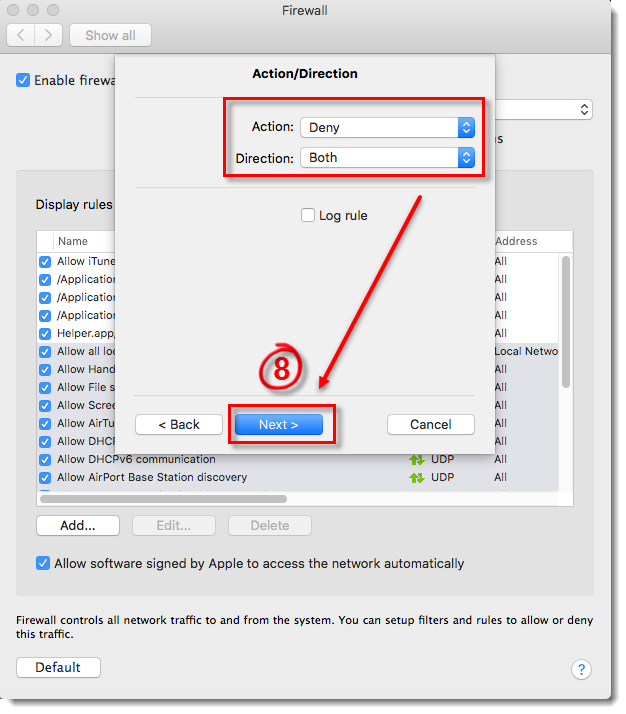
Figure 4-7
- To create a rule to always block the application, select TCP & UDP from the Protocol drop-down menu, select Both from the Ports drop-down menu and then select All from the Local Port and Remote Port drop-down menus. You can achieve more custom rules using different combinations of the Protocol and Port settings. Once you are finished, click Next.
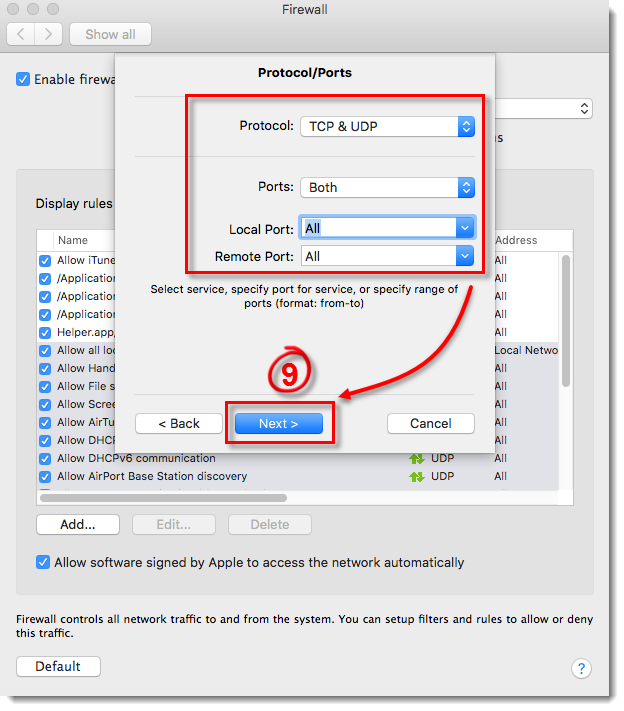
Figure 4-8
Next to Destination, select where your rule will be applied: to the entire Internet, to your local network, or to a specific subnet or IP address range. Select Entire Internet to create a rule that will be applied everywhere so that your application will always be allowed. Click Finish to create your new rule, and then close the Firewall window to return to the main program window.
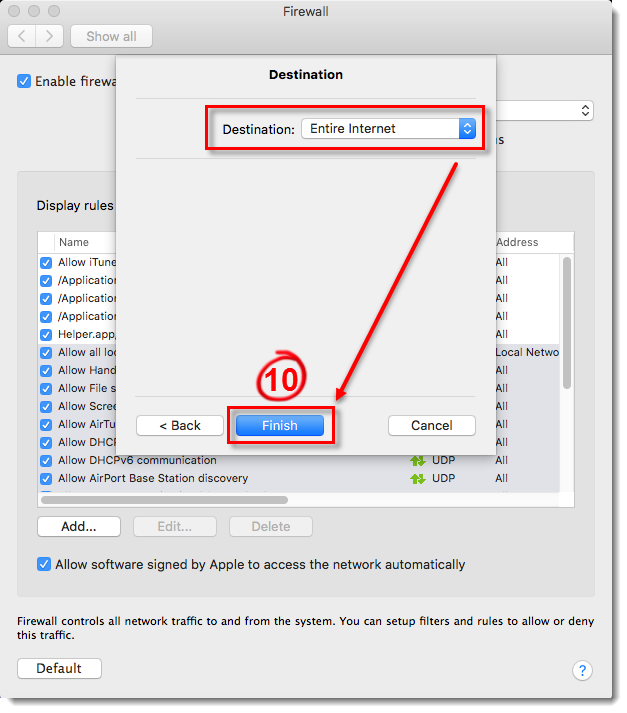
Figure 4-9
Troubleshooting
My third-party application is not working
If a non-Apple application stops working after enabling the home firewall, it’s likely because the application requires inbound connections initiated from the server side, which the firewall blocks by default for non-Apple applications.
Solution 1:
Enable inbound communication specifically for the affected application.
Solution 2:
Enable inbound communication for all trusted third-party applications (less secure than Solution 1).
Solution 3:
Enable all inbound communications (least secure option).
Several of my signed, non-Apple applications aren’t working
If certain non-Apple applications stop functioning after enabling the home firewall, it’s likely because they require inbound connections initiated from the server side. By default, the firewall blocks this type of connection for non-Apple applications.
Solution 1:
Enable inbound communication specifically for each affected application.
Solution 2:
Allow inbound communication for all trusted third-party applications. This is slightly more efficient than Solution 1 but offers less security.
An issue is occurring due to the home firewall
A universal solution isn’t possible for every issue a user might encounter, as each solution depends on the specific home firewall setup. However, we can suggest steps to help users identify the source of the problem:
Enable logging for blocked connections.
Replicate the issue.
Open the Firewall Logs under the Logs subsection of the Tools section in the main interface.
Identify the blocked communications. For easier analysis, export the firewall logs as a CSV file, then import it into a spreadsheet program like MS Excel to search for the issue.
Create the necessary rule in the home firewall to allow the identified communication.