Issue
- Requirements for the creation of ESET Inspect Web Console certificates in ESET PROTECT On-Prem
- Import the ESET Inspect Web Console certificate from a file during the ESET Inspect Server installation
Details
Click to expand
A certificate for the HTTPS/SSL connection between the ESET Inspect Web Console and the web browser is required for a successful installation of the ESET Inspect Server. During the installation, you are prompted to use one. You can either import the certificate from a file or use one from ESET PROTECT On-Prem.
After you set up the ESET Inspect Web Console HTTPS/SSL certificate, continue to configure the ESET Inspect Connector-side certificate. You can choose one of the following options:
- Get the certificate from ESET PROTECT On-Prem
- Import the certificate from a file
- Do not use the connector-side certificate
Solution
Requirements for the creation of ESET Inspect Web Console certificates in ESET PROTECT On-Prem
By default, when you create a Peer Certificate in ESET PROTECT On-Prem, the Host field is set to *, which makes the certificate’s Common Name (CN) and Subject Alternative Name (SAN) equal to a single asterisk. ESET Inspect does not support certificates where the Common Name (CN) or Subject Alternative Name (SAN) is just *. Instead, you must use the actual hostname or IP address of the ESET Inspect Server in the Host field.
Format
- Certificates must be in the PKCS #12 format. PKCS #12 is a file format for storing multiple cryptographic objects in a single file, such as certificates. Files in the PKCS #12 format usually have the
.pfxor.p12extension. - Certification Authorities are stored in the X.509 format (that is, in files with the
.derextension), which is another file format frequently used in cryptography.
Common Name (CN) and Subject Alternative Name (SAN) rules
These rules apply to the Common Name (CN) in the main certificate, the Subject Alternative Name (SAN) entries, and the Common Name (CN) and Subject Alternative Name (SAN) in any additional certificates included in the PKCS #12 file.
- Common Name (CN) and Subject Alternative Name (SAN) must include a real hostname or IP address
- Not allowed:
*(just a single asterisk) - Allowed:
*.yourcompany.comoryourcompany.*.hq.com
(Wildcards are allowed only as part of a domain name, not as the entire hostname.)
Mandatory parameters for creating a Peer Certificate
- Component: ESET Inspect Console
- Host: real IP Address of the ESET Inspect Server
To allow connections from other networks, add multiple IP addresses or hostnames separated by a space, comma, or semicolon. Example:192.168.20.22;10.1.183.88 - No semicolons (
;) in file or folder names for certificate paths (semicolons are used as separators for multiple certificates)
Import the ESET Inspect Web Console certificate from a file during the ESET Inspect Server installation
-
On the first Web console certificate screen in the ESET Inspect Server installer, select Import the certificate from a file and click Next.
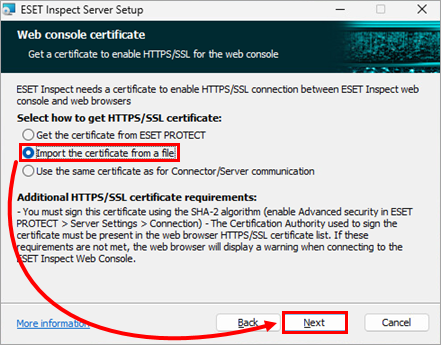
Figure 1-1 -
In the HTTPS/SSL certificate field, define the path to the file with the ESET Inspect Web Console Certificate (
.pfxfile): type or paste the path to the file or click Change to navigate to the file location and select the file manually. If required, in the Certificate password field, type the certificate password. Click Next.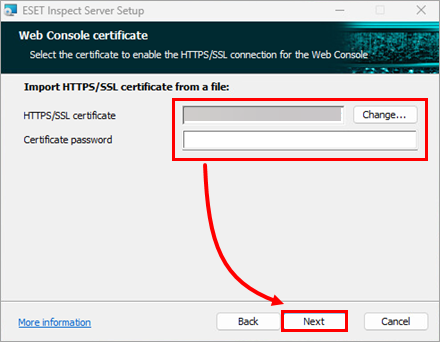
Figure 1-2