Issue
- Client computers do not appear in the ESET PROTECT or ESET PROTECT On-Prem Web Console
- Add client endpoints or servers to your managed network
Click the expanders below to show the procedure for ESET PROTECT or ESET PROTECT On-Prem:
ESET PROTECT On-prem
Solution
Following installation, client computers found by ESET PROTECT On-Prem are automatically displayed in the console. If some client computers are not found, there are three ways to add them to the Computers screen.
-
Active Directory synchronization—ESET PROTECT On-Prem automatically scans your existing Active Directory (AD) during installation. However, if changes are required to your AD or client computers that do not appear in the Console, run this task to re-sync ESET PROTECT with your AD.
-
ESET Rogue Detection Sensor—ESET Rogue Detection Sensor (RD Sensor) is automatically installed if you performed a package installation of ESET PROTECT On-Prem. It identifies client computers without ESET products installed and displays them on your dashboard. Use the RD Sensor report on your dashboard to locate client computers recently added to your network so that you can deploy ESET products to them.
-
Manual Entry—You can manually add a new client computer at any time by submitting its IP address and/or hostname or importing a CSV file.
See the Add computers section of the ESET PROTECT On-Prem Administration Guide for more information.
Active Directory synchronization
If you have an existing Active Directory (AD), ESET PROTECT On-Prem may have already added the computers from your AD during installation. To view computers from your AD that are already added in ESET PROTECT On-Prem :
-
Open the ESET PROTECT On-Prem Console in your browser and log in.
-
Click Computers
 → All and select the check box next to Show Subgroups.
If members of your AD are not shown, follow the steps below in the ESET PROTECT On-Prem Web Console to run the Static Group Synchronization task:
-
Open ESET PROTECT On-Prem in your web browser and log in.
-
Click Tasks, expand Server Tasks, and then click Static Group Synchronization.
-
Click Static Group Synchronization and select Run Now from the drop-down menu. ESET PROTECT On-Prem will automatically add unmanaged computers from your AD to the All group. Click here for instructions to add a computer from All to a static group in ESET PROTECT On-Prem.
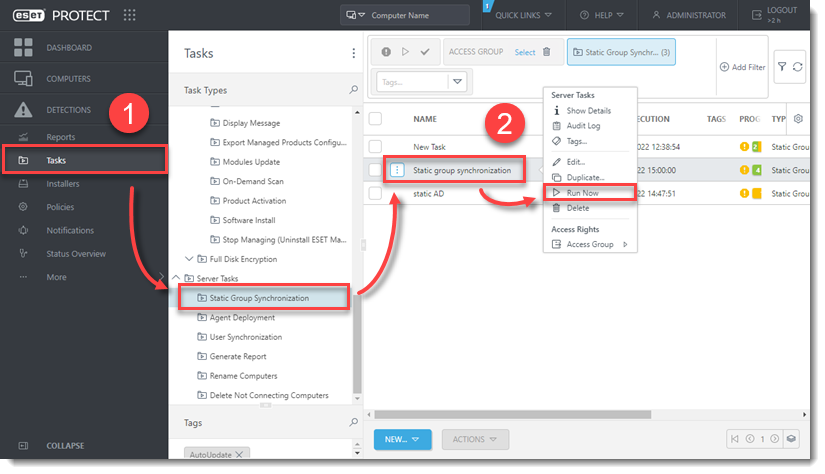
Figure 1-1 -
If you perform a new ESET PROTECT On-Prem installation, deploy the ESET Management Agent.
Using ESET Rogue Detection Sensor
A user must have the following permissions for their home group:
When these permissions are in place, follow the steps below.
If you are not using AD synchronization, the easiest way to add a computer to the ESET PROTECT On-Prem structure is using Rogue Detection Sensor (RD Sensor). RD Sensor is automatically installed as part of the ESET PROTECT On-Prem package installation and begins working as soon as ESET PROTECT On-Prem is activated.
Follow the instructions below to find new computers on your network using RD Sensor in the ESET PROTECT On-Prem Web Console:
-
Click Reports → Computers, scroll down and click Rogue computers.
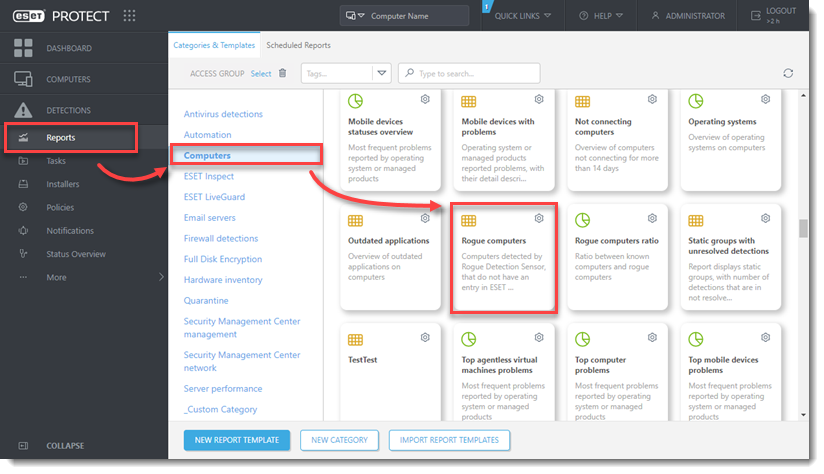
Figure 2-1 -
A list of unmanaged computers will be displayed. Click anywhere in the list and then click Add all displayed items (alternatively, you can click Add to add computers individually).
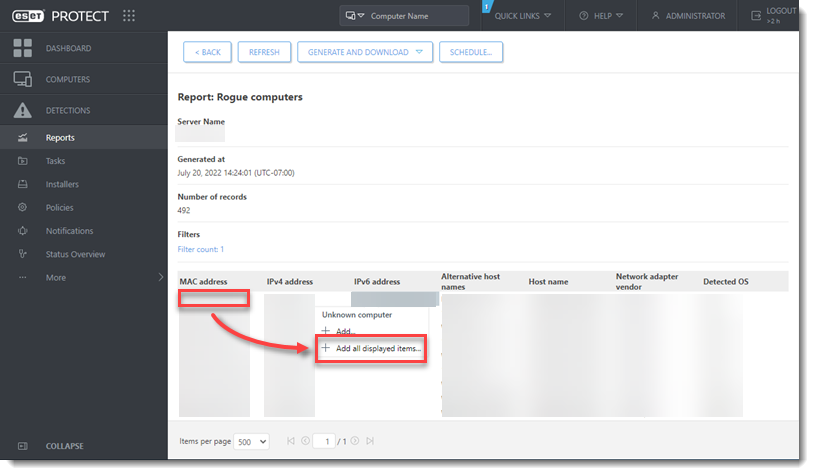
Figure 2-2 -
Select a Parent Group (by default, All selected), click the trash icon next to any computers you want to be removed, and then click Add.
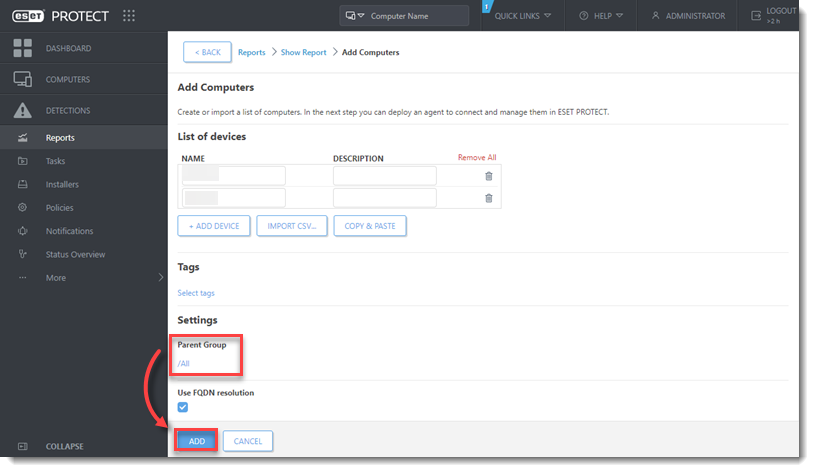
Figure 2-3 -
A notification will be displayed with the option to deploy ESET Management Agent to unmanaged computers. Click Deploy Agents to send the ESET Management Agent to these unmanaged computers.
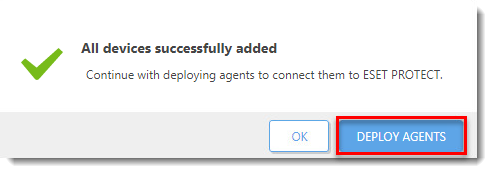
Figure 2-4 -
If you perform a new installation of ESET PROTECT On-Prem, deploy the ESET Management Agent.
Manual entry
A user must have the following permissions for their home group:
When these permissions are in place, follow the steps below.
-
Open ESET PROTECT On-Prem in your web browser and log in.
-
Click Computers → All. Click Add Device and select Computers.
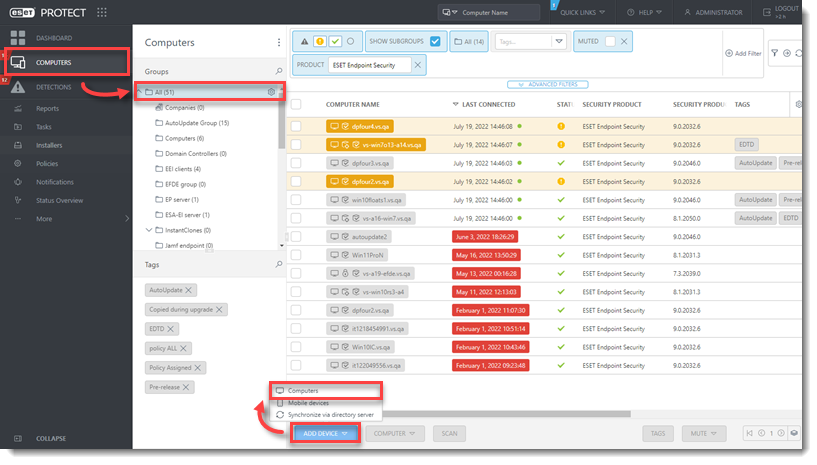
Figure 3-1 -
In the Name field, type the IP address or hostname and click +Add Device. Repeat for each computer that you want to add. After all the computers are listed, click Add.
Alternatively, you can click Import CSV to upload a CSV file containing hostnames of computers to add (delimit each hostname with a comma). See the Add computers section of ESET PROTECT On-Prem Online Help for more information.
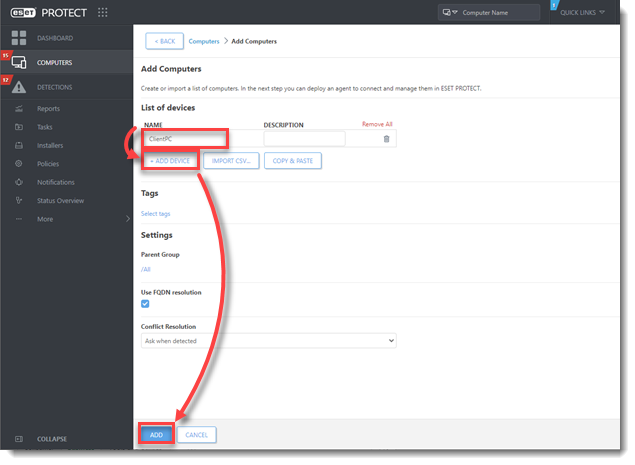
Figure 3-2 -
A notification will be displayed with the option to deploy the ESET Management Agent to unmanaged computers. Click Deploy Agent to send the ESET Management Agent to these unmanaged computers.
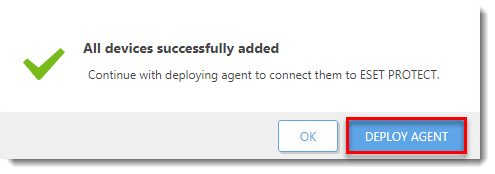
Figure 3-3 -
If you perform a new installation of ESET PROTECT On-Prem, deploy the ESET Management Agent.
ESET PROTECT
Solution
Following installation, client computers found by ESET PROTECT are automatically displayed in the Web Console. If some client computers are not found, there are three ways to add them to the Computers screen:
-
Active Directory synchronization—If changes are required to your AD or client computers that do not appear in the Web Console, synchronize ESET PROTECT with AD.
-
ESET Rogue Detection Sensor—Rogue Detection (RD) Sensor monitors the network in which it is deployed. When a new device without an Agent connects to the network, RD sensor reports this information to the ESET PROTECT. Follow the RD Sensor Installation steps to deploy RD Sensor into your network.
-
Manual entry—You can manually add a new client computer using the ESET Remote Deployment Tool.
See the Computers section of the ESET PROTECT Online Help guide for more information.
Active Directory synchronization
Use ESET Active Directory Scanner to synchronize ESET PROTECT with Active Directory.
ESET Rogue Detection Sensor
A user must have the following permissions for their home group:
When these permissions are in place, follow the steps below.
You can add a computer to the ESET PROTECT structure using Rogue Detection Sensor (RD Sensor). RD Sensor monitors the network in which it is deployed. When a new device without an Agent connects to the network, it reports this information to the ESET PROTECT.
I. Install Rogue Detection Sensor
Follow the RD Sensor Installation steps to deploy RD Sensor into your network.
II. Add client computers using RD Sensor
Follow the instructions below to find new computers on your network using RD Sensor in the ESET PROTECT Web Console:
-
Open ESET PROTECT in your web browser and log in.
-
Click Reports → Computers, scroll down and click Rogue computers.
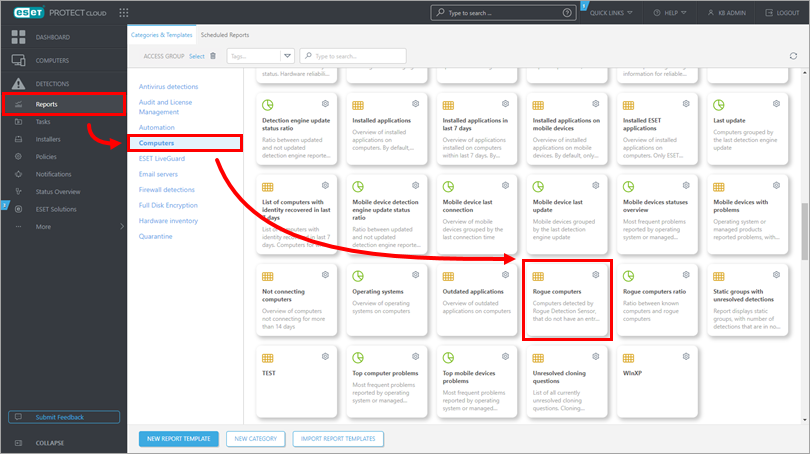
Figure 4-1 -
A list of unmanaged computers will be displayed. Click anywhere in the list and then click Add all displayed items (alternatively, you can click Add to add computers individually).
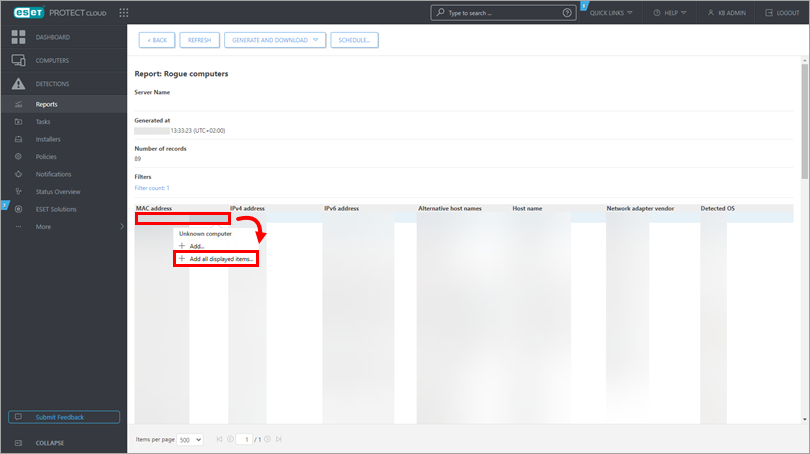
Figure 4-2 -
Select a Parent Group (by default, All is selected), click the trash icon next to any computers you want to remove and click Add.
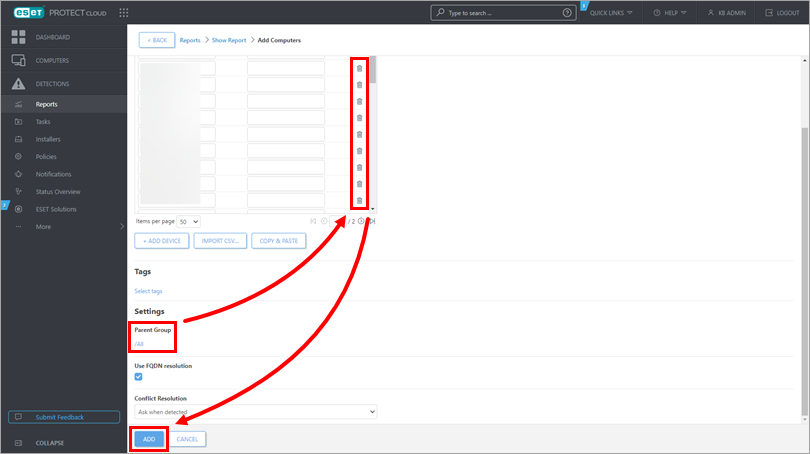
Figure 4-3 -
The All devices successfully added notification will be displayed. Click Deploy Agents to send the ESET Management Agent to these unmanaged computers.
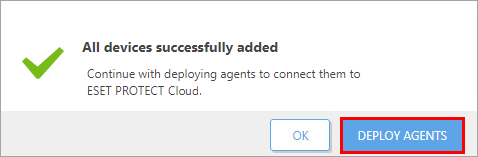
Figure 4-4
Add computers manually
A user must have the following permissions for their home group:
When these permissions are in place, follow the steps below.
-
Open ESET PROTECT in your web browser and log in.
-
Follow the instructions to download and run the ESET Remote Deployment Tool.
-
Proceed to add computers manually.