Issue
- Enable SSL/HTTPS settings in the Control Panel
- SSL Details
- Certificate Options: Upload Certificate
- Certificate Options: Create new certificate
- Redirect Options: Upload certificate
- Manual Confiuguration
Details
Click to expand
If you have installed the ESET Endpoint Encryption Server using the All in one package from the ESET website, you can enable SSL/HTTPS settings in the Control Panel.
Solution
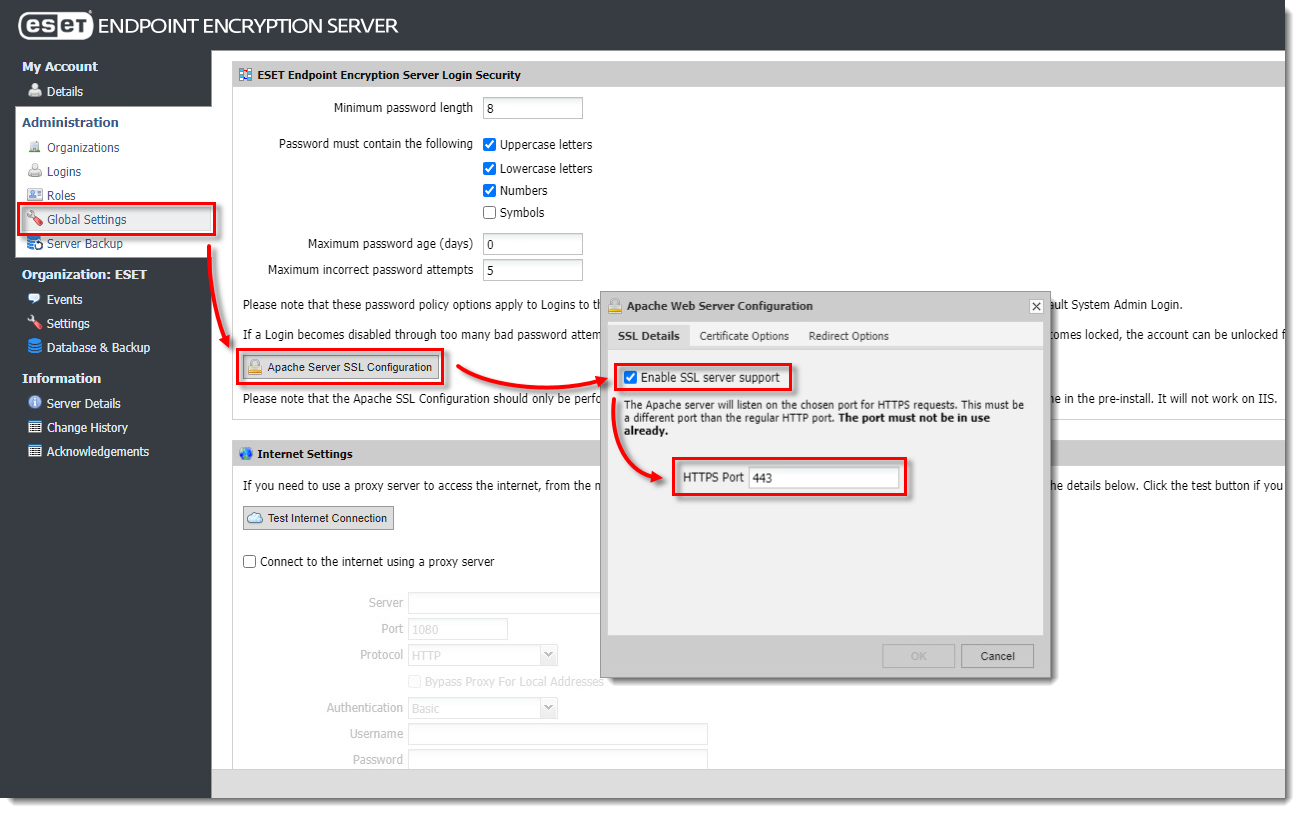
SSL Details
To enable SSL, follow the instructions below:
- Log in to ESET Endpoint Encryption server.
Access the ESET Endpoint Encryption Server Control Panel.
Select Global Settings.
Click Apache Server SSL Configuration.
Select Enable SSL Server support check box.
Type in your selected port (the default HTTPS port is 443)
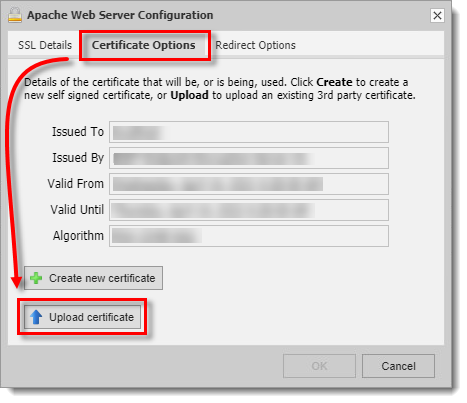
Certificate Options: Upload Certificate
- Select the Certificate Options tab and click Upload certificate.
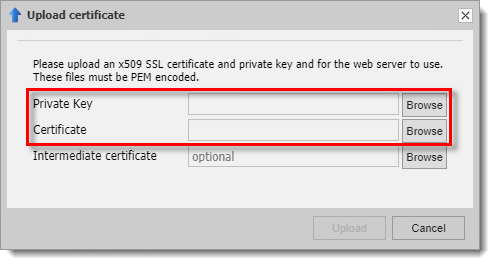
Click Browse and upload
server.keyto Private Key field andserver.crtto Certificate field.
Certificate Options: Create new certificate
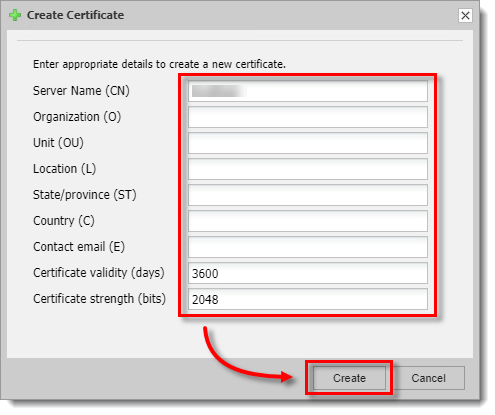
If you do not already have a certificate file, a self-generated certificate can be generated for test purposes:
Select Certificate options tab and click Create new certificate.
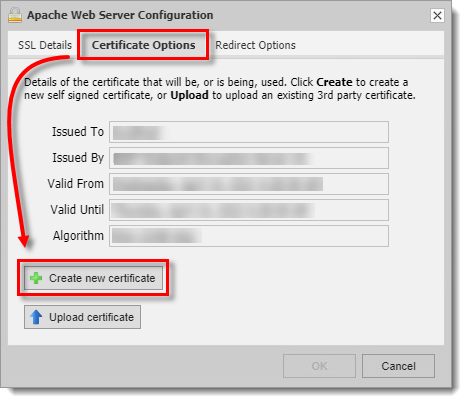
Type in the appropriate details into the form.
Redirect Options
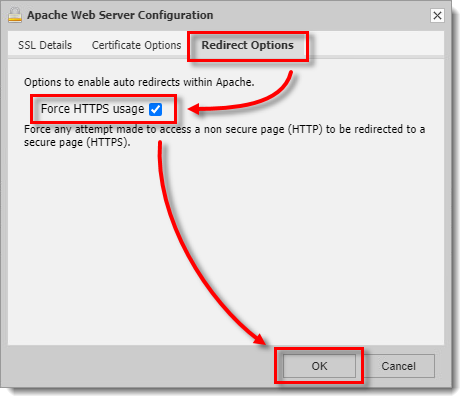
If you want to force HTTPS usage:
Click the Redirect Options tab.
Select the Force HTTPS usage check box.
Manual Configuration
If you have installed the EEE Server stand-alone package and manually configured Apache, follow the instructions below:
Certificates
If you have already purchased your SSL certificate, simply copy the supplied server.key and server.crt files into the folder Program Files\DESlock+ HTTP\conf\
Self Signed Certificates
If you do not already have a certificate file, a self-generated certificate can be generated for test purposes using the openssl tool following the steps below:
Open an elevated command prompt.
Navigate to
Program Files\DESlock+ HTTP\bin(ProgramFiles (x86)on 64bit platforms).Type or copy/paste the command
openssl req -config ..\conf\openssl.cnf -new -out server.csr.You will be required to type and verify the entry of a passphrase. All other requests can be left as default by pressing the Enter key on your keyboard except Common Name which must match the name of the webserver address hosting the certificate.
Type in the command
openssl rsa -in privkey.pem -out server.key.Type in the passphrase that you specified previously. If successful, the command should return the text writing RSA key.
Type in the command
del .rnd.Type in the command
openssl x509 -in server.csr -out server.crt -req -signkey server.key -days 365. Note: this sets the certificate to last 365 days.Type in the command
move server.key ..\conf\.Type in the command
move server.crt ..\conf\.
Applying the certificate
With either a purchased or test certificate type perform the following steps:
As a security measure, be sure to change the file permissions on the certificate files so that they are read-only and only administrator users can access them.
Open the file
Program Files\DESlock+ HTTP\conf\httpd.conf(ProgramFiles (x86)on 64bit platforms).Find the line
#LoadModule ssl_module modules/mod_ssl.so, remove the#symbol from the line.Find the line
#Include conf/extra/httpd-ssl.conf, remove the#symbol from the line.At the end of the
httpd.conffile, add these lines (this will redirect attempts to access using http to the https address instead):
LoadModule rewrite_module modules/mod_rewrite.so
RewriteEngine On
RewriteCond %{HTTPS} off
RewriteRule ^/dlpes(|/.*)$ https://%{HTTP_HOST}%{REQUEST_URI} [R=302,L]
- Save the updated
httpd.conffile.
On 64-bit operating systems the following modification is required:
You need to update the ssl configuration with the short path to the logs folder. You can find the short path filenames using the DIR /X command. The example below is of a default Windows 7 x64 system using the ES preinstall.
Open
\Program Files (x86)\DESlock+ HTTP\conf\extra\httpd-ssl.confin notepad.Find the SSLSessionCache value and change as below commenting out the existing SSLSessionCache and applying the new path (highlighted below) then save the change:
# Inter-Process Session Cache:
# Configure the SSL Session Cache: First the mechanism
# to use and second the expiring timeout (in seconds).
#SSLSessionCache "dbm:C:/Program Files (x86)/DESlock+ HTTP/logs/ssl_scache"
#SSLSessionCache "shmcb:C:/Program Files (x86)/DESlock+ HTTP/logs/ssl_scache(512000)"
SSLSessionCache "shmcb:C:/Progra\~2/DESloc\~1/logs/ssl_scache(512000)"
SSLSessionCacheTimeout 300
On all operating systems:
- Restart the DESlockHTTP service within the services control panel.