Issue
- Deploy ESET Virtualization Security (EVS) in physical and/or virtualized environments
Solution
Prerequisites
Before installing ESET Virtualization Security (EVS), make sure your system meets the following prerequisites:
- VMware vCenter and VMware vShield deployed according to instructions provided by VMware
- vShield auditor present with username, password and vShield IP address (recommended)
- ESET Remote Administrator Virtual Appliance 6.3 or later (one deployment per environment), or ESET ESET Remote Administrator Server installed on a dedicated machine
- ESET Remote Administrator Virtual Agent host (one installation per environment)
- VMware Tools with VMCI Driver installed on each protected virtual machine/guest
I. Install and configure standalone components
-
vAgent Host
- Download the ESET Remote Administrator vAgent Host and save the file to your desire save location.
Download ESET Remote Administrator vAgent Host
- Log into vSphere Client and click File → Deploy OVF Template.
- Click Browse, navigate to the image you downloaded in step 1 (alternatively, you can choose to enter the URL where the image is located) and click Open. Click Next.
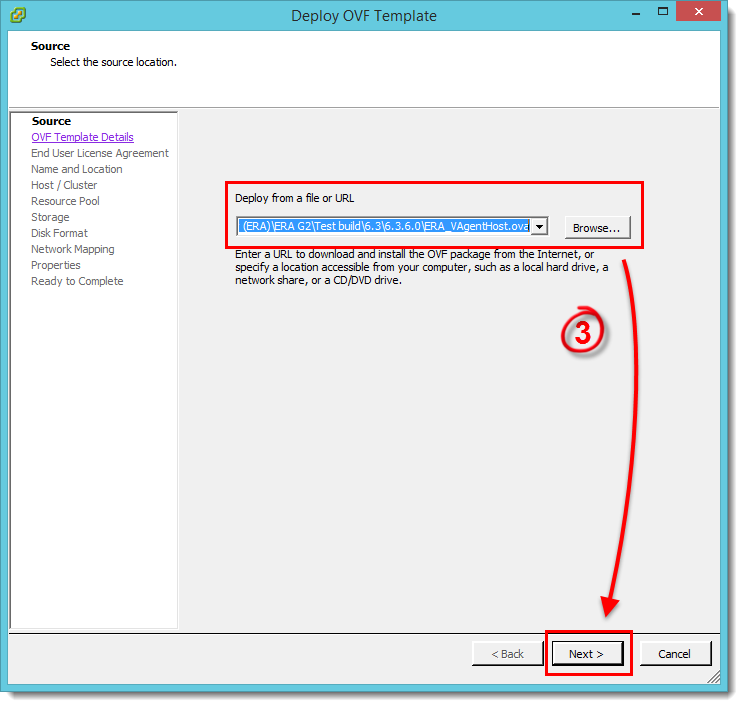
Figure 1-1
Click the image to view larger in new window - Verify that you have selected the correct image and click Next.
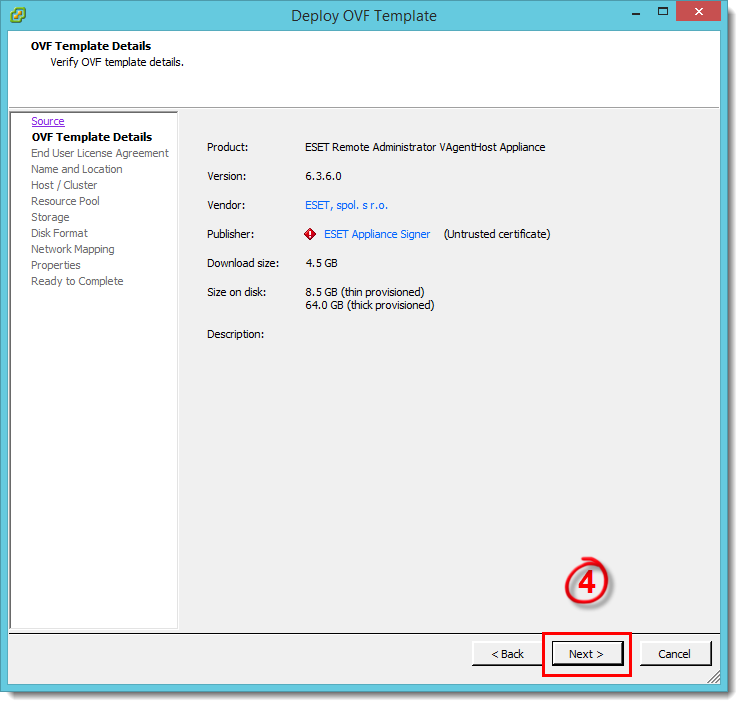
Figure 1-2
Click the image to view larger in new window - Read the End User License Agreement and click Accept → Next.
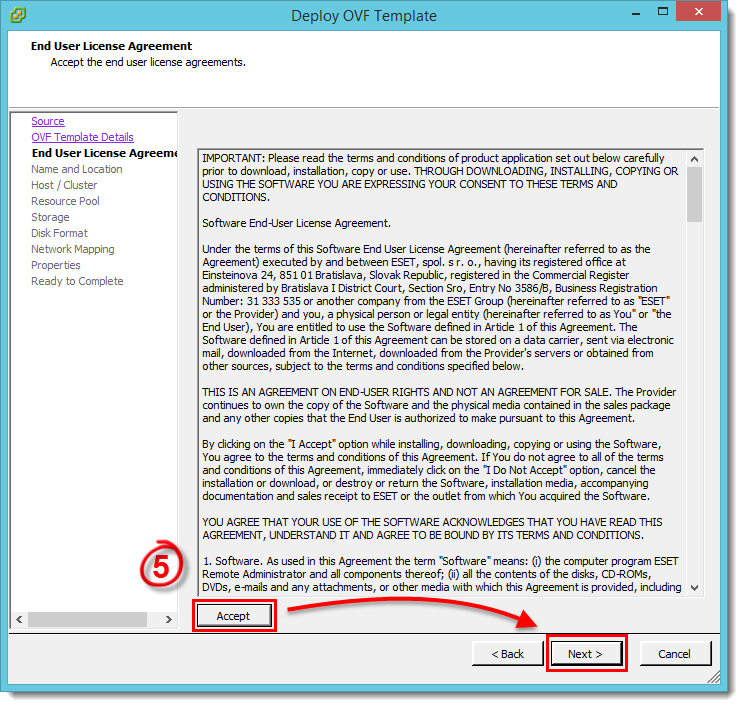
Figure 1-3
Click the image to view larger in new window - Type a name (for the deployed template) into the Name field, select the location where the virtual machine files will be stored and then click Next.
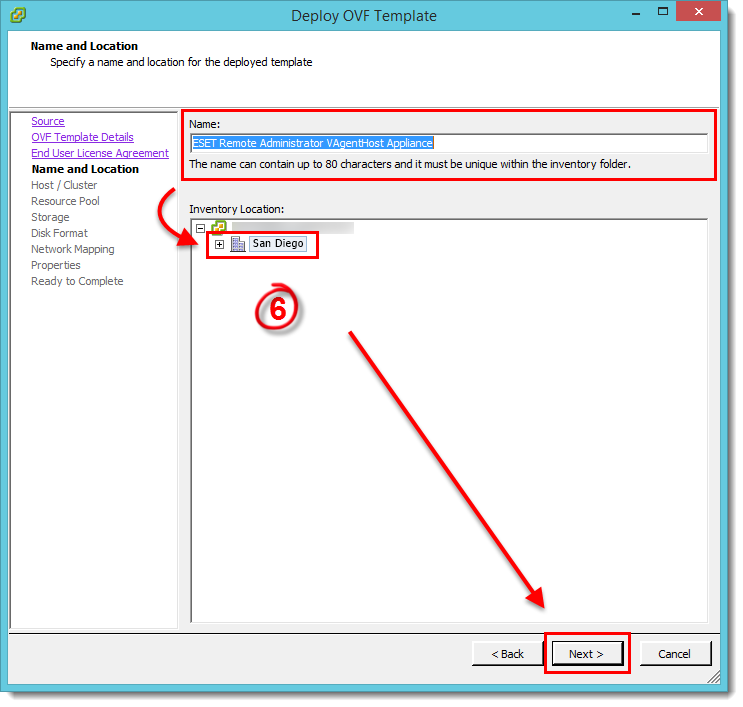
Figure 1-4
Click the image to view larger in new window - Select the host or cluster on which you want to run the template and click Next.
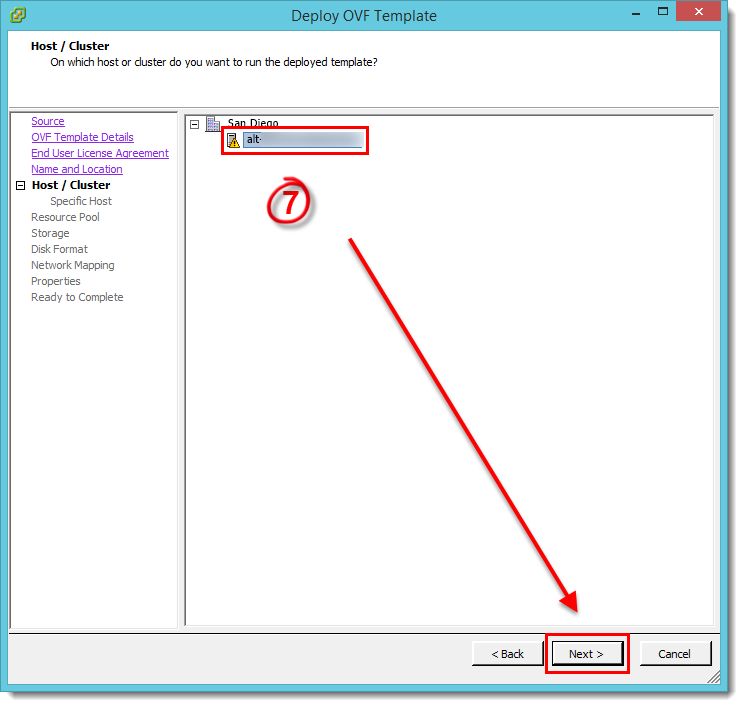
Figure 1-5
Click the image to view larger in new window - Select the resource pool within which you want to deploy the template and click Next.
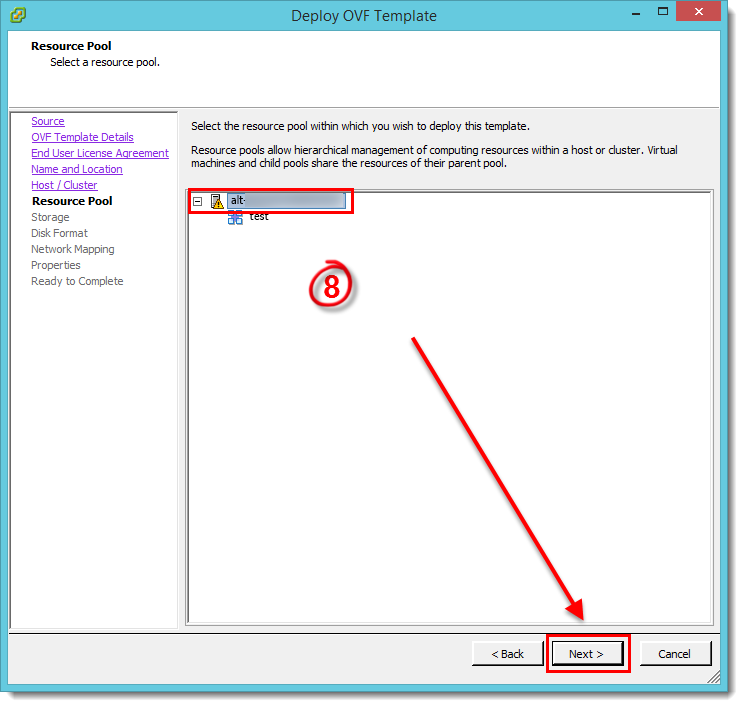
Figure 1-6
Click the image to view larger in new window - Select a storage location for the virtual machine files and click Next.
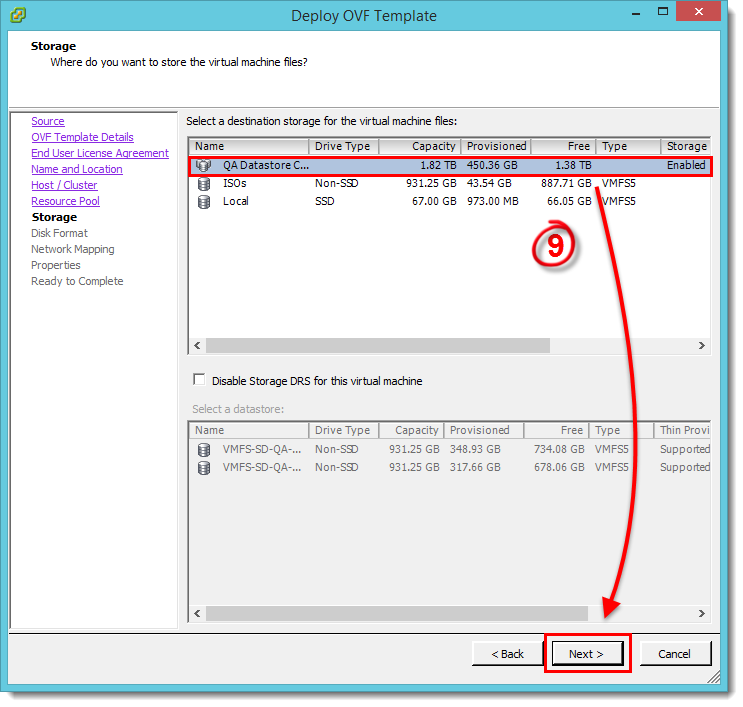
Figure 1-7
Click the image to view larger in new window - Select the format that the virtual disks will use and click Next.
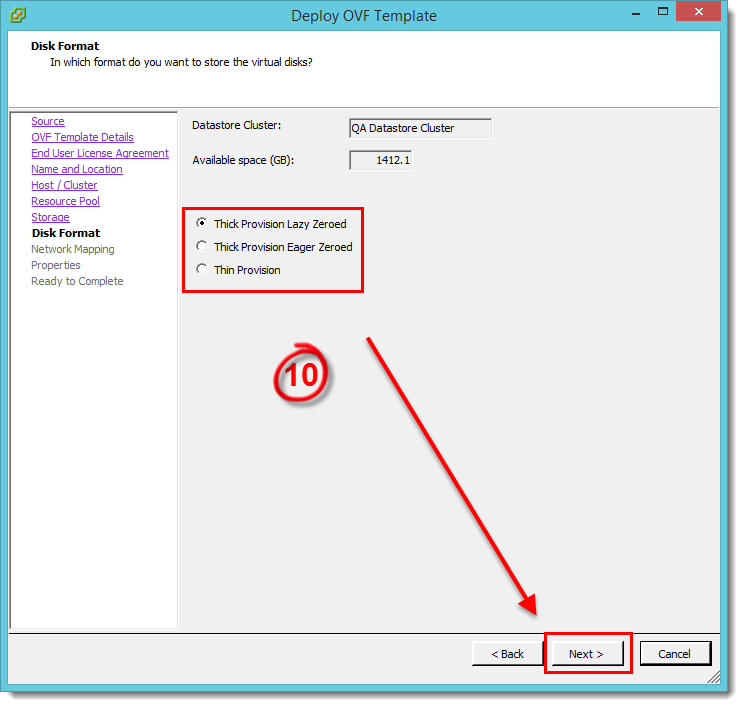
Figure 1-8
Click the image to view larger in new window - Select the network to be used by the virtual machine and click Next.
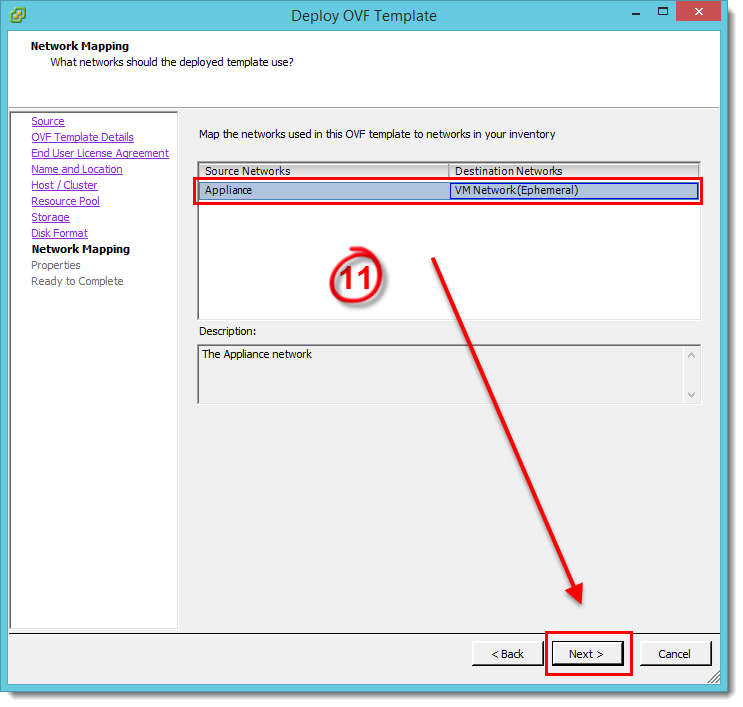
Figure 1-9
Click the image to view larger in new window - From ESET Remote Administrator: Export your Certification Authority, Proxy Certificate, and Agent Certificate in Base64 format (you will need these in the next step). Click here for step-by-step instructions.
- In the Properties window, specify the following information for the connection between vAgent Host and ERA and click Next (fields not mentioned are optional):
Hostname: The hostname of your ERA VAgentHost appliance.
Password: To be used on your ERA VM and as its CentOS root password.
ERA Server Hostname: The hostname or IP address of your ERA Server or ERA Proxy (to allow connection between ERA vAgent Host and ERA Server/Proxy).
ERA Server Port: Port used by your ERA Server or Proxy (default is 2222).
Certification Authority - Base64: Paste the Certification Authority (Base64 format) that you exported in step 12.
Proxy Certificate - Base64: Paste your Proxy Certificate (Base64 format) that you exported in step 12.
Agent Certificate - Base64: Paste your Agent Certificate (Base64 format) that you exported in step 12.
Specify the following fields to ensure that the ERA vAgent Host is able to connect to ERA Server/Proxy:
ERA Server Hostname
Webconsole Hostname
Webconsole username and password
- Review the deployment summary, select the check box next to Power on after deployment and then click Finish.
- A virtual machine with the settings you specified will automatically be created. This process can take several minutes depending on network performance. Once the vAgent Host is successfully deployed, open it. The basic information screen, shown below, gives an overview of protected machines and allows you to configure settings by pressing Enter.
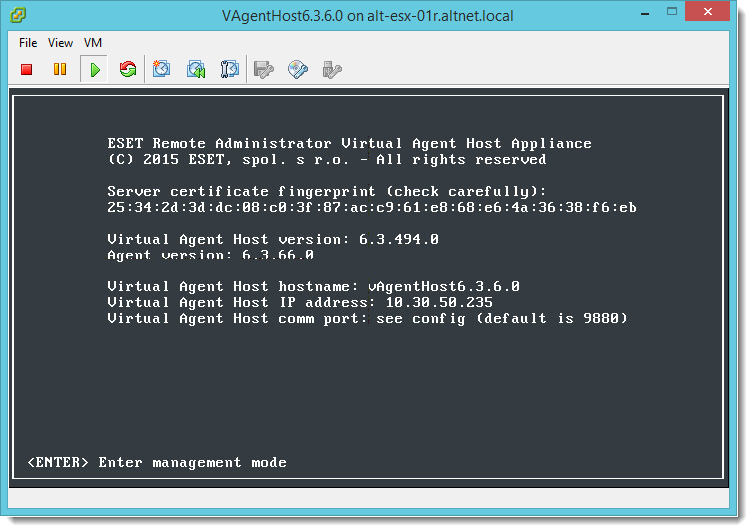
Figure 1-10
Click the image to view larger in new window
- Download the ESET Remote Administrator vAgent Host and save the file to your desire save location.
- ESET Virtualization Security
- Download ESET Virtualization Security and save the file to your desired save location.
Download ESET Virtualization Security
- Log into vSphere Client and click File → Deploy OVF Template.
- Click Browse, navigate to the image you downloaded in step 1 (alternatively, you can choose to enter the URL where the image is located) and click Open. Click Next.
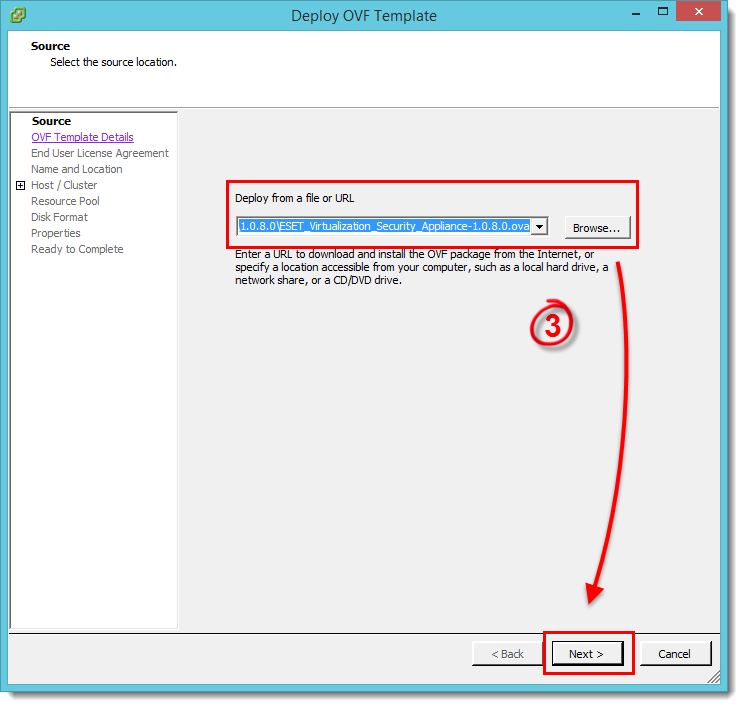
Figure 2-1
Click the image to view larger in new window - Verify that you have selected the correct image and click Next.
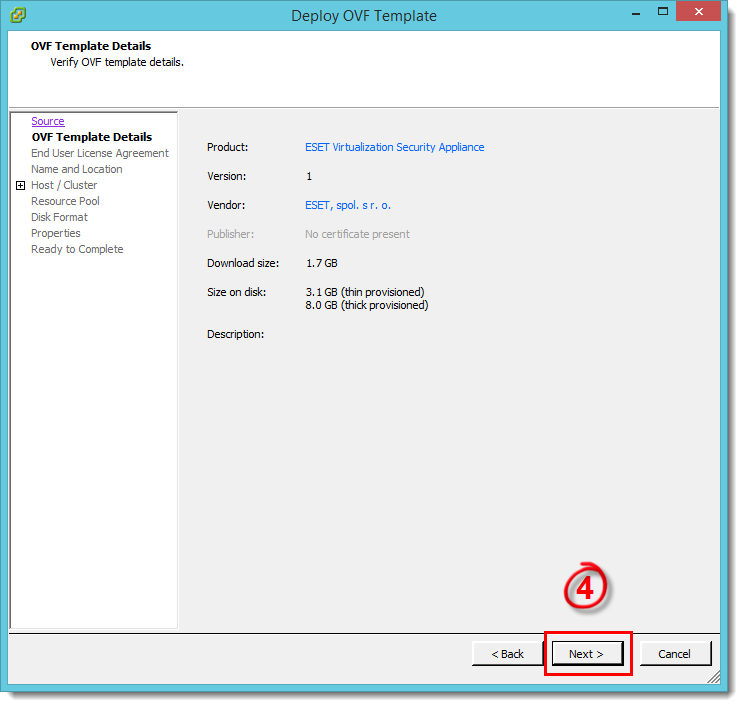
Figure 2-2
Click the image to view larger in new window - Read the End User License Agreement and click Accept → Next.
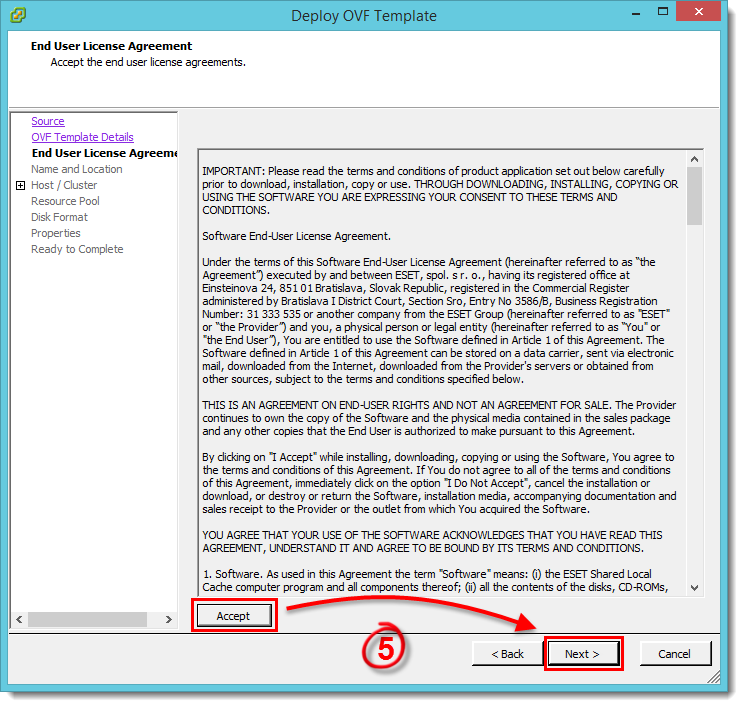
Figure 2-3
Click the image to view larger in new window - Type a name (for the deployed template) into the Name field, select the location where the virtual machine files are stored and then click Next.
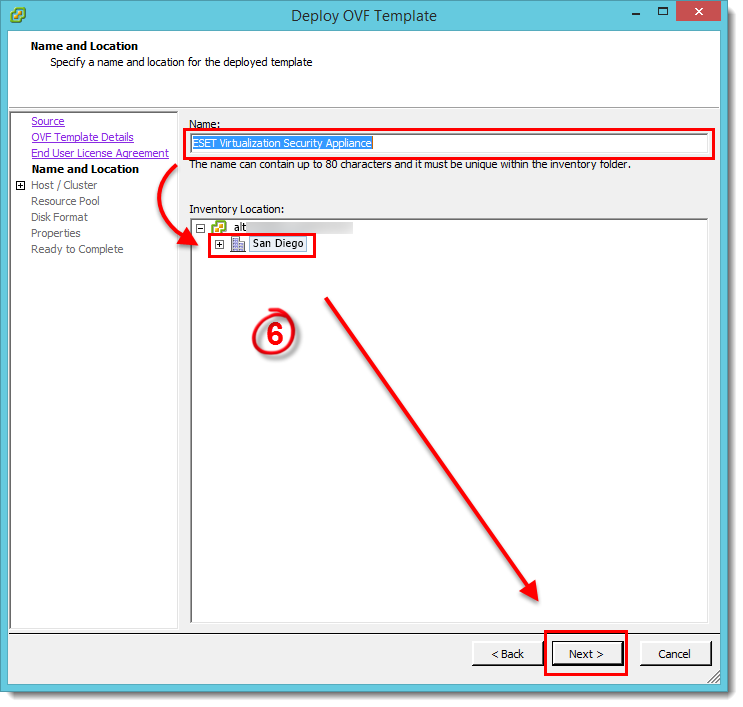
Figure 2-4
Click the image to view larger in new window - Select the host or cluster on which you want to run the template and click Next.
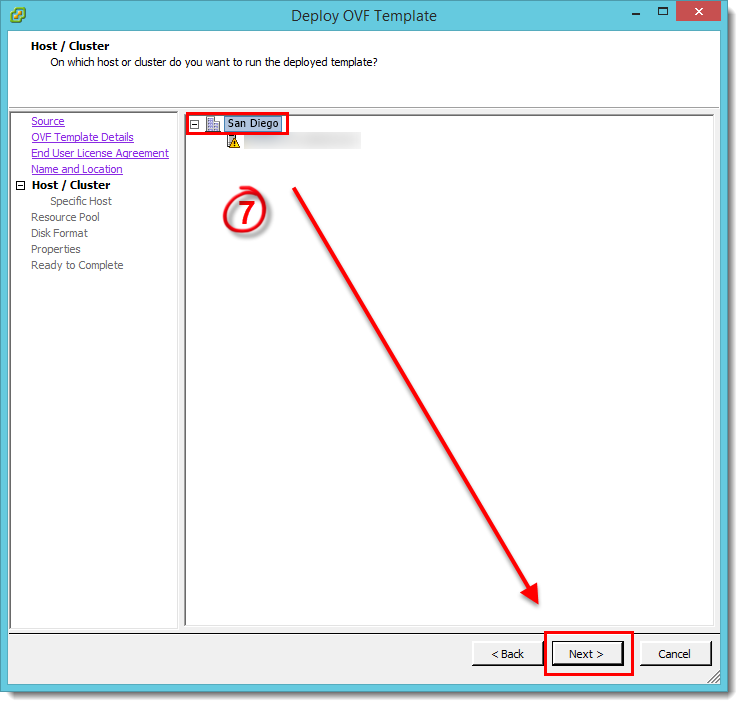
Figure 2-5
Click the image to view larger in new window - Select a storage location for the virtual machine files and click Next.
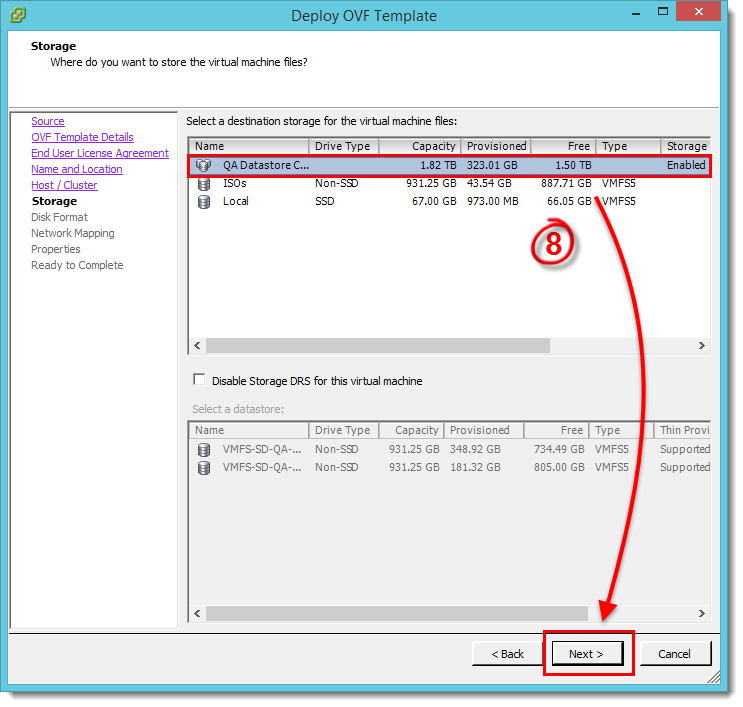
Figure 2-6
Click the image to view larger in new window - Select the format that the virtual disks will use and click Next.
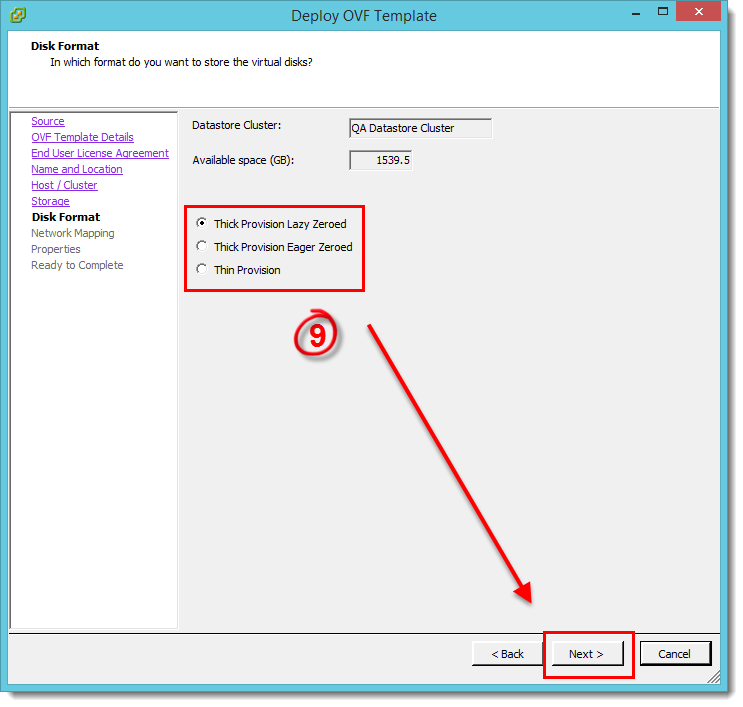
Figure 2-7
Click the image to view larger in new window - Select the network to be used by the virtual machine and click Next.
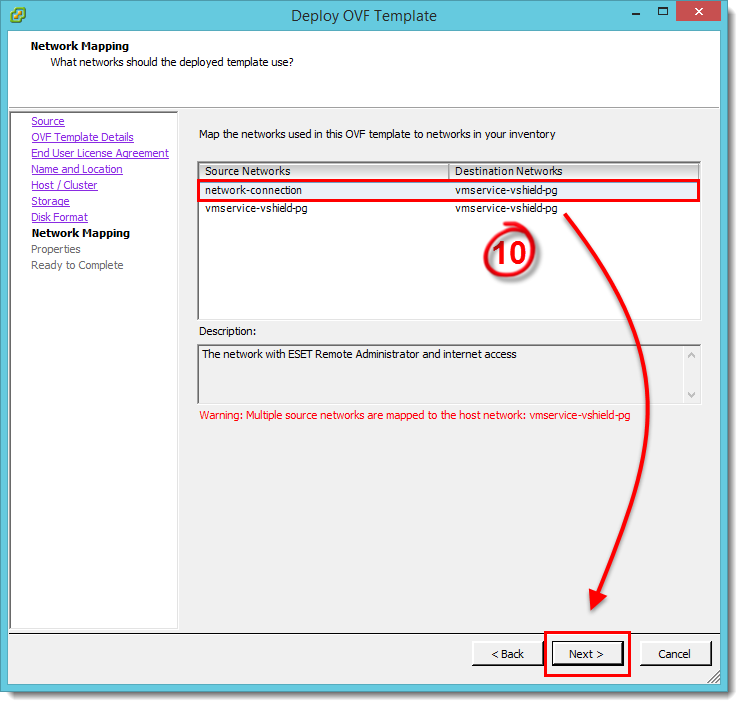
Figure 2-8
Click the image to view larger in new window - In the Properties window, specify the following information for the connection between ESET Virtualization Security (EVS) and ERA and then click Next:
Hostname: The hostname of your ERA VAgentHost appliance.
Password: To be used on your ERA VM and as its CentOS root password.
ERA Server Hostname: The hostname or IP address of your ERA Server or ERA Proxy (to allow connection between ERA vAgent Host and ERA Server/Proxy).
ERA Server Port: Port used by your ERA Server or Proxy (default is 2222).
Certification Authority - Base64: Paste the Certification Authority (Base64 format) that you exported in step 12.
Proxy Certificate - Base64: Paste your Proxy Certificate (Base64 format) that you exported in step 12.
Agent Certificate - Base64: Paste your Agent Certificate (Base64 format) that you exported in step 12.
Specify the following fields to ensure that the ERA vAgent Host is able to connect to ERA Server/Proxy:
ERA Server Hostname
Webconsole Hostname
Webconsole username and password
- Review the deployment summary, select the check box next to Power on after deployment and then click Finish.
- A virtual machine with the settings you specified will automatically be created. This process can take several minutes depending on network performance. Once the vAgent Host is successfully deployed, open it. The basic information screen gives an overview of protected machines and allows you to configure settings by pressing Enter.
- Download ESET Virtualization Security and save the file to your desired save location.
II. Activate components connected to ERA
You can activate these components by performing a product activation task from ERA. Click here for step-by-step instructions.
III. Create a policy to connect the ESET Virtual Security Appliance to vAgent Host
Click here for step-by-step instructions.
IV. vCenter synchronization
Once you have completed parts I-III above, you will need to perform vCenter synchronization. Click here for step-by-step instructions.
V. Enable VM protection and policy configuration via ERA
-
Open ESET Remote Administrator Web Console (ERA Web Console) in your web browser and log in.
- Click Admin
 → Policies.
- Click Policy → New.
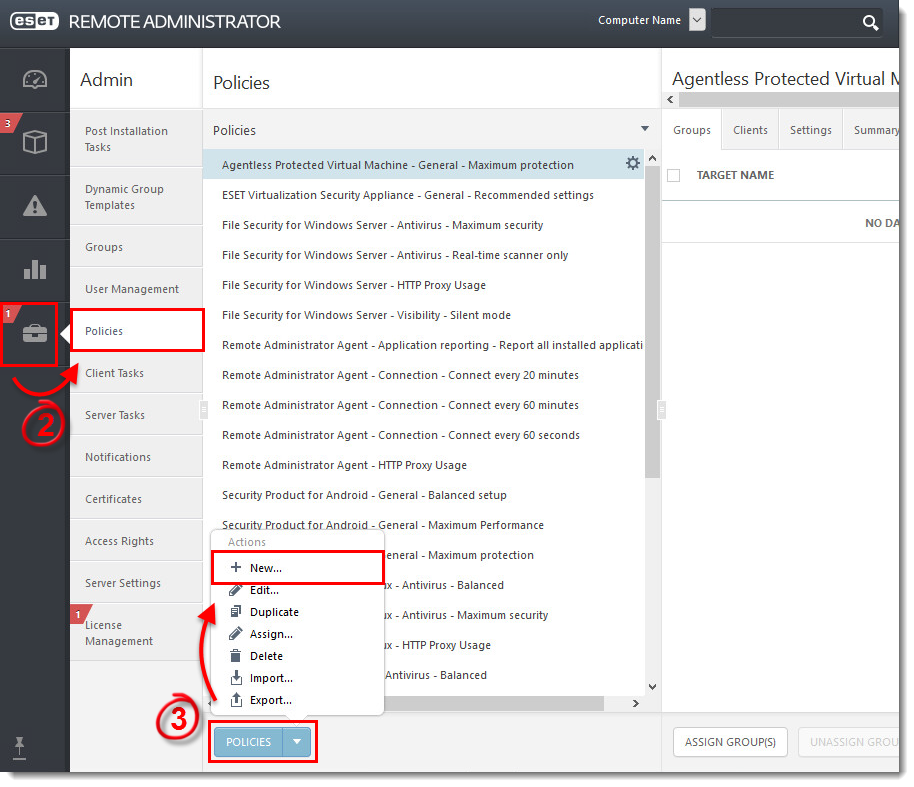
Figure 5-1
Click the image to view larger in new window - Type a name for your new policy into the Name field.
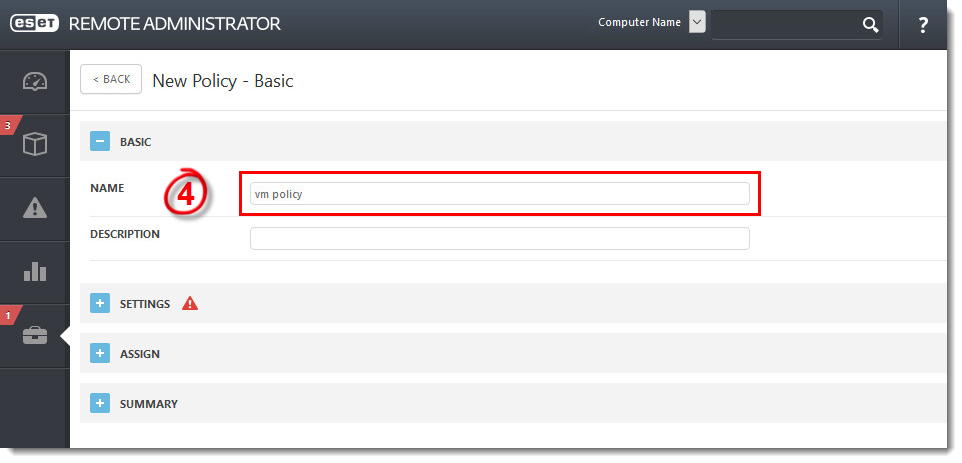
Figure 5-2
Click the image to view larger in new window - Expand Settings and select ESET Virtualization Security - Protected VM from the drop-down menu.
- Click Antivirus → Real-time file system protection.
- Expand Basic and click the toggle next to Enable Real-time File System Protection to enable it.
- Click Finish.
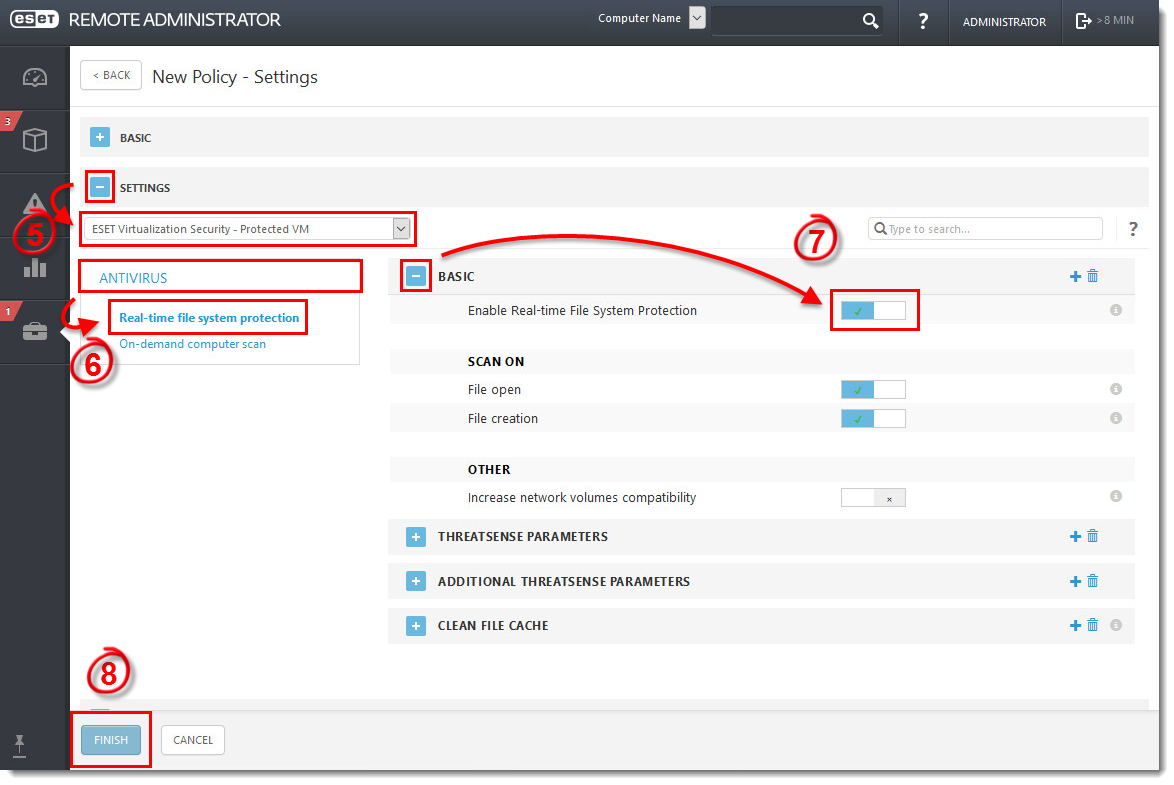
Figure 5-3
Click the image to view larger in new window - Click Admin → Policies, select the policy you just created and click Assign Group(s).

Figure 5-4
Click the image to view larger in new window - Select the check box(es) next to the group(s) to which your virtual machines belong and click OK.
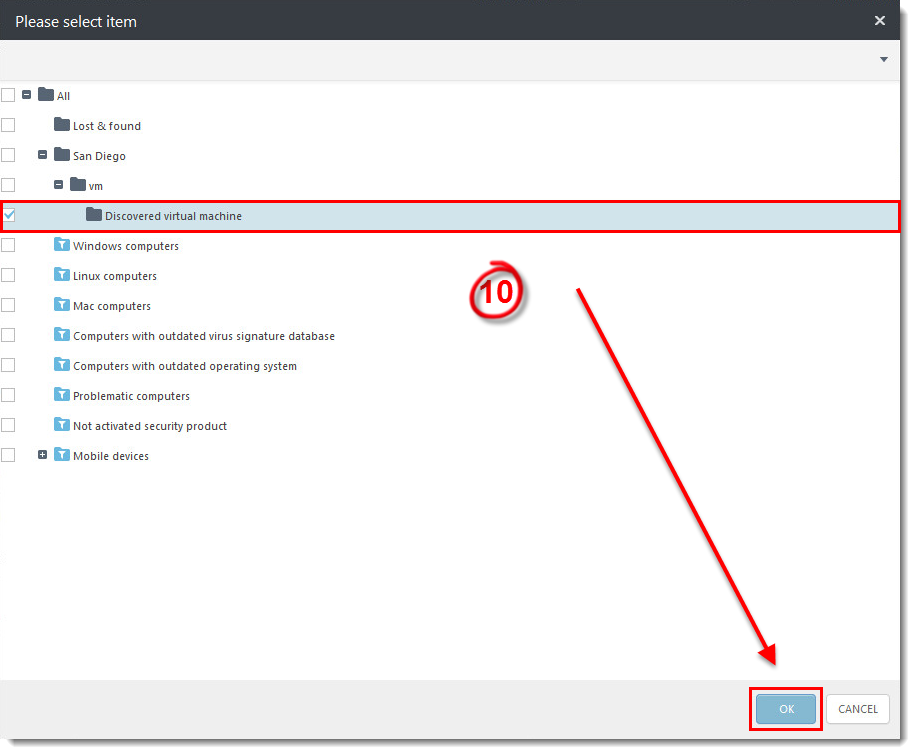
Figure 5-5
Click the image to view larger in new window