Solution
Getting Started with ERA for Managed MSPs: Step 2 of 4
← Prerequisites & System Requirements | Configure ESET Remote Administrator for Managed MSPs →Follow the instructions below to install ESET Remote Administrator (ERA) Server on your network.
Click the link below to download the ESET Remote Administrator (ERA) Server installer file:
Download ESET Remote Administrator Server
Right-click the installer setup.exe and select Run as administrator (if prompted, accept the User Account Control elevation prompt).
Click Next.
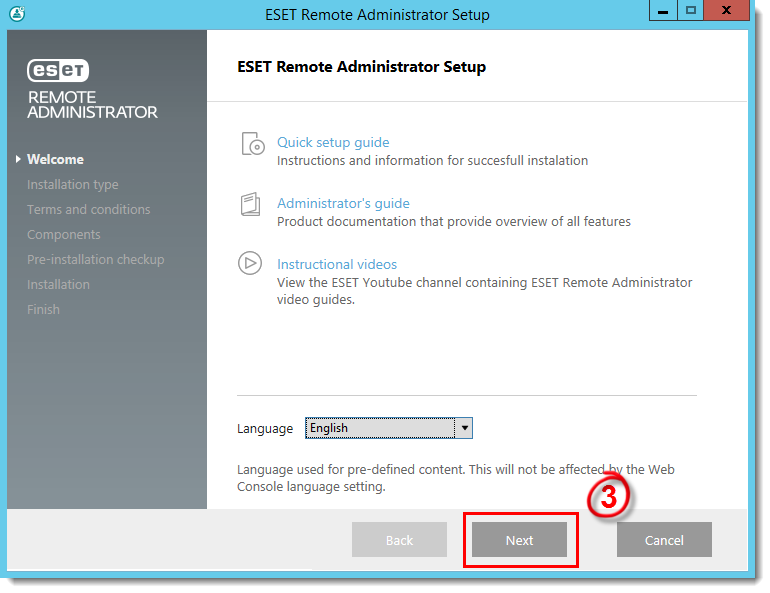
Figure 1-1
- Select Install ESET Remote Administrator (ERA) Server and click Next.
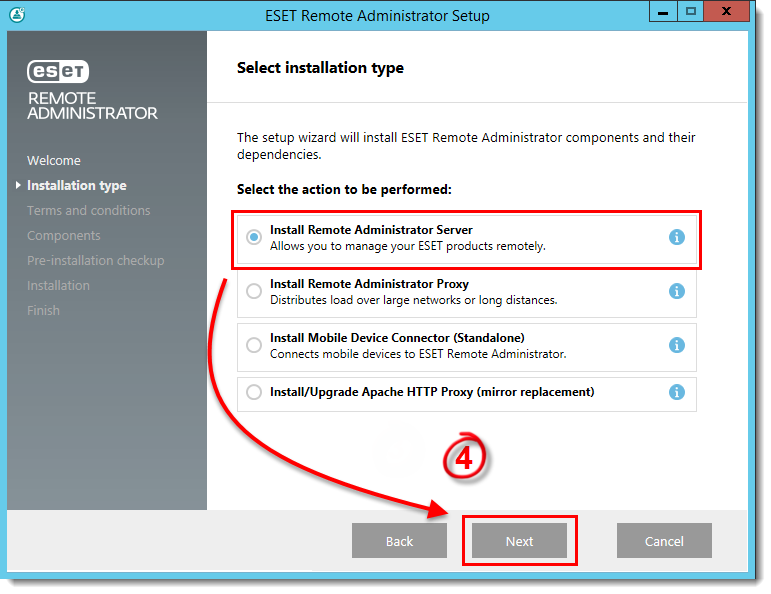
Figure 1-2
- Read the End User License Agreement. If you agree, select I accept the terms in the license agreement and click Next.
- Your network architecture will determine which components should be installed. Read the descriptions below and deselect the check box next to any components that you do not want to install:
- Microsoft SQL Server Express: If you have an existing Microsoft SQL or MySQL database that you will use with ESET Remote Administrator, deselect this check box. Leave this check box selected to create a new Microsoft SQL Server Express database for use with ESET Remote Administrator.
- Web Console: This will install the Apache Tomcat service necessary for ESET Remote Administrator (ERA) Server to manage clients. We strongly recommend that you leave this check box selected.
- ESET Mobile Device Connector: This will install the ESET Mobile Device Connector (MDC) component, which allows for the remote management of Android and iOS devices. See our MDC FAQ for more information.
- ESET Rogue Detection Sensor:
- Apache HTTP Proxy:
We recommend that you deselect this component if you are unsure whether it is needed on your network. Apache HTTP Proxy can deliver significant performance improvements on networks of roughly 40 computers or more.
Using HTTP Proxy will create and apply several proxy-based policies for clients and apply them automatically, which can affect your ability to download updates.
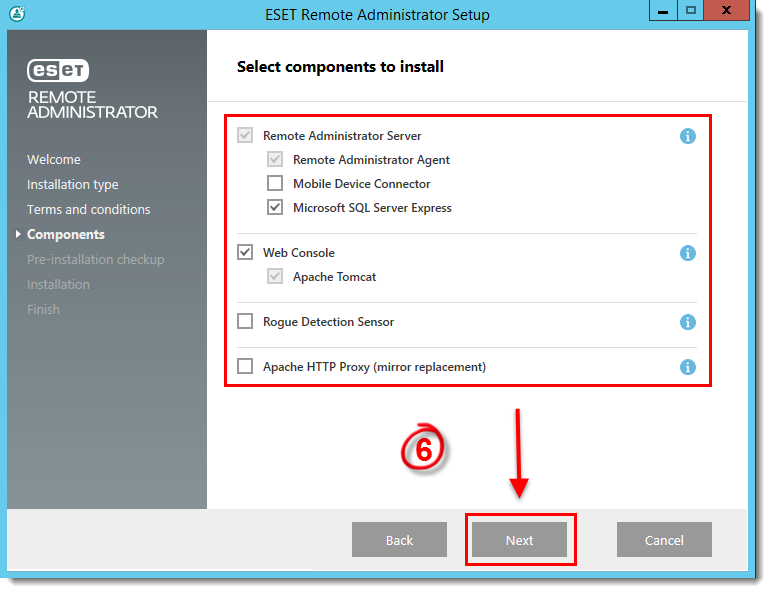
Figure 1-3
- Click Next in the ESET Remote Administrator (ERA) Server Setup window.
- Select Activate later and click Next.

Figure 1-4
- If you chose to have Microsoft SQL Server Express installed in step 6, click Next to perform a database connection check and continue to step 10.
Users with a pre-existing database: Select the appropriate database type from the Database drop-down menu. Type the Database name, Hostname and Port (you can find this information in SQL Server Configuration Manager) for your database into the appropriate fields and then click Next. In the following screen, select Use existing user and then type or copy/paste in the Database username and Password if one is used.

Figure 1-5
- Type the password you will use to log into ERA Web Console into the Password and Confirm Password fields. Make sure to record this password for use later and then click Next.

Figure 1-6
- In the Certificate information window, you can customize your Certificate Authority. The only mandatory fields are Authority common name and Certificate validity. Type or copy/paste in any information about your Certificate Authority that you want to add. If you create a password make sure that you record it because all client computers using this certificate will require that password to use the certificate. Click Next when you are finished.

Figure 1-7
- Click Install.
- At the Installation successful window, click the URL link to open ERA Web Console. We recommend that you bookmark or make note of this URL for future reference. By default, the ERA installer will create a link to Web Console in your Start menu.
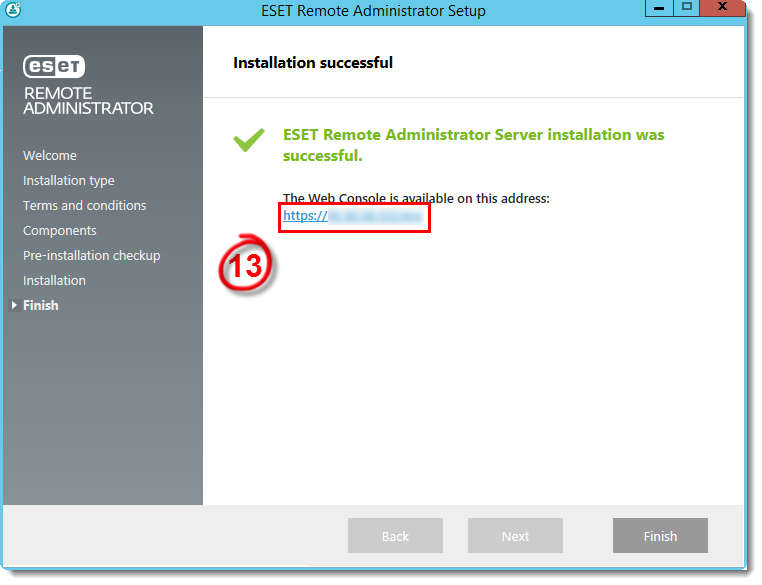
Figure 1-8
Open ESET Remote Administrator Web Console (ERA Web Console) in your web browser, log in and save the ERA Web Console to your browser's favorites. How do I open ERA Web Console?
- Skip the startup wizard and continue to configure ERA (step 3 of 4).