Issue
- Install the ESET Management Agent to client workstations remotely using the ESET PROTECT Web Console
- Reinstall the ESET Management Agent to orphaned or disconnected client workstations using the ESET PROTECT Web Console
- Deploy the ESET Management Agent remotely using ESET PROTECT On-Prem
- A client workstation was orphaned or disconnected because it was pointed at an absent or incorrect server
Solution
Prerequisites
Ensure you meet the requirements for remote deployment of ESET Management Agent.
- Deployment on Windows targets.
- Deployment on Linux or macOS machines: Make sure the target machine has SSH daemon enabled and running on port 22 and a firewall is not blocking this connection. Use the following command (replace the IP address with the IP of your ESET PROTECT Server) to add an exception in Linux firewall:
iptables -A INPUT -s 10.0.0.1 -p tcp --dport 22 -m state --state NEW -j ACCEPT - Deployment on Linux machines: Select a user with permission to use the sudo command or root user. If root is used, the ssh service must allow you to log in as root.
Remotely install or reinstall the ESET Management Agent
-
Open ESET PROTECT or ESET PROTECT On-Prem in your web browser and log in.
-
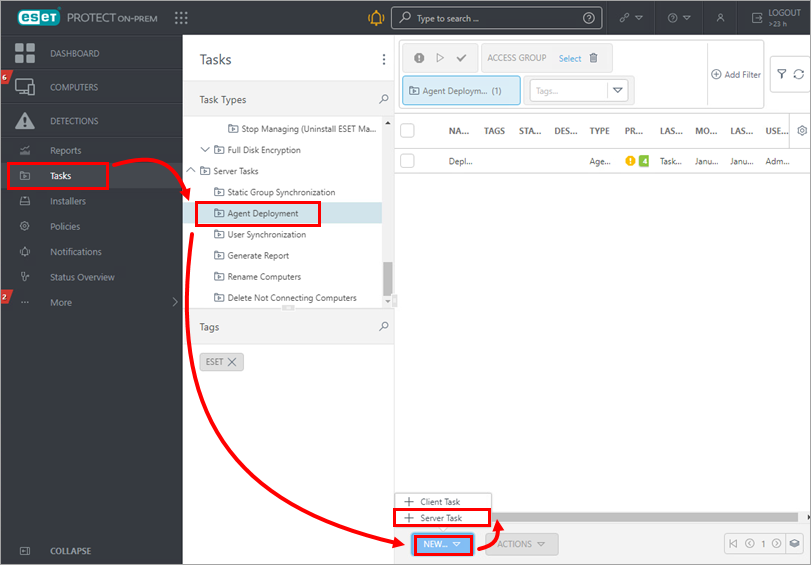
Click Tasks → Agent Deployment →New → Server Task.

Figure 1-1 -
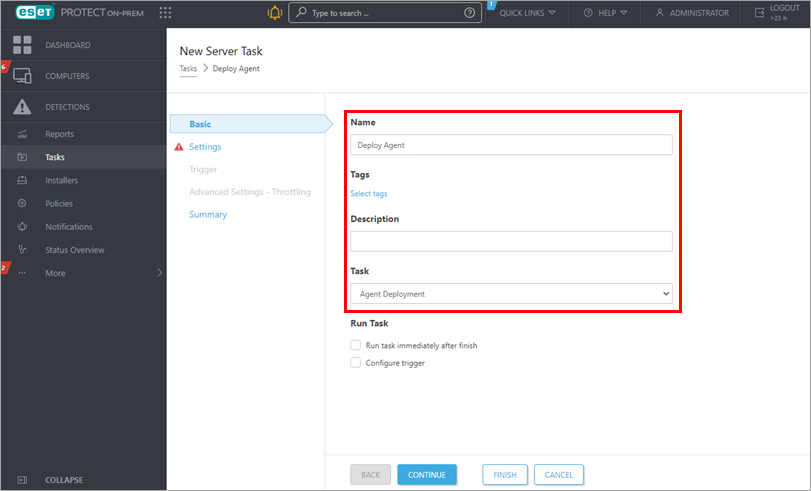
Type a Name and optional Description for your task. Select Agent Deployment from the Task drop-down menu.

Figure 1-2 -
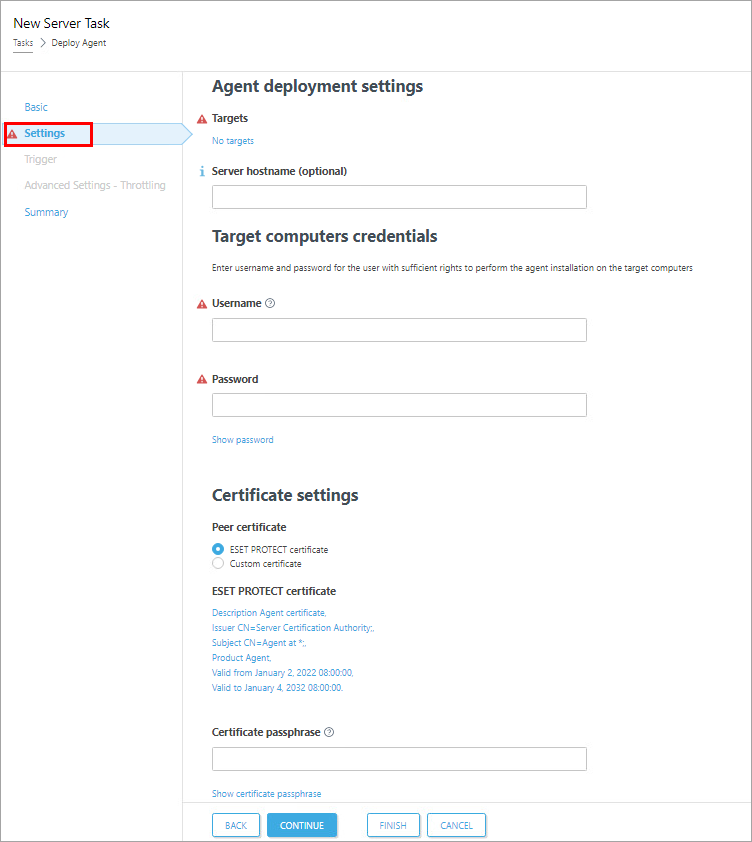
Click Settings, and configure the settings listed below to your preference (fields marked with a * are mandatory). ESET PROTECT Server can select the appropriate Agent installation package for operating systems automatically.

Figure 1-3
-
- *Targets — Select the clients that will receive this task. Click Targets, navigate to the group the target client workstations belong to, select the target clients and then click OK.
- Server hostname — Type a server hostname if the client hostname differs from that of the server. Alternatively, you can type the IP address if you are having hostname resolution issues.
- * Username/Password — The Username and Password fields are for the user with sufficient rights to perform a remote agent installation (not your ESET-issued Username). The username should be typed in the following format:
%domainname%\AdminUsername. - * Peer certificate/ESET PROTECT certificate — This is the security certificate and Certificate Authority for the agent installation. You can select the default certificate and Certificate Authority, or use custom certificates.
- Custom certificate — If you use a custom certificate for authentication, navigate to that certificate and select it when installing the Agent.
- Certificate passphrase — Optionally, you can create a password for the certificate. If you apply a password for a certificate, users will be required to type it before they can install ESET Management Agent using that certificate.
- Deselect the check box next to Participate in product improvement program if you do not agree to send crash reports and telemetry data to ESET. If the check box is left selected, telemetry data and crash reports will be sent to ESET.
-
Click ESET PROTECT Certificate and verify the correct certificate created during installation is selected.
-
Click the Summary section to review your configured settings and then click Finish.
If you are performing a new installation of ESET PROTECT On-Prem, deploy your ESET endpoint products.
Troubleshooting
If the remote deployment of Agent fails, refer to: