Issue
- After contacting ESET Technical Support, you may be asked to attempt activation and provide us with the ECP logs from your failed activation
- Enable Licensing Advanced Logging
- infoWebClientFlags.zip
Solution
![]() Business users: Create ECP logs using ESET Windows endpoint products.
Business users: Create ECP logs using ESET Windows endpoint products.
Enable Licensing Advanced Logging
If the Licensing advanced logging option is unavailable, follow the steps in the infoWebclientFlags.zip section.
-
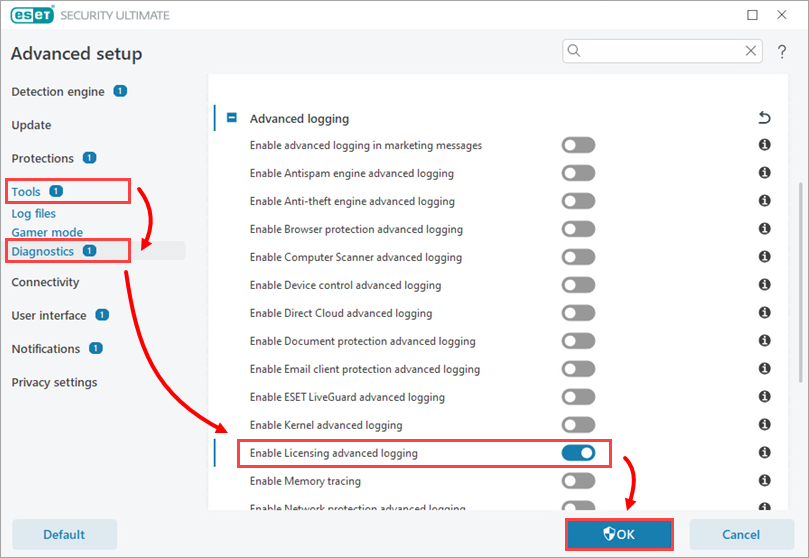
Press the F5 key to access Advanced setup.
-
Click Tools → Diagnostics.
-
Expand Advanced Logging and click the toggle next to Enable Licensing advanced logging is enabled. Click OK.
- Attempt to activate your ESET product again to reproduce the error and generate the log.
-
Navigate to the ECP folder, located at
C:\ProgramData\ESET\ESETSecurity\Diagnostics\ECP. - Select all the log files, right-click them and then select Send to → Compressed (zipped) folder from the context menu to create a .zip file.
- If you have not already done so, open a case with ESET Technical Support before you submit your
.zipfile.
- Attach the .zip file to an email reply to ESET Technical Support. A Technical Support representative will examine the log and respond as soon as possible with the recommended action based on their findings. If you are unable to attach a zipped log file, change the file extension to .file (for example, ECP.file).
infoWebClientFlags.zip
-
Download infoWebClientFlags.zip folder and save it to your Desktop.
-
Press the F5 key to access Advanced setup.
-
Click Detection engine (formerly Antivirus or Computer) → HIPS and click the toggle next to Enable Self-Defense to disable it. Click OK.

Figure 2-1 -
Restart your computer.
-
Open the infoWebClientFlags folder you saved in step 1, double-click infoWebClientFlagsEnable.reg and click Run.

Figure 2-2 -
Restart your computer.
-
Activate your ESET product again to reproduce the issue and generate the log.
-
Open the infoWebClientFlags folder, double-click infoWebClientFlagsDisable.reg and click Run.
-
Repeat steps 2-5. Confirm the toggle next to Enable Self-Defense is re-enabled.
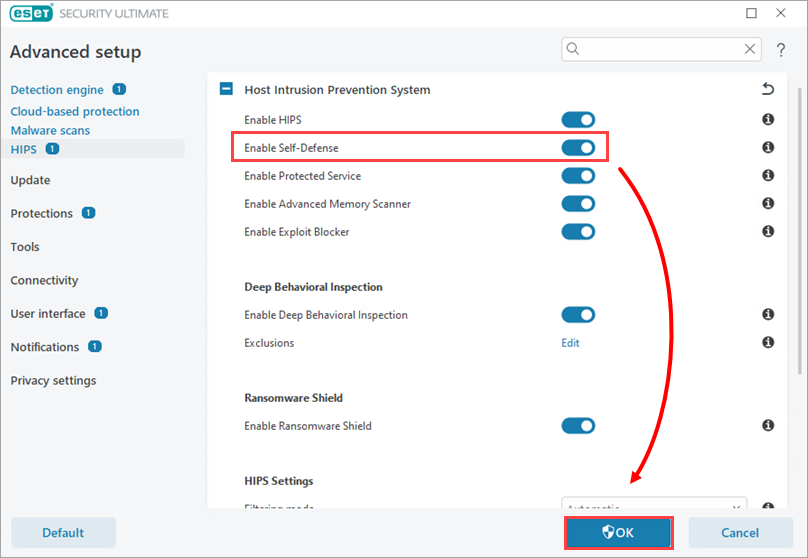
Figure 2-3 -
Navigate to the ECP folder, by default this folder is located at C:\ProgramData\ESET\\ECP, you may need to make hidden files visible to see this folder.
-
Select all the log files, right-click them and then select Send to → Compressed (zipped) folder from the context menu to create a .zip file.
-
If you have not already done so, open a case with ESET Technical Support before you submit your .zip file.
-
Attach the .zip file to an email reply to ESET Technical Support. A Technical Support representative will examine the log and respond as soon as possible with the recommended action based on their findings. If you are unable to attach a zipped log file, change the file extension to .file (for example, ECP.file).