Solution
On networks with mobile users, ESET security products can be configured to use dual update profiles. This allows the software to first attempt to update from the local LAN Update Server (Mirror); if the user is out of the office and unable to receive updates from the Mirror, the software will automatically attempt to update through the Internet, directly from the ESET update servers.
VIDEO:How do I create a dual update profile configuration with ESET Remote Administrator? (4.x
Creating the Secondary (Internet Updating) Profile
-
Open the ESET Remote Administrator (ERA) Configuration Editor by clicking Start → All Programs → ESET → ESET Remote Administrator Console → ESET Configuration Editor.
-
From the tree structure on the left, click ESET Smart Security, ESET NOD32 Antivirus → Update module and right-click Profile (My Profile).
-
From the context menu, click New Profile. The New Profile window will appear (See Figure 1-1).
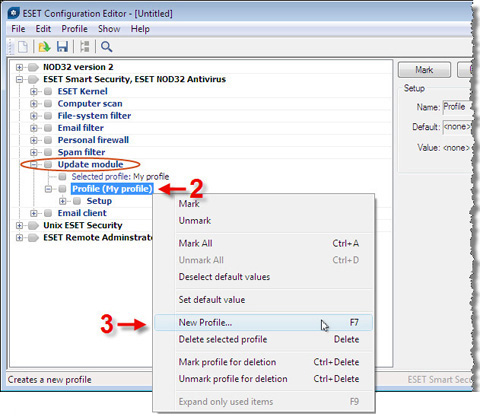
Figure 1-1
-
In the New Profile name field, type Internet Updating and click OK (See Figure 1-2).
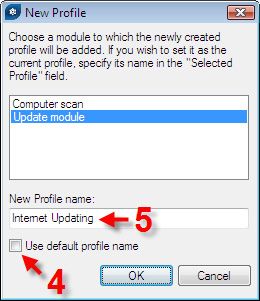
Figure 1-2
-
Click the + symbol next to the newly-created Profile (Internet Updating) to expand all options. Similarly, expand the Setup options.
-
Click on Username. In the right panel, enter the username from the license information provided by ESET (See Figure 1-3).
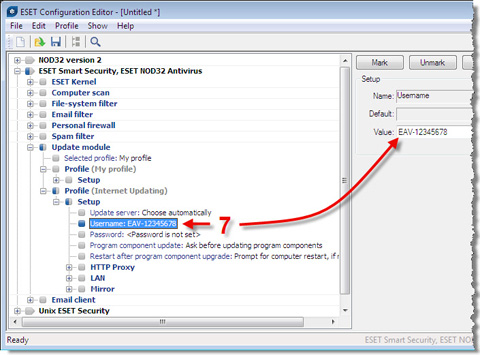
Figure 1-3
-
Click Password in the left column and then click the Set Password button in the right panel.
-
The Password window will appear. Enter the password from the license information provided by ESET, and then enter it once more to confirm. Click OK (See Figure 1-4).
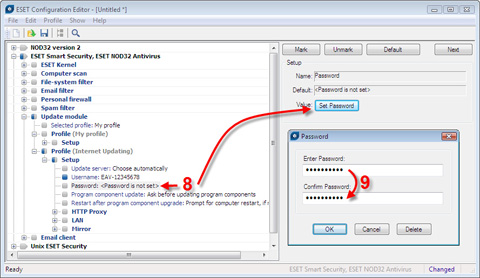
Figure 1-4
Activating dual profiles
-
From the tree structure, click ESET Smart Security, ESET NOD32 Antivirus → ESET Kernel → Setup → Scheduler/Planner.→ Scheduler/Planner. In the right panel, click the Edit button (See Figure 1-5).
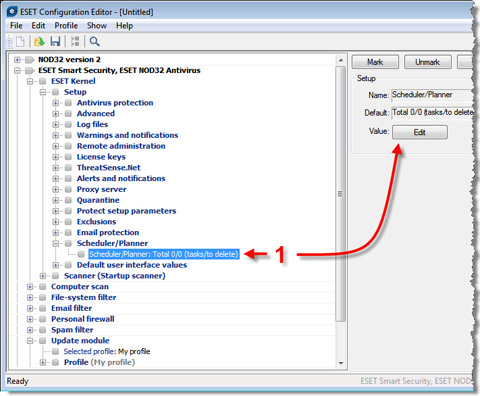
Figure 1-5
-
The Scheduled Tasks window will appear (not shown). Click the Add button in the lower-left corner to display the Add Task window.
-
From the drop-down menu, select Update. Click Next (See Figure 1-6).
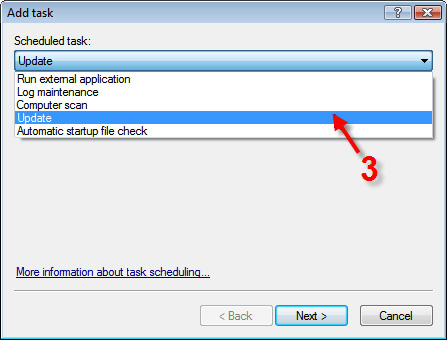
Figure 1-6
-
Type in the following and be precise: Regular automatic update. Select Repeatedly and click Next (See Figure 1-7).
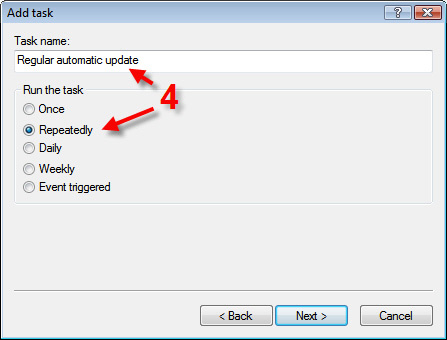
Figure 1-7
-
The next Add task window will appear, displaying the default interval time between updates. Leave the interval set to 60 min. and click Next (See Figure 1-8).
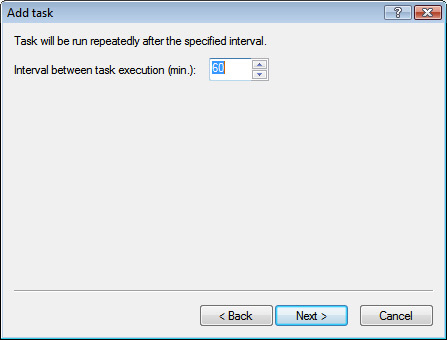
Figure 1-8
-
In the event that a scan does not run at the scheduled time (e.g., computer is off), the option is given to specify an alternate time. Select Wait until the next scheduled time and click Next (See Figure 1-9).
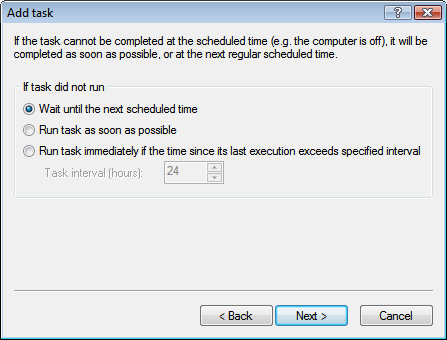
Figure 1-9
-
A Summary window with your chosen settings will be displayed (not shown). Review the settings and click Finish. The Special settings window will be displayed.
-
In the Name column, click Primary profile. From the Value drop-down menu, select My Profile.
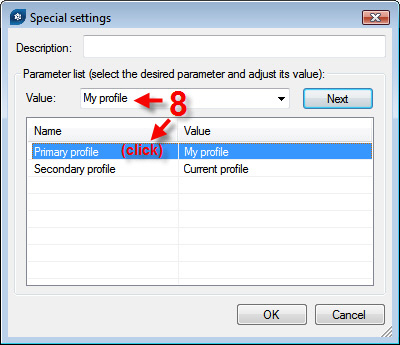
Figure 1-10
-
Click Secondary profile. From the Value drop-down menu, select user-defined name and then type Internet Updating (the profile created in step 4 of the previous section). Click OK.
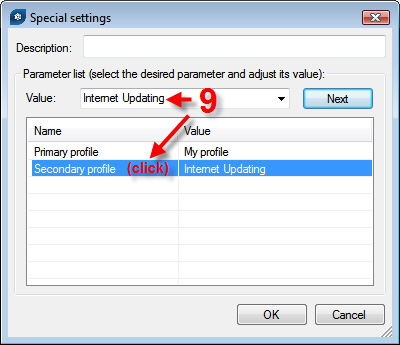
Figure 1-11
-
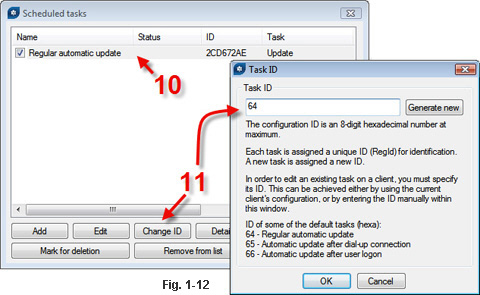
Click the new Scheduled task, Regular automatic update.
-
Click the Change ID button to display The Task ID window. Type in: 64. An ID of '64' tells the software that the scheduled task being created is a Regular automatic update. Click OK.
-
Click OK in the lower right corner of the Scheduled tasks window.
-
The ERA Configuration Editor window should still be open. Click the Save icon at the top of the window to save your new profile and scheduled tasks.
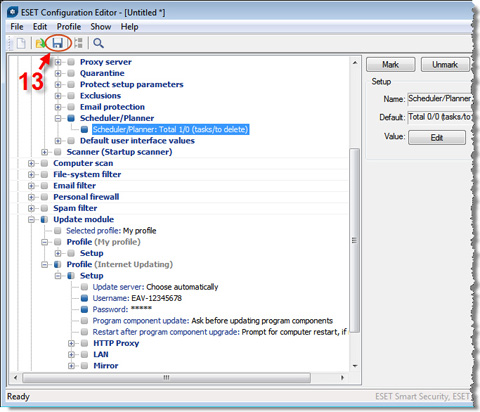
Figure 1-13
You can also use these same basic concepts when creating a new package, editing a package, or pushing out a new configuration to existing installations of ESET NOD32 Antivirus.