Issue
- Integrate ESET Secure Authentication with OWA
- Best practices for securing access to Microsoft Exchange services
Solution
Prerequisites
The instructions below require the following prerequisites:
- A working OWA environment
- Access to an account with "Domain Administrator" privileges
- A valid ESET Secure Authentication license
For further information, see the ESET Secure Authentication (ESA) Setup Checklist and the ESET Secure Authentication Installation Manual.
Install
-
Download the ESET Secure Authentication installer file.
-
On the system providing the OWA environment, run the installer file with Admin rights.
-
Review the license agreement and click I accept.
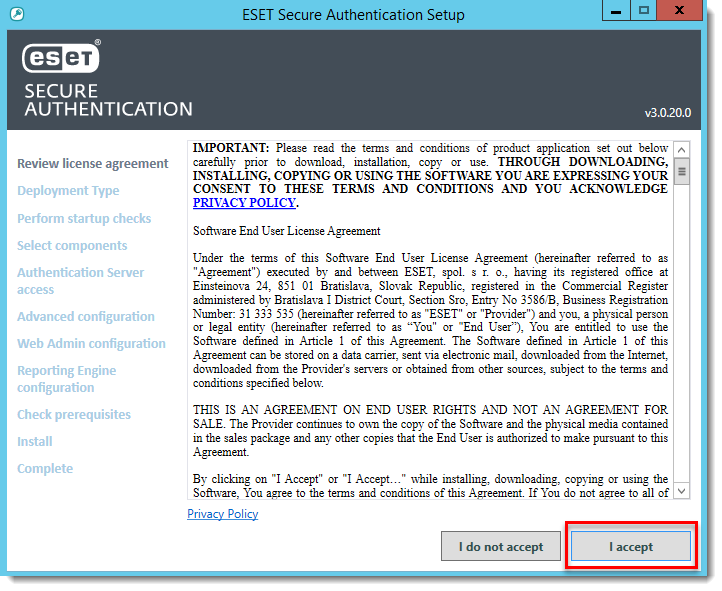
Figure 1-1
- Select the appropriate deployment type for the installation and click Next.
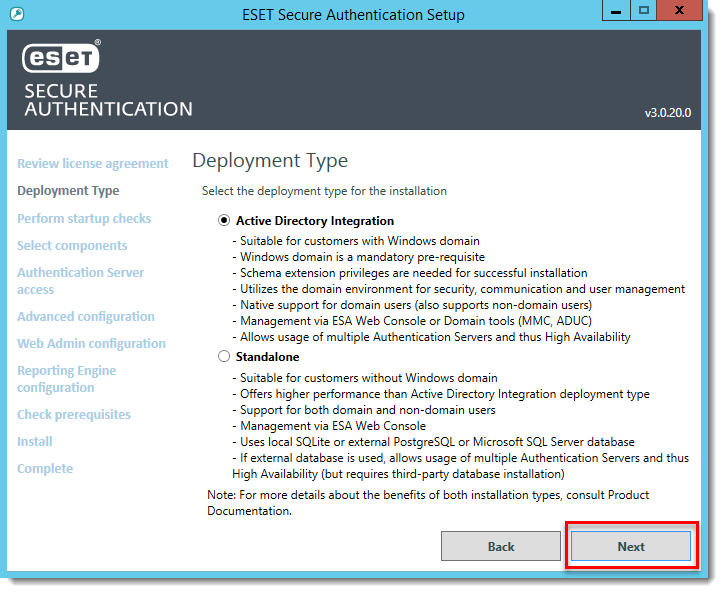
Figure 1-2
- Make sure all startup checks are Successful and then click Next.
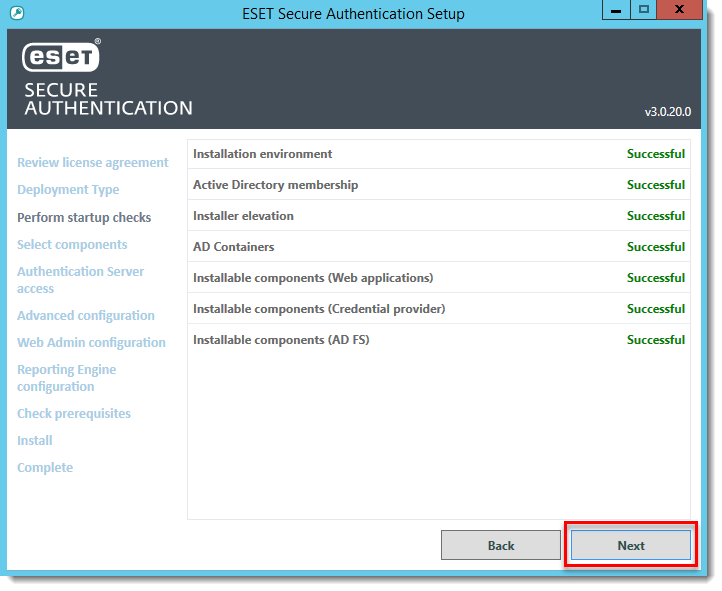
Figure 1-3
- Select which components you want to install and click Next. The following components are required:
- Authentication Server
- Microsoft Exchange Server
- Authentication Server
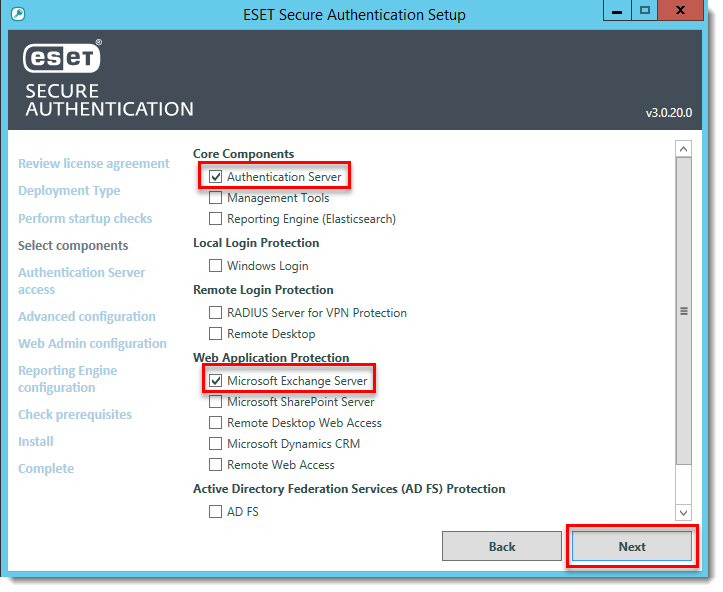
Figure 1-4
- Click Close when the installation completes.
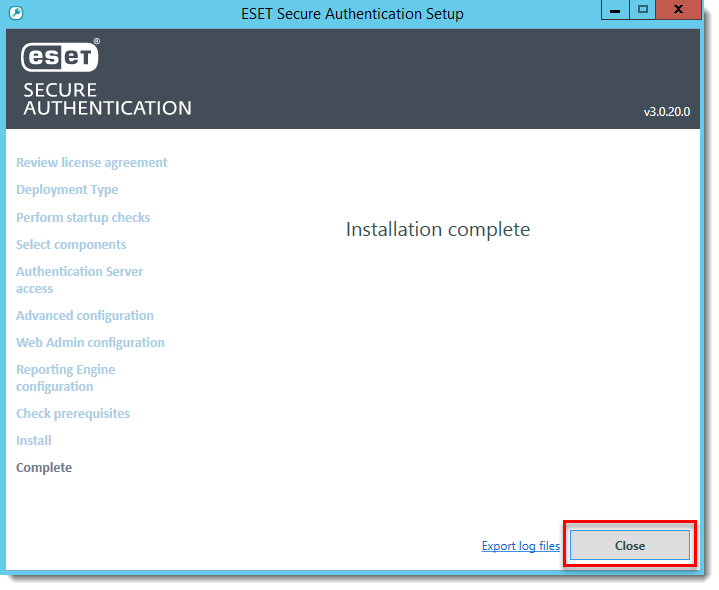
Figure 1-5
Configure
- Open the ESET Secure Authentication web console.
- Click Settings > License, and then select the applicable license type.
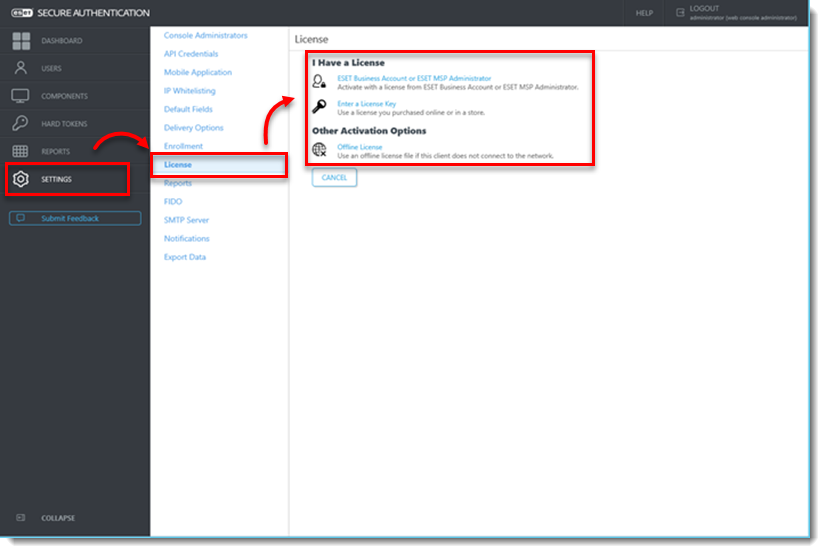
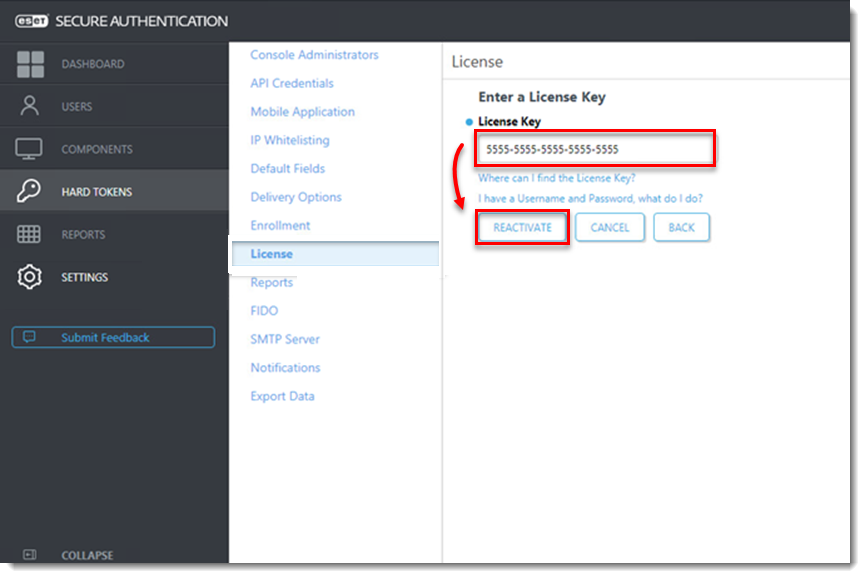
- Enter the License Key and click Activate (or Reactivate).
- Click Settings > Mobile Application, specify a token name and click Save.
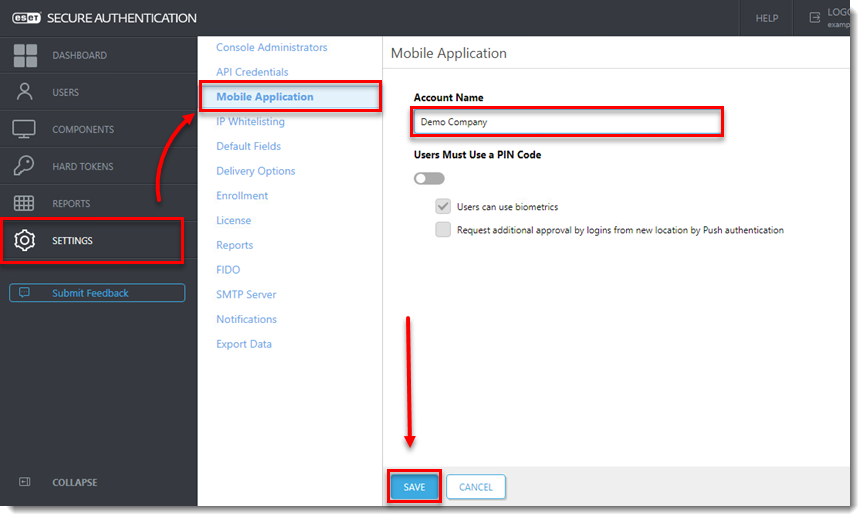
Figure 2-3
- Click Components and verify that the toggle next to 2FA is enabled is enabled for both Exchange Control Panel and Outlook Web App.
For enhanced security, we recommend deselecting the check box next to Allow NON-2FA for both Exchange Control Panel and Outlook Web App.
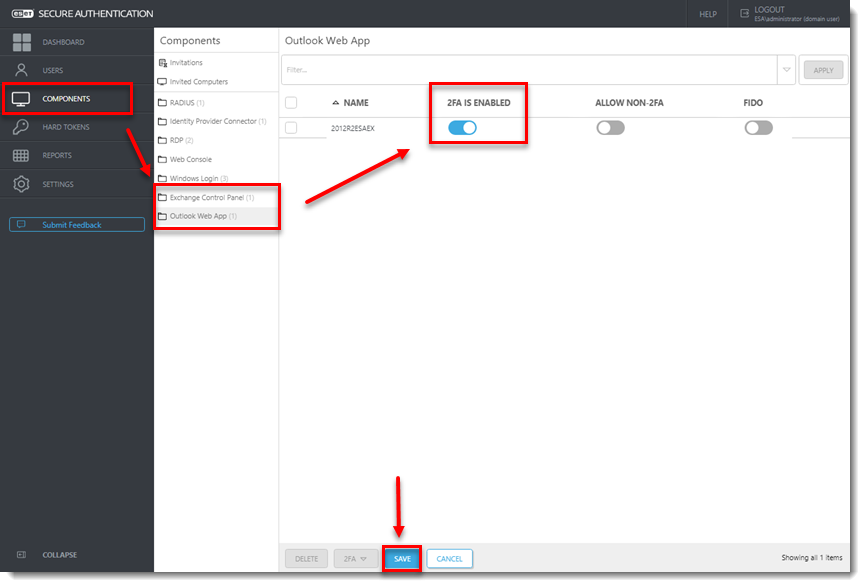
Figure 2-4
- Click Settings > IP Whitelisting and select the check box next to Enable per feature IP whitelisting and Outlook Web App. Type the following two addresses (for IPv6 and IPv4) to ensure that IT administrators cannot be completely locked out from the system if they are not able to use MFA:
- ::1
- 127.0.0.1
- Select the check box next to Exchange Control Panel to enable it.
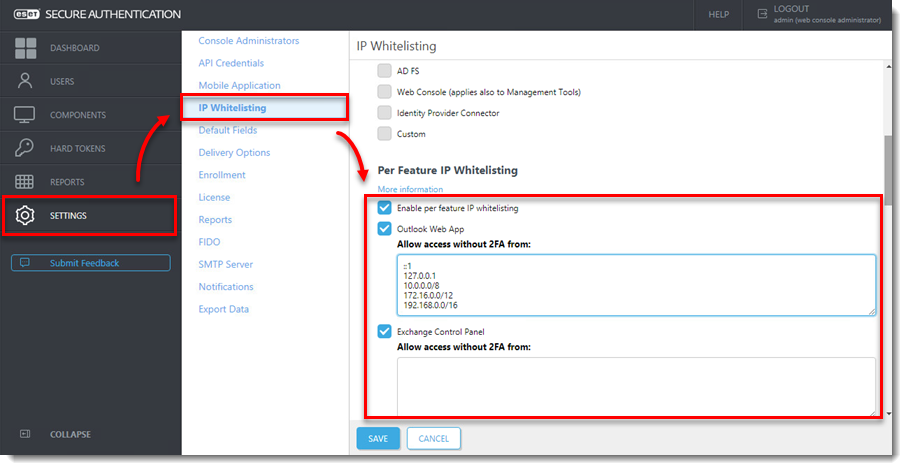
Figure 2-5
Enroll Users
To allow access to ESET Secure Authentication, users need to be configured for one of the available Token Types. The most basic Token Type is SMS-Based OTP. To enable this token, ensure all users have a mobile phone number configured for their account.
If all users have their mobile phone number set, follow the instructions below.
- Click Users and select the applicable Realm.
- Click the User name you want to enroll.
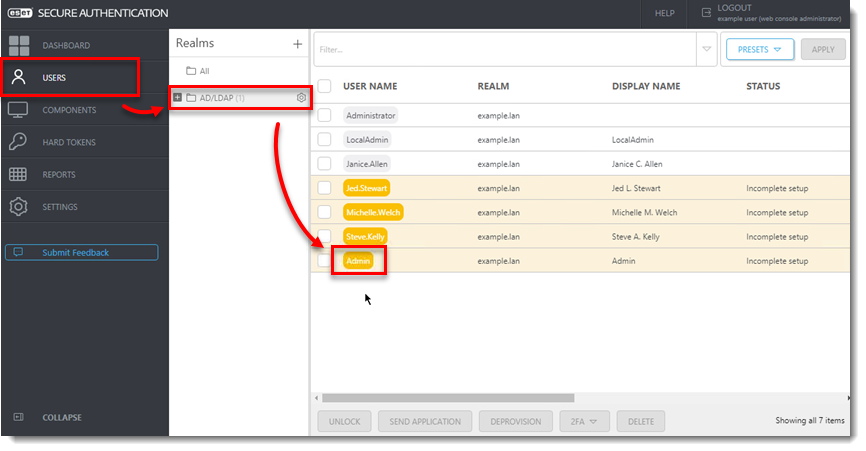
Figure 3-1
- Confirm that a valid phone number is entered, click the toggle next to the token type you want to send to enable it, then click Actions and select Send Application.
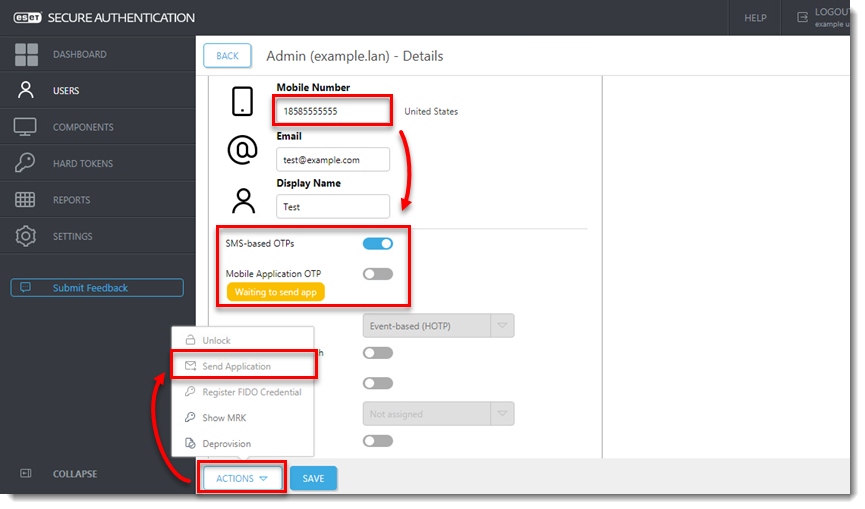
Figure 3-2
This user is now configured to use the assigned OTP. When the user attempts to log in to OWA, ESET Secure Authentication will request the user's OTP.
Enable Push token on Android mobile devices
If you want to use a push token instead of the SMS-Based OTP, follow the instructions below.
- Click Users and select the applicable Realm.
- Select the check box next to each user name you want to enable the push token for.
- Click 2FA, select Enable > Application Push.
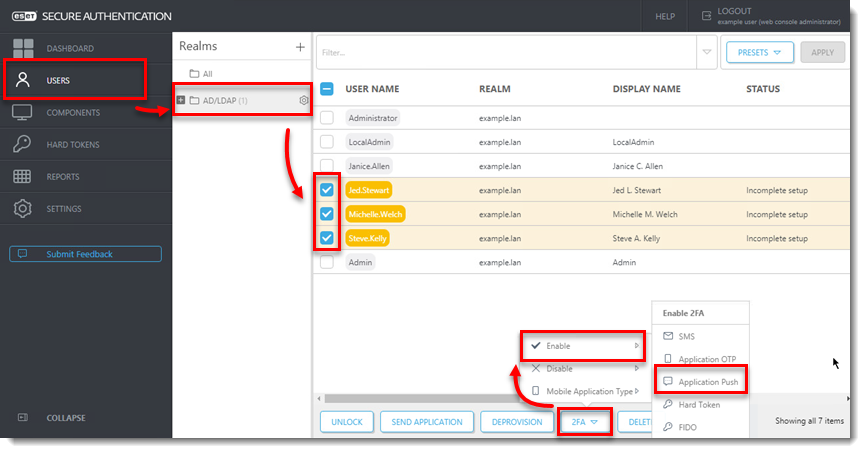
Figure 4-1
ESET Secure Authentication will display a randomly generated login ID and on the currently enrolled device, the user will receive a push notification asking to Approve or Reject the authentication attempt.
Harden Exchange Services
This section provides some security best practices.
A default installation of Microsoft Exchange Server will also provide a number of other services to the internet including ActiveSync and Exchange Web Services (EWS). Research shows that some of these services can be used to bypass MFA solutions such as ESET Secure Authentication. To prevent this, we strongly recommend that you limit access to these services from outside the company network.
ActiveSync
Microsoft ActiveSync allows mobile devices to easily connect to Microsoft Exchange. ESET Secure Authentication does not support Microsoft ActiveSync and therefore, we recommend that you limit access to this service.
We recommend that you specify only certain devices (for example, company phones) to connect via ActiveSync. This can be done through the Exchange Control Panel as well as the Exchange Management Shell.
Exchange Services
For all publicly available services, we recommend that you restrict access to the following services based on IP addresses:
- Autodiscover
- EWS
- mapi
- Microsoft-Server-ActiveSync
- OAB
- PowerShell
- Rpc
- To set these restrictions, open the OWA website in the Internet Information Services (IIS) Manager and navigate to IP Address and Domain Restrictions for each of the services listed above.
- In the Actions window, click Edit Feature Settings.
- From the Access for unspecified clients drop-down menu, select Deny.
- From the Deny Action Type drop-down menu, select Not Found.
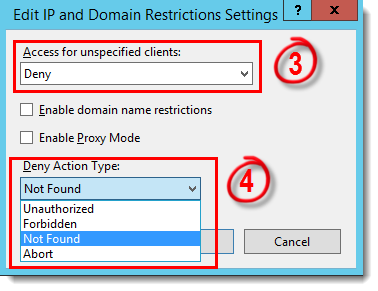
Figure 5-1
-
Click Add Allow Entry and in the Specific IP address field, add the following addresses (to prevent the system itself from being unable to access certain resources it might need during operation):
- ::1
- 127.0.0.1
-
Repeat steps 1– 5 for all services.