Issue
Solution
Access HIPS settings
Several settings affect how the Host-based Intrusion Prevention System (HIPS) monitors system operations, and they are accessible in the Advanced setup menu.
-
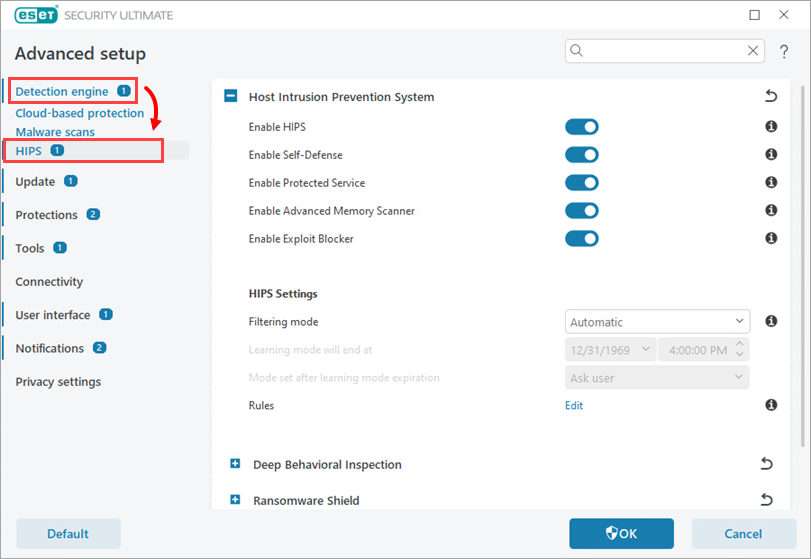
Press the F5 key to access the Advanced setup.
-
Click Detection Engine → HIPS.

Figure 1-1
The following settings can be accessed in the Basic section of the HIPS module:
- Enable HIPS – Re-enable HIPS if it has been disabled.
- Enable Self-Defense – The built-in Self-defense HIPS technology prevents malicious software from corrupting or disabling your antivirus and antispyware protection. Self-defense protects crucial system processes and ESET processes, registry keys and files from being tampered with. When disabled, click to enable the HIPS Self-Defense mechanism.
- Enable Protected Service – Enables kernel protection.
- Enable Advanced Memory Scanner – Works with Exploit Blocker to strengthen protection against malware that is designed to evade detection through the use of obfuscation or encryption. Advanced Memory Scanner is enabled by default.
- Enable Exploit Blocker – Fortifies commonly exploited application types such as web browsers, PDF readers, email clients and Microsoft Office components. Exploit Blocker now supports Java and helps improve detection and protection from these kinds of vulnerabilities.
Deep Behavioral Inspection
- Enable Deep Behavioral Inspection – An additional layer of protection that works as a part of the HIPS module. This HIPS extension analyzes the behavior of all programs running on the computer and warns you if the behavior of the process is malicious.
- Exclusions – You can exclude processes from the analysis. To ensure that all processes are scanned for possible threats, we recommend only creating exclusions when absolutely necessary.
Ransomware Shield
- Enable Ransomware Shield – Another layer of protection that works as a part of the HIPS module. It monitors the behavior of applications and processes that try to modify your personal data. If an application's behavior is considered malicious, or the reputation-based scanning shows an application to be suspicious, the application will be blocked or the user will be prompted to block or allow it.
HIPS settings
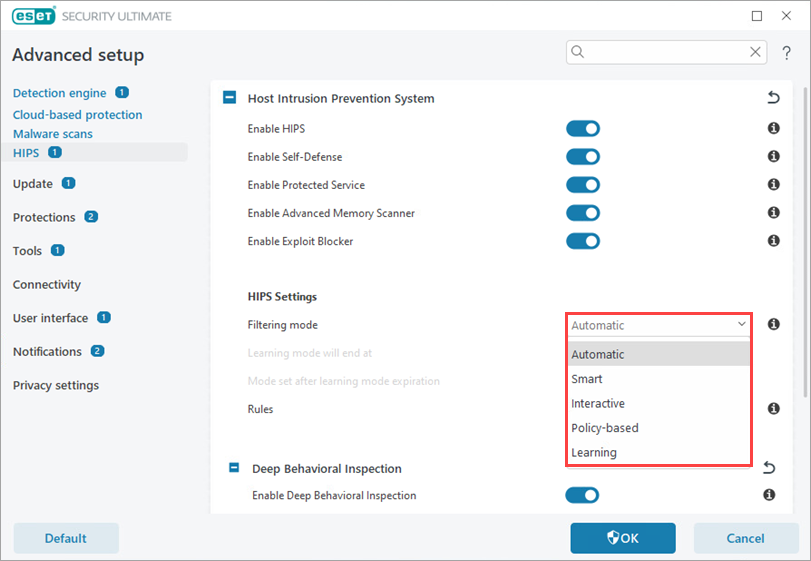
Filtering Mode – There are five filtering modes you can select to change how HIPS filters system activity.
- Automatic mode: This is the default setting. In this mode, operations are enabled except for those that are blocked by pre-defined rules that protect your system.
- Smart mode: You will only receive notifications about suspicious system events.
- Interactive mode: Only recommended for advanced users. You will receive notifications that prompt you to Allow or Deny each operation detected. Select the Create rule check box to save your response as the rule for a given operation. Selecting the check box next to Temporarily remember this action for this process will cause the action (Allow/Deny) to be remembered until HIPS rules are changed, the HIPS filtering mode is changed, the HIPS module is updated or your computer is restarted.
- Policy-based mode: Operations not defined by a rule are blocked. See HIPS – Advanced setup for more details.
- Learning mode: In Learning mode, operations are enabled and a rule is created after each operation. Rules created in this mode can be viewed in the Rule editor, but their priority is lower than the priority of rules created manually or rules used in Automatic mode.
- Selecting Learning mode enables the Learning mode will end at option. When the specific time period passes, the Learning mode is disabled. The maximum time period is 14 days. After this time period has passed, you will be prompted to edit the rules and select a different filtering mode.

Figure 2-1
- Selecting Learning mode enables the Learning mode will end at option. When the specific time period passes, the Learning mode is disabled. The maximum time period is 14 days. After this time period has passed, you will be prompted to edit the rules and select a different filtering mode.
-
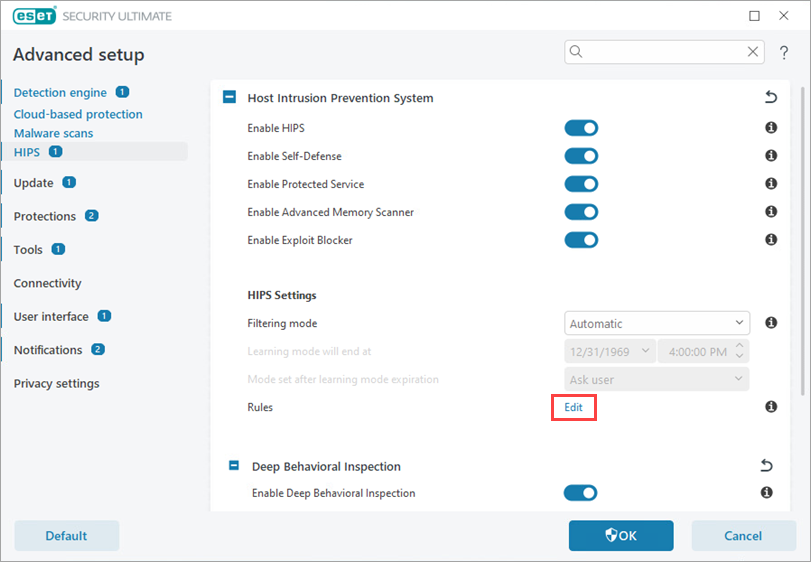
Rules editor – Click Edit to add, modify, or remove HIPS rules.

Figure 2-2
Advanced setup
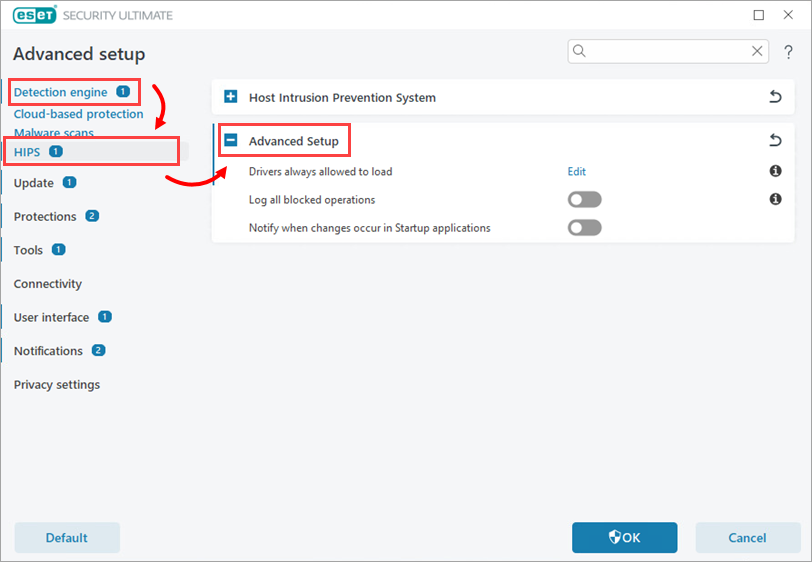
Click Detection Engine and click HIPS → Advanced setup to access more settings for debugging and analyzing an application's behavior.

HIPS → Advanced setup contains the following settings:
- Drivers always allowed to load: Selected drivers are always allowed to load regardless of configured filtering mode unless explicitly blocked by user rule.
- Log all blocked operations: All blocked operations will be written to the HIPS log. Use this feature only when troubleshooting or requested by ESET Technical Support, as it might generate a huge log file and slow down your computer.
- Notify when changes occur in Startup applications: Displays a desktop notification each time an application is added or removed from system startup.