Issue
- Automatically enable ESET LiveGuard Advanced (formerly ESET Dynamic Threat Defense) on compatible products in your network using ESET PROTECT
Solution
Prerequisites
- Activate ESET LiveGuard Advanced. You must import the ESET LiveGuard Advanced license using ESET PROTECT Hub (EPH), ESET Business Account (EBA) or ESET MSP Administrator
- Client machines with a version of ESET Management Agent that is not earlier than the version of the Server component
- Activated ESET security products that are compatible with ESET LiveGuard Advanced
- Create a dynamic group: ESET LiveGuard compatible
- Create a dynamic group: Missing ESET LiveGuard license
- Create a dynamic group: ESET LiveGuard license
- Create a policy for ESET LiveGuard (EES/EEA)
- Create a policy for ESET LiveGuard (ESET Server Security)
- Apply policies to the group (ESET LiveGuard Activated)
- Click Computers, expand Windows computers, click Windows (desktops) → gear icon.
 In the program menu window, click New Dynamic Group.
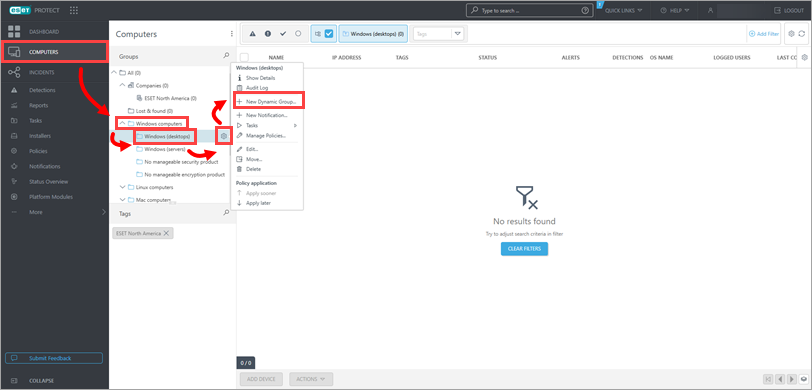
Figure 1-1 -
Type a name for the new group (in this example, ESET LiveGuard compatible). The Description field is optional.
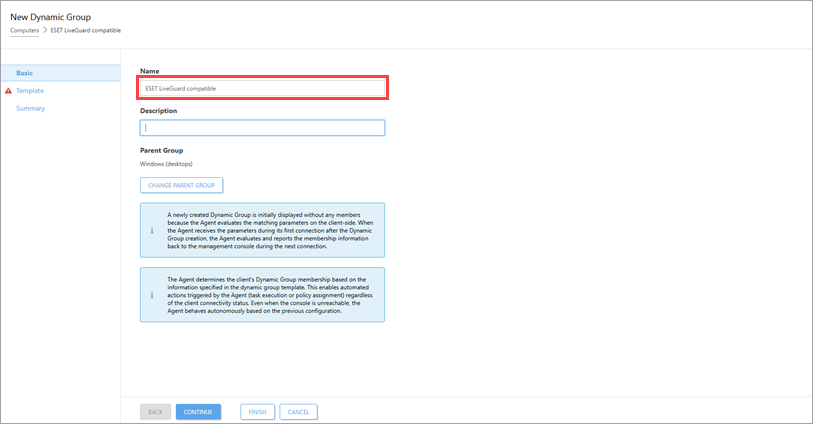
Figure 1-2 -
Click Template → New.
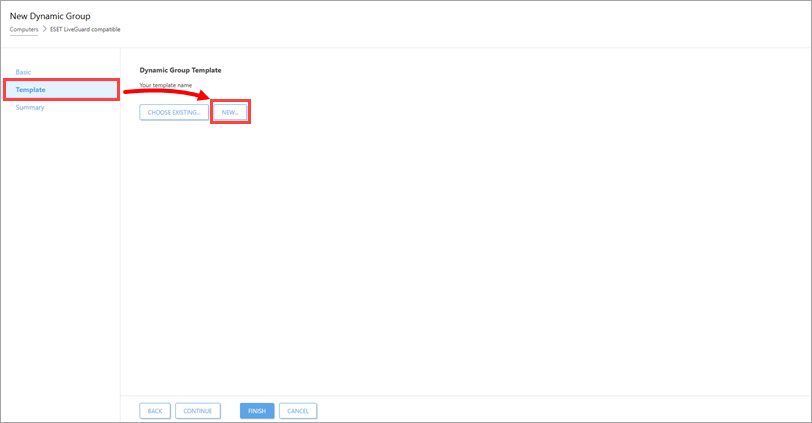
Figure 1-3 -
Type a name for your template (the Description field is optional) and click Expression.
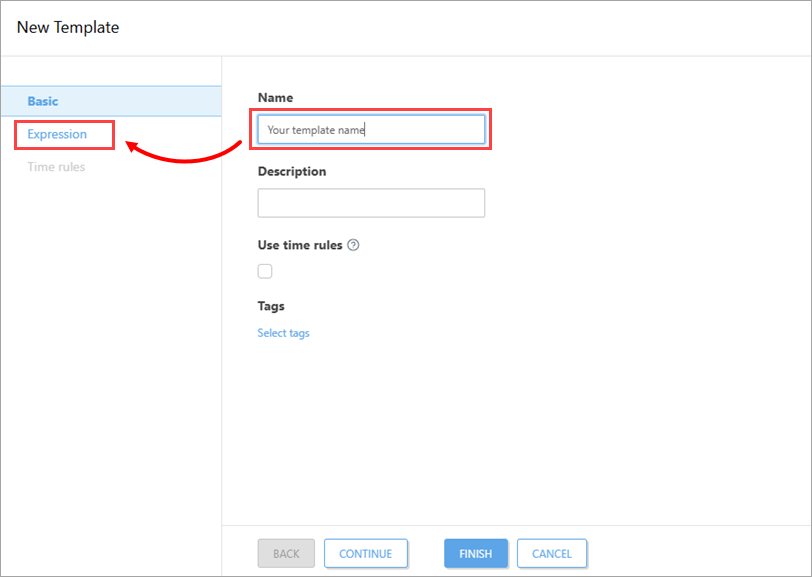
Figure 1-4 -
Click Add Rule.
-
In the dialog window, expand Installed software, select Application name and click OK.
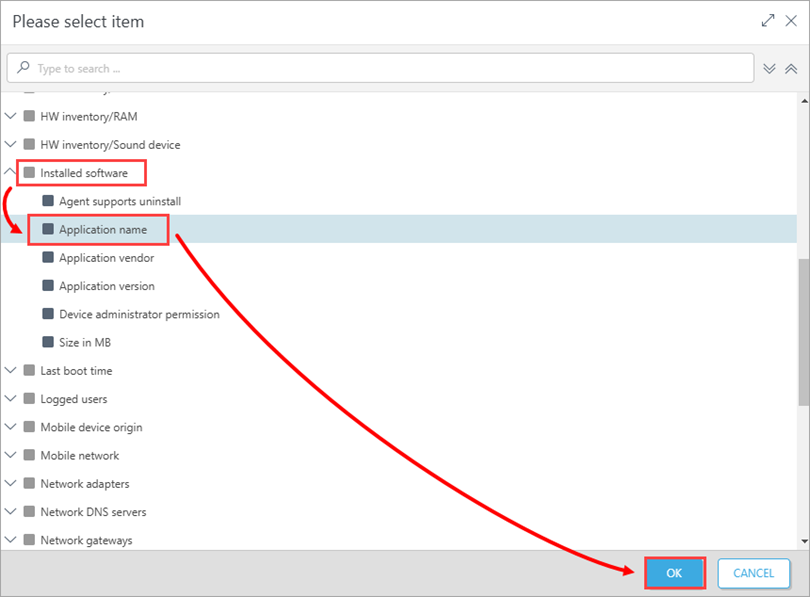
Figure 1-5 -
Ensure that the operator next to Installed software . Application name is set to is one of. Click Add → Add to add two additional fields, then type in the values listed below and click Finish → Finish.
- ESET Endpoint Security
- ESET Endpoint Antivirus
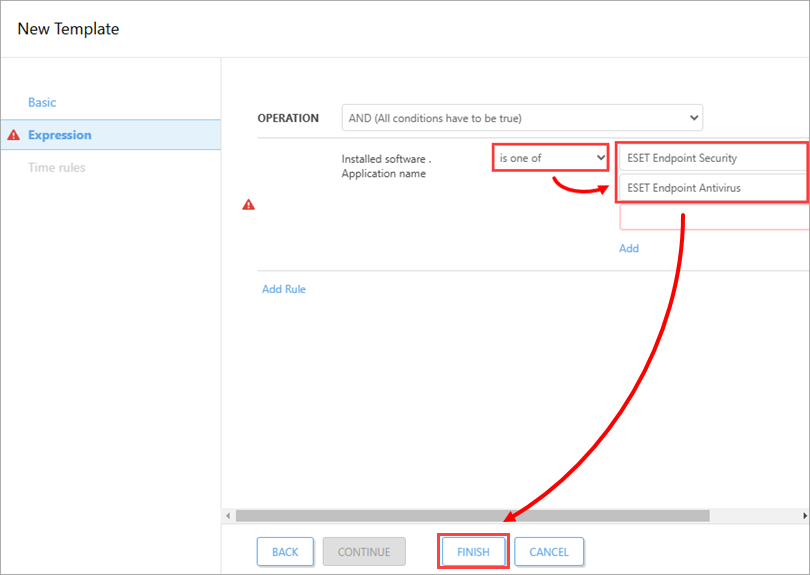
Figure 1-6
II. Create a dynamic group: Missing ESET LiveGuard Advanced license
-
Click Computers, expand Windows computers → Windows (desktops) and click ESET LiveGuard Compatible → gear icon.
In the program menu window, click New Dynamic Group.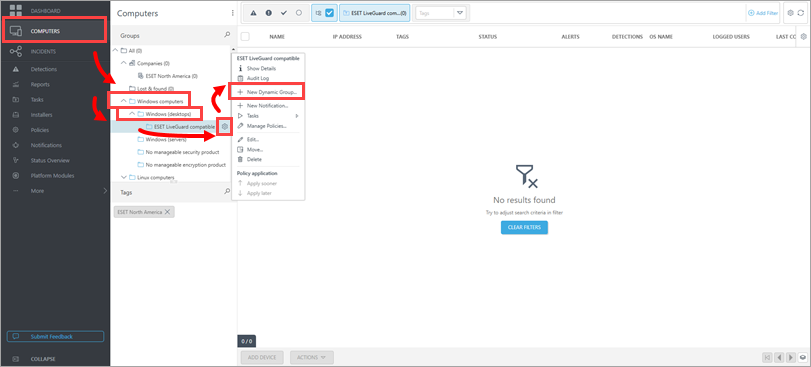
Figure 2-1 -
Type a name for the new group (in this example, Missing ESET LiveGuard license). The Description field is optional.
-
Click Template → New and type a name for your template (the Description field is optional).
-
Click Expression, select NOR (All conditions have to be false) from the drop-down menu next to Operation and click Add Rule.
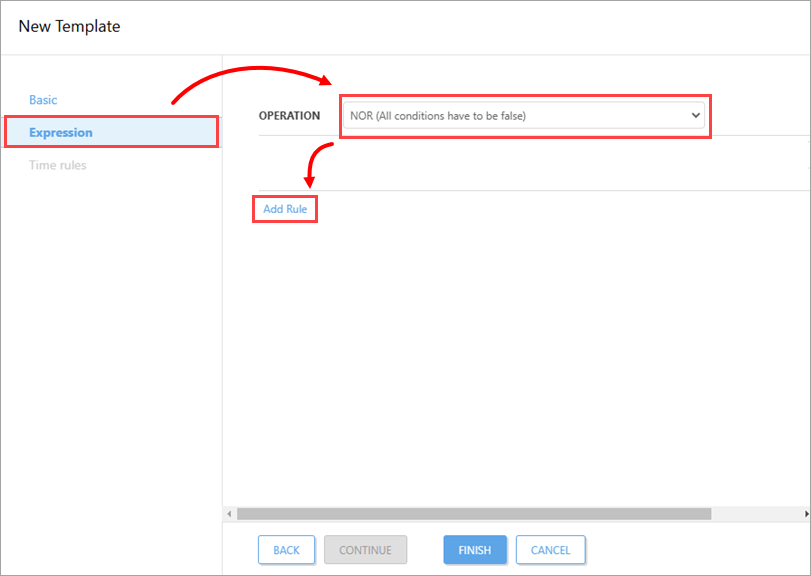
Figure 2-2 -
In the dialog window, expand Activation and click License product name → OK.
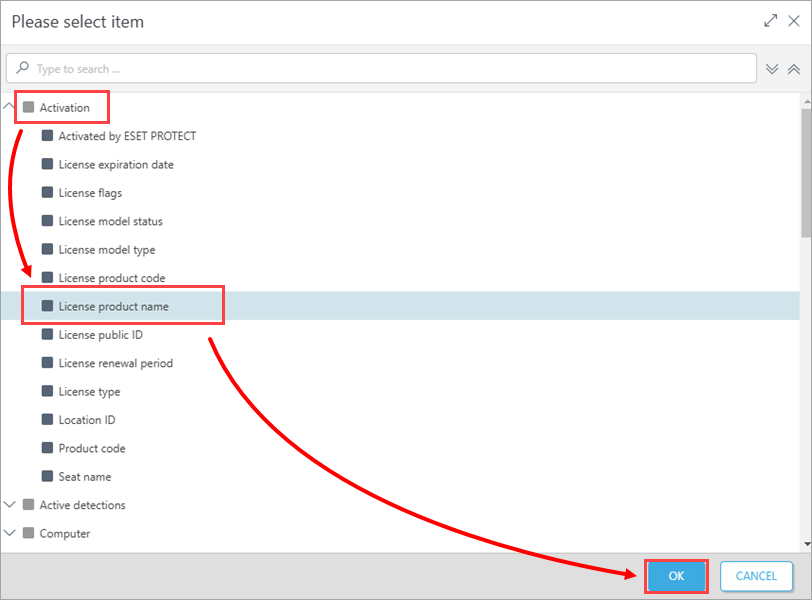
Figure 2-3 -
Change the value to contains in the drop-down menu next to Activation . License product name. Type ESET LiveGuard Advanced to the respective field and click Finish → Finish.
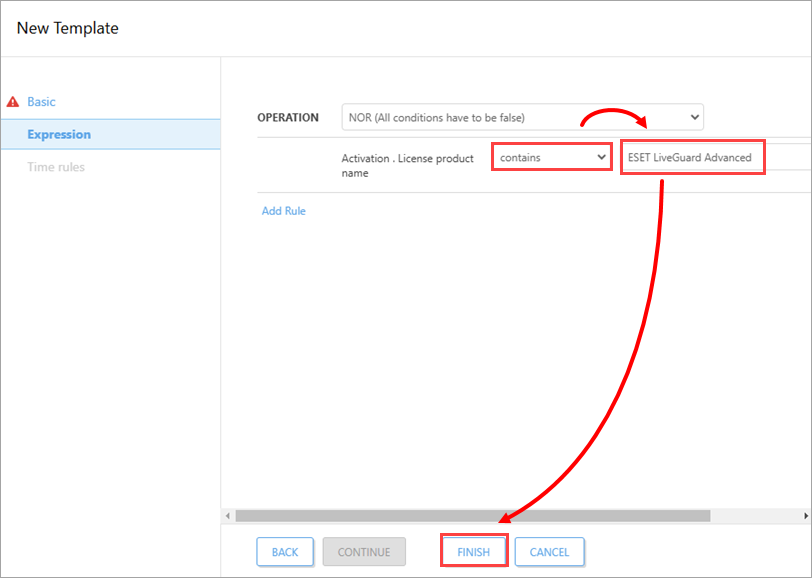
Figure 2-4
III. Create a dynamic group: ESET LiveGuard license
-
Click Computers, expand Windows computers → Windows (desktops) and click ESET LiveGuard compatible → the gear icon.
In the program menu window, click New Dynamic Group. -
Type a name for the new group (in this example, ESET LiveGuard license). The Description field is optional.
-
Click Template → New and type a name for your template (the Description field is optional).
-
Click Expression → Add Rule.
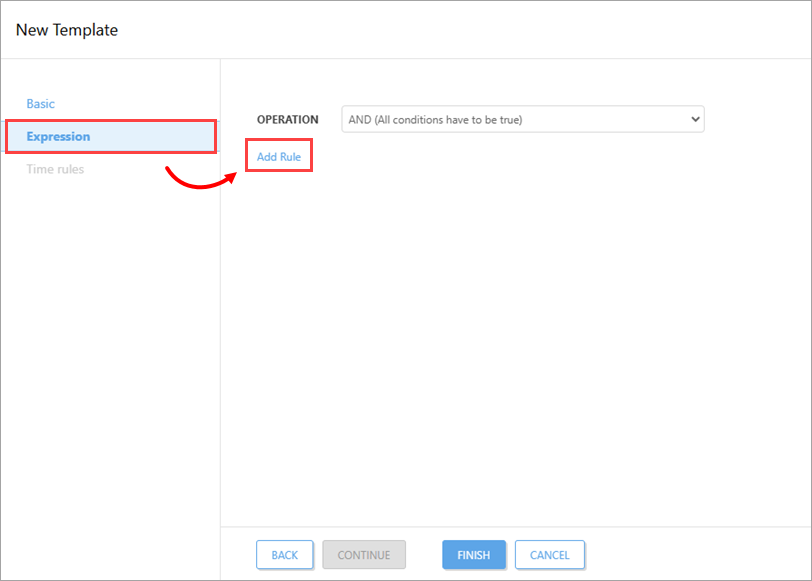
Figure 3-1 -
In the dialog window, expand Activation and click License product name → OK.
Figure 3-2 -
Change the value to contains in the drop-down menu next to Activation . License product name. Type ESET LiveGuard Advanced into the respective field and click Finish.
-
Click Finish to save the Dynamic group.
IV. Create a policy for ESET LiveGuard (EES/EEA)
-
Click Policies → New Policy.
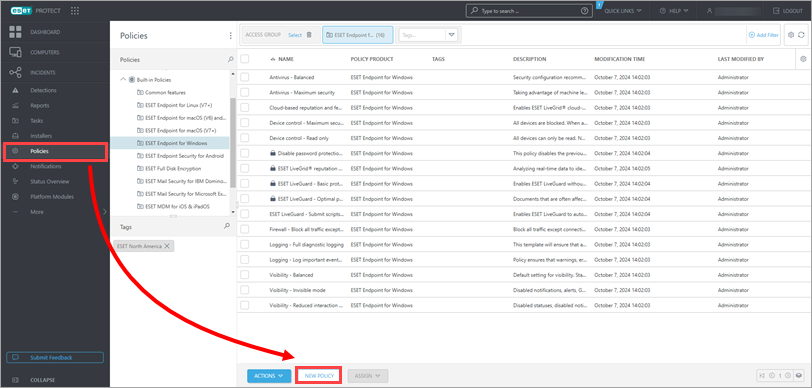
Figure 4-1 -
Type a name for the new policy (in this example, Enable ESET LiveGuard (EES/EEA). The Description field is optional. Click Continue.
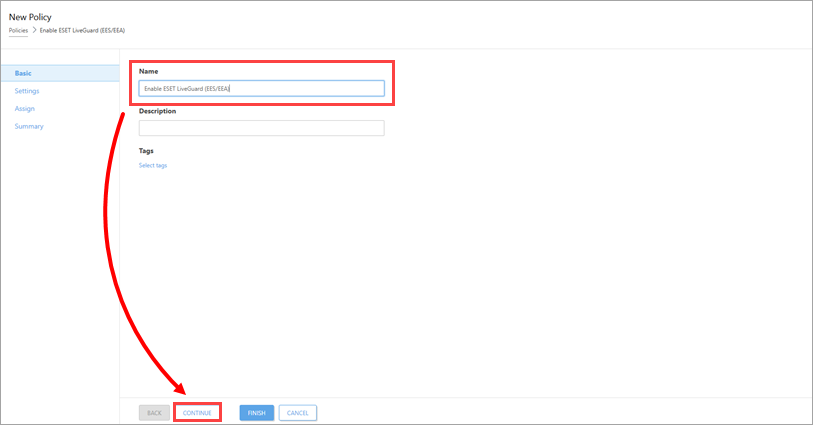
Figure 4-2 -
Select ESET Endpoint for Windows from the drop-down menu. Expand Protections, click Cloud-based protection and click the toggle next to Enable ESET LiveGrid® reputation system (recommended) and Enable ESET LiveGrid® feedback system to enable these options. These settings are necessary on each device where ESET LiveGuard is enabled.
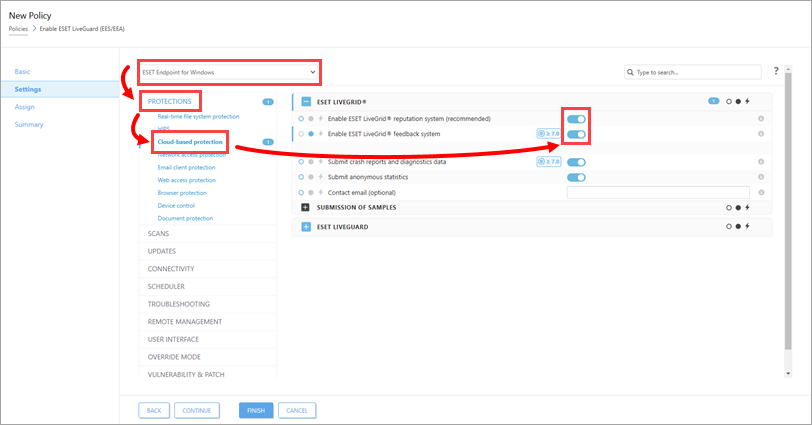
Figure 4-3 - Expand ESET LiveGuard, click the toggle next to Enable ESET LiveGuard to enable it and click Finish.
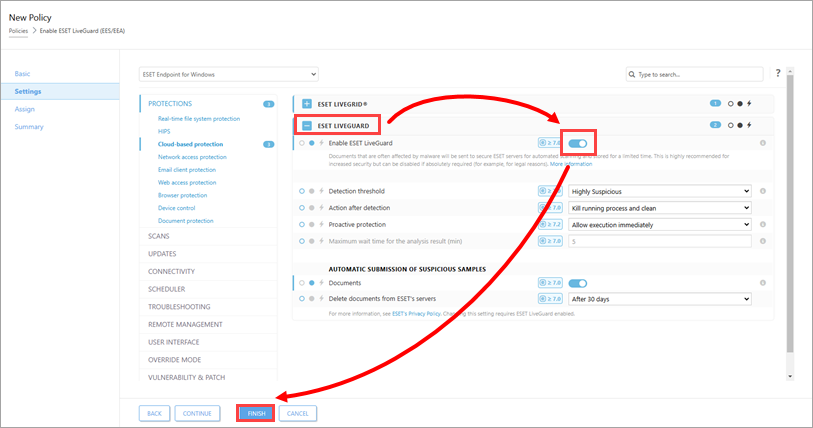
Figure 4-4
V. Create a policy for ESET LiveGuard (ESET Server Security)
-
Click Policies → New Policy.
-
Type a name for the new policy (for example, ESET LiveGuard (ESET Server Security). The Description field is optional. Click Continue.
-
In the Settings section, select ESET Server/File Security for Microsoft Windows Server (V6+) from the drop-down menu. Expand Detection Engine, click Cloud-based protection and click the toggle next to Enable ESET LiveGrid® reputation system (recommended) and Enable ESET LiveGrid® feedback system to enable these options.
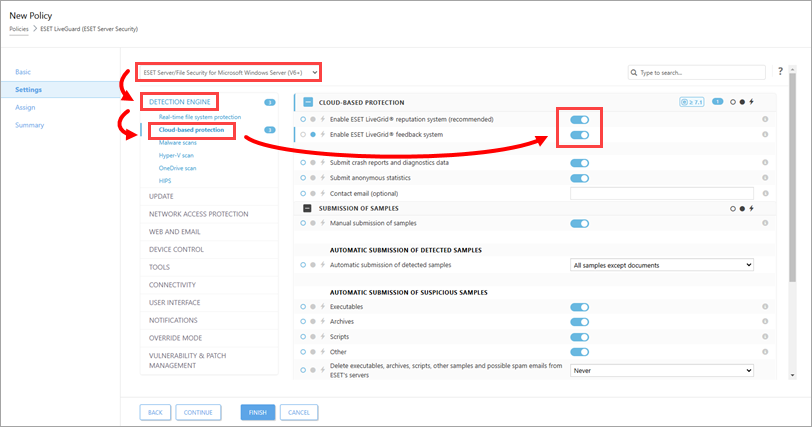
Figure 5-1 - Expand ESET LiveGuard, click the toggle next to Enable ESET LiveGuard to enable it and click Finish.
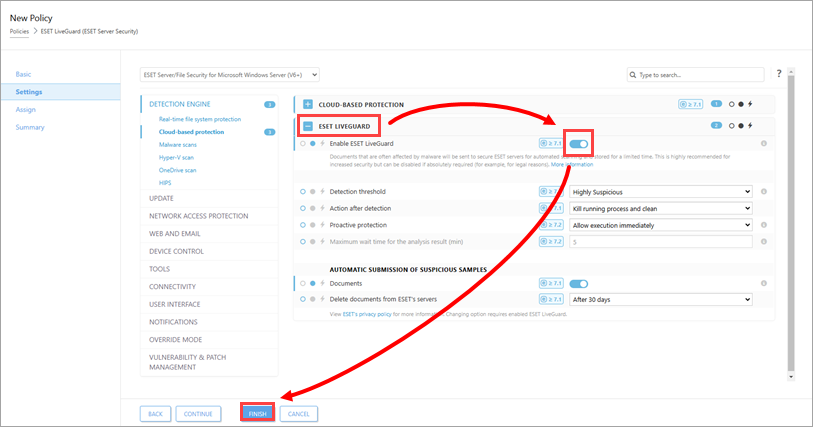
Figure 5-2
VI. Apply policies to that group (ESET LiveGuard activated)
-
Click Computers, expand Windows computers → Windows (desktops) and click ESET LiveGuard compatible → ESET LiveGuard license Dynamic group you created in section III and click the gear icon. In the program menu window, click Manage Policies.
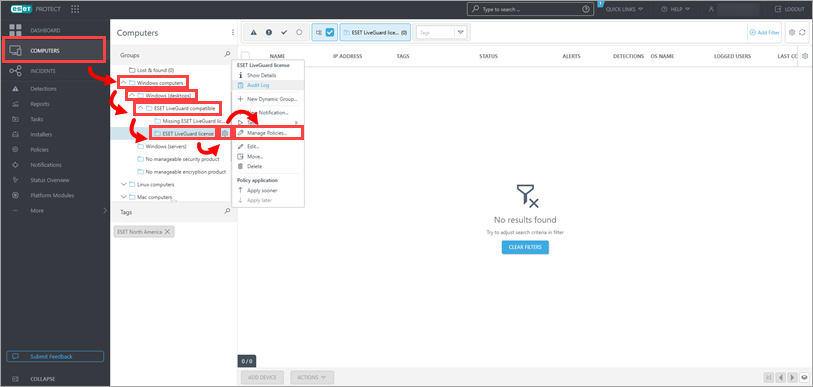
Figure 6-1 -
Click Add Policy.
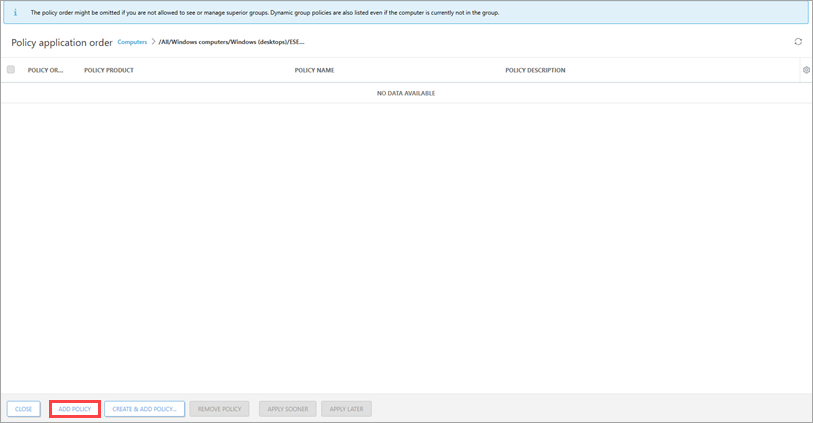
Figure 6-2 -
Select the check boxes next to the two policies you created in Section IV and Section V and click OK.

Figure 6-3
When the ESET Management Agent contacts the ESET PROTECT Server the policies will be applied to the applicable products. Each connected client machine with a compatible ESET LiveGuard-activated product receives this policy and enables ESET LiveGuard.