Issue
- The following guide details the steps to take if a new user is given ownership of a workstation managed by an ESET Endpoint Encryption (EEE) Server and the old user needs to be removed from the machine.
Solution
Activate the new user
- Login under the new Windows profile of the new user on the workstation in question. When prompted for an activation code, activate the user as detailed in the following article: [KB7157] Activate ESET Endpoint Encryption Client using ESET Endpoint Encryption Server
Add the new user to Full Disk Encryption
If the system is already full disk encrypted, then the new user will require an FDE login on the machine. This can be skipped if Full Disk Encryption is not already in place on the machine.
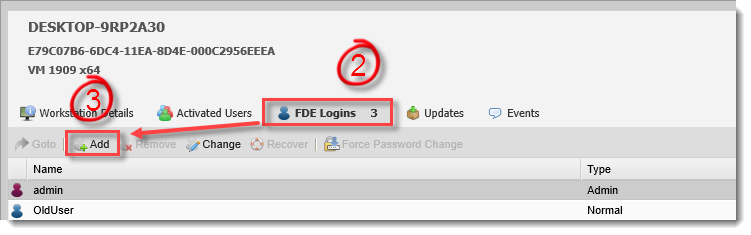
- View the Workstation Details of the Workstation.
- Select the FDE Logins tab.
- Click the Add button.
- Select the login type, then click Next.
- Select the Email address of the user that was activated during the "Activate a new user" steps above, then click Next.
- Fill out the required details for the Add FDE Login command, then click Add.

- Synchronize the client workstation to receive the command, then the EEE Server.
- You should now find the new login listed in the FDE login tab with a status of OK.
- At this point, you may like to get the new user to restart the system and verify they can successfully boot through the ESET Endpoint Encryption (EEE) Preboot screen with their FDE login details.
Deactivate the original user
This will remove the original user from the system.
Important: You will need the original Windows profile of the user being targeted for deactivation to be loaded for this command to be processed successfully.
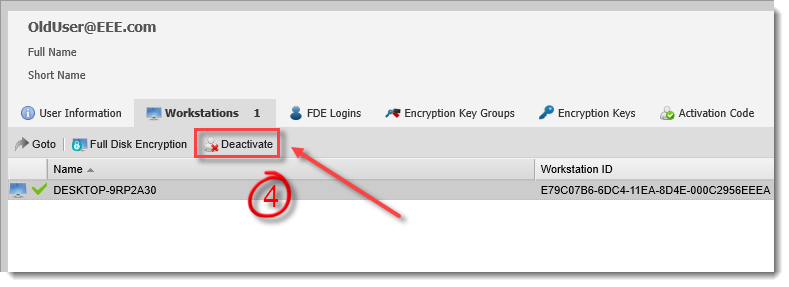
- View the User Information of the User.
- Select the Workstations tab.
- Select the machine they are being removed from in the list of Workstations.
- Click the Deactivate button.
- Set the Are you sure you want to deactivate this user? checkbox to confirm the operation.
- Click the Deactivate button.

- Log in to the Windows profile of the original user being deactivated. If the user is logged in, click the Proxy Sync menu item from the EEE menu.
- On the EEE Server, click the Proxy Sync button in the lower left corner.
Note: If the user has been deactivated from all the machines they use, they will still be using a license on the EEE Server, indicated by their blue icon. If they will no longer require a license this can be resolved by revoking the user license from the EEE Server, as detailed below.
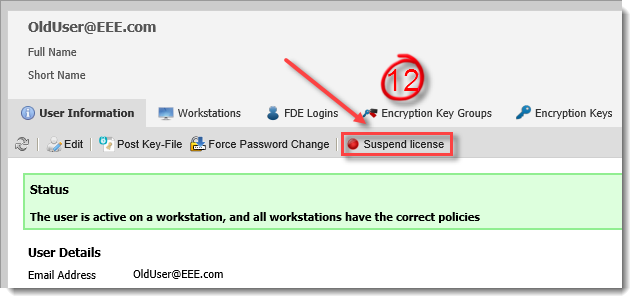
- Select the Users branch in the left-hand navigation tree.
- Select the user in the list of users in the EEE Server.
- Click the Details button.
- Click the Suspend license button.
- Click Yes to suspend the license.
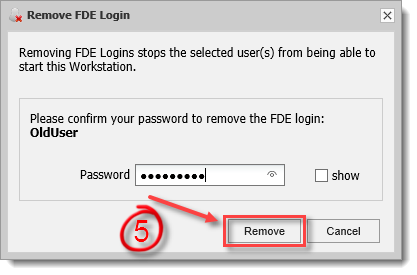
Remove the old user's FDE login
This process will only be required if the machine uses Full Disk Encryption.
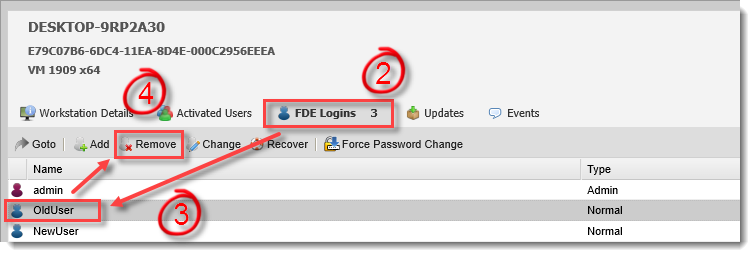
- View the Workstation Details of the Workstation.
- Select the FDE Logins tab.
- Select the old user's FDE login in the list of logins (you can use the associated user field to identify the correct login).
- Click the Remove button.
- Enter your password, then click the Remove button.
- The login will change state to Delete Pending.
- The operation will happen automatically over time. To speed up the process, perform a manual sync of the client workstation, then on the EEE Server, click the Proxy Sync button in the lower left corner.
- When the command has been processed, the login will be removed from the list of FDE Logins.