Solution
Introduction
This article describes how to configure a Barracuda NG Firewall® device to authenticate users against an ESA Server. Before proceeding, verify that you've installed the RADIUS Server component of ESET Secure Authentication and can access the RADIUS service that allows external systems to authenticate users.
Before your Barracuda NG Firewall® device can use the ESA Server to authenticate users via RADIUS, it must be set up as a RADIUS client on the ESA Server. Next, your server running the ESA RADIUS service must be setup as a RADIUS Server on the Barracuda NG Firewall® device. Once these configurations have been specified, you can start logging into your Barracuda NG Firewall® using ESA OTPs.
Step I - RADIUS client configuration
The RADIUS protocol requires that access requests to RADIUS servers include the IP address for the RADIUS client (for example, the Barracuda NG Firewall® device).
To allow the Barracuda NG Firewall® device to communicate with your ESA Server, you must configure the device as a RADIUS client on your ESA RADIUS Server:
- Launch the ESA Management Console (found under Administrative Tools).
- Navigate to RADIUS Servers and locate the hostname of the server running the ESA RADIUS service.
- Right-click the hostname and select Add Client from the context menu.
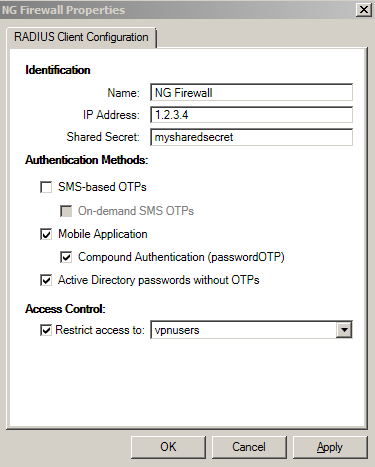
- Configure a RADIUS client (see Figure 1-1 below).
Figure 1-1
Click the image to view larger in new window
- Click OK. Restart the RADIUS service from the Services control panel when you are prompted.
ESA has now been configured to communicate with the Barracuda NG Firewall ®. You must now configure the Barracuda NG Firewall ® device to communicate with the ESA Server.
Step II - Configure RADIUS Authentication on your Barracuda NG Firewall® device
- Log into the NG Firewall® using NGAdmin.
- Navigate to Config → Config Tree → BoxInfrastructure ServicesAuthentication Service.
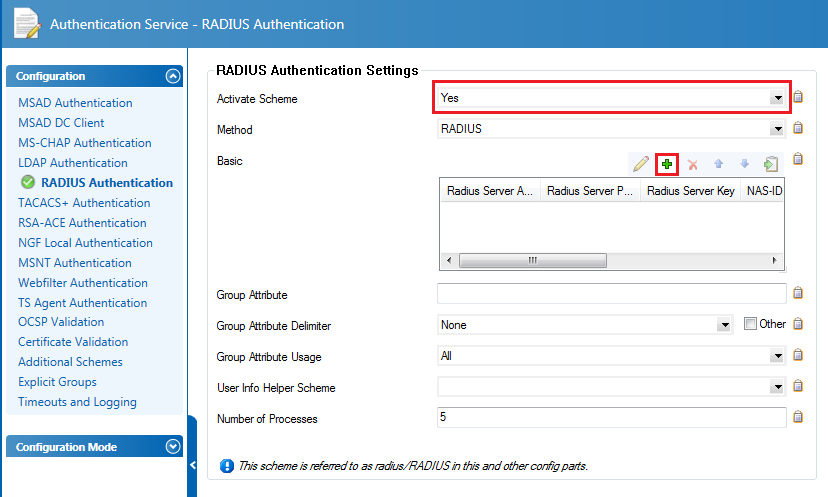
- Select RADIUS Authentication and then select Yes from the Activate Scheme drop-down menu (see Figure 2-1).
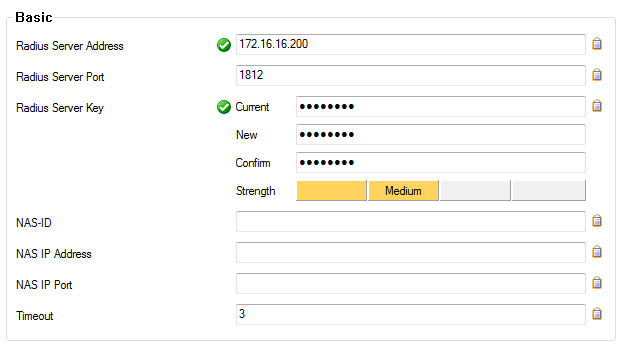
- Click + to add a new RADIUS Server (see Figure 2-1 and Figure 2-2 below).
Figure 2-1
Click the image to view larger in new window
- Type your ESA Server IP address and Radius Server Key (your Shared Secret from Figure 1-1) into the Radius Server Address and RadiusServer Key fields, respectively.
Figure 2-2
Click the image to view larger in new window
Step III - Configure Group Policy options
- Navigate to Config → Config Tree → BoxVirtual Servers[Your Virtual Server name]VPN ServiceClient to Site.
- Click the External CA tab → Click here for options.
Figure 3-1
Click the image to view larger in new window
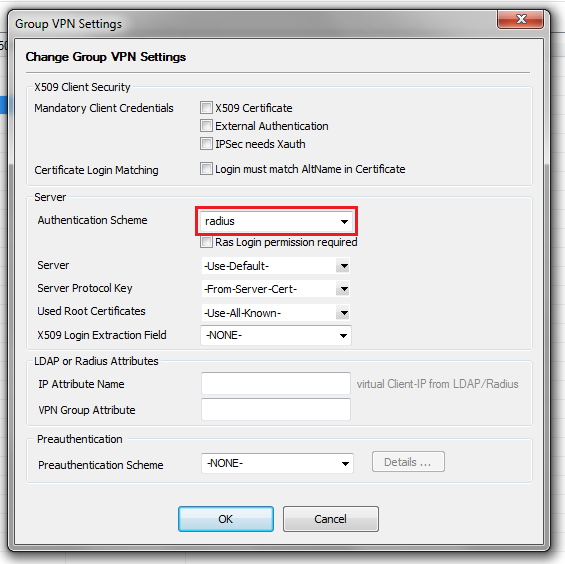
- Select radius from the Authentication Scheme drop-down menu.
Figure 3-2
Click the image to view larger in new window
Step IV - Test the connection
- Run Barracuda VPN Client®.
- Choose your VPN profile and enter the credentials of your test user. Please ensure that you are using an account with Mobile Application 2FA using ESA enabled. In the password field, append the OTP generated by the Mobile Application to your AD password. For example, if the user has an AD password of Pa$$w0rd and an OTP of 616623, you should type Pa$$w0rd616623.
Troubleshooting
If you are unable to authenticate via the ESA RADIUS server, check your Barracuda NG Firewall® logs for any errors. To view these logs navigate to Logs and open the log file BoxControlAuthService.
If consulting your logs does not enable you to authenticate via the ESA RADIUS server, ensure you have performed the following steps:
- Run a smoke test against your RADIUS server, as per the Verifying ESA RADIUS Functionality.
- If no faults were fixed and you are still unable to connect, revert to an existing sign-in configuration (that does not use 2FA) and verify that you are able to connect
- If you are still unable to connect, contact ESET technical support.


